
1. Tutorial: Implementing Two-Factor Authentication in FileMaker
- Tutorial: Implementing Two-Factor Authentication in FileMaker
- Using OTP for Securing Web Services
- Practical test with OTP and Basic Authentication for the document service
In today's digital landscape, security is of paramount importance for IT systems. The principles outlined in this article can be employed to enhance the security of FileMaker clients in your corporate solution. Moreover, they can be seamlessly integrated into FileMaker websites using WebDirect, the PHP API, and more.
Additionally, this approach can serve as an added layer of security for web services that require credentials for access. By incorporating a one-time password (OTP) provided by FileMaker, web services can verify it alongside user credentials.
In this tutorial, I will introduce the new functions in the ACF-Plugin that enable the implementation of two-factor authentication.
1.1. What is OTP? ↑
OTP stands for One-Time Password. It involves the use of a standardized computer algorithm to generate a 6-digit code that changes every 30 seconds. These 30-second intervals are referred to as "time slots." The generated code is based on the computer's clock on the device generating it. Most modern computers synchronize their time with network time servers, which typically ensures accurate timekeeping.
However, there may be instances where a user enters the code precisely as the time slot changes. To account for potential variations in computer times, it's advisable to verify the previous and subsequent time slots as well. The ACF plugin now includes functions for both verifying and generating OTP codes based on an OTP secret.
1.2. Enabling Two-Factor Authentication for FileMaker Client Users ↑
In this setup, I have installed software on a web server called "zint", a versatile barcode generator capable of generating QR code images. To utilize zint's capabilities, I have provided a small PHP file on the web server that runs as a web service.
Below is the PHP code:
<?php

// Decode BASE64Url encoded text in the input.
function base64url_decode($data) {
    $padded = str_pad($data, strlen($data) % 4, '=', STR_PAD_RIGHT);
    return base64_decode(str_replace(['-', '_'], ['+', '/'], $padded));
}

if (isset($_GET["txt"])) {
    $txt = base64url_decode($_GET["txt"]);
    //
    // You have to edit this path to point to some temporary storage.
    $file = "/var/www/tools.horneks.no/tmp/" . md5(microtime()) . ".png";
    $ht = "";
    if (isset($_GET["h"])) {
        $ht = "--height=" . $_GET["h"] . " ";
    }
    if (isset($_GET["bt"])) {
        $bt = $_GET["bt"];
        $cmd = "/usr/local/bin/zint -b $bt -o $file $ht -d " . '"' . $txt . '" 2>&1';
    } else {
        $cmd = "/usr/local/bin/zint -o $file $ht -d " . '"' . $txt . '" 2>&1';
    }

    $lines = array();
    $res = exec($cmd, $lines);
    header('Pragma: public');
    header('Cache-Control: max-age=1');
    header('Expires: ' . gmdate('D, d M Y H:i:s \G\M\T', time() + 1));
    header('Content-Type: image/png');
    echo readfile($file);
    unlink($file);
}
?>
Now that we have our QR-Code web service up and running, let's explore three essential functions:
- Generate a Random OTP Secret: This function allows us to create a random OTP (One-Time Password) secret, an integral part of two-factor authentication.
- Verify a User-Supplied OTP Code: With this function, we can validate an OTP code provided by the user against the OTP secret.
- Generate QR Images Using Our Web Service: We'll utilize the following functions from the ACF-Plugin for these tasks: generate_OTP_secret, BASE64_ENCODE, HTTP_GET, and check_OTP_code.
These functions collectively enhance security and facilitate two-factor authentication in various applications, including FileMaker clients and web services.
// ACF Functions executed by the ACF plugin

function GenOTP_Secret ()
    FunctionID 3602;
    return generate_otp_secret();
end

// Function to use a web-service to generate the QR image.

function GeneratebarCode ( string secret, string name, string user, string company )
    FunctionID 3600;
    string totp = format ('otpauth://totp/%s:%s?secret=%s&issuer=%s', name, user, secret, company);
    totp = substitute (totp, " ","%20");
    totp = BASE64_ENCODE( totp, 3); // 3 means no linefeeds, BASE64Url format
    string params = format ( "bt=%d&txt=%s", 58, totp);
    string res = HTTP_GET ("https://tools.horneks.no/tools/barcodegen.php?"+params, "" );

    res = BASE64_ENCODE (res);
    // Format return for viewing in a web-viewer on the activate Two-factor form.
    res = "data:text/html,<img src = 'data:image/png;base64," + res + "'/>";
    return res;
end

// Verification function.

function VerifyOTPcreds (string secret, string OTPCode)
    FunctionID 3601;
    return check_otp_code ( secret, OTPCode,1);
end
After compiling and loading this solution into FileMaker, you can implement the following components:
- User Registration: If a user isn't already registered, you can create a registration process.
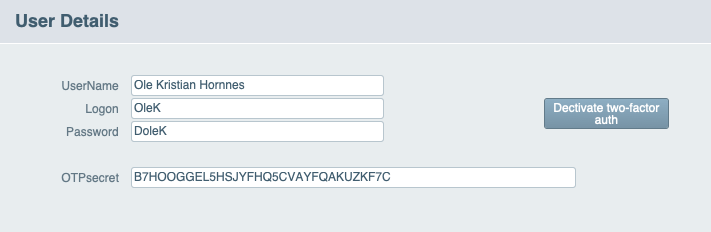
- Two-Factor Fields: Add fields related to two-factor authentication, including TwoFactorEnabled, TwoFactorSecret, and LastOTPCode.
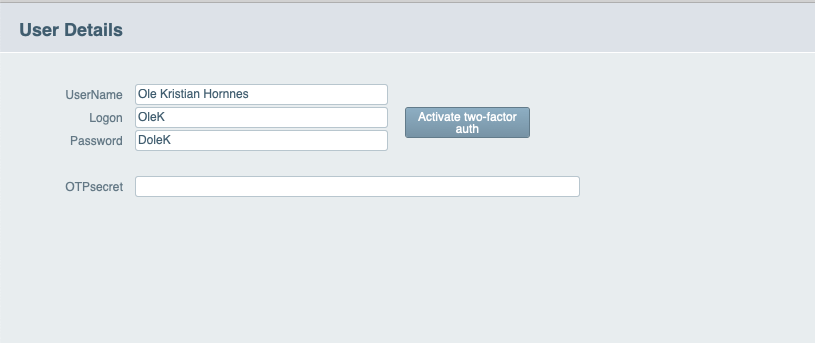
- User Layout: Design a user-friendly layout with buttons for enabling and disabling two-factor authentication.
- Two-Factor Activation Card Layout: Create a card layout to guide users through the activation process. Display the two-factor secret for entry into an authenticator app and embed a web viewer to show a QR image for easy app integration.
- OTP Code Field: Include a field where users can enter the 6-digit OTP code generated by their authenticator app for verification before enabling two-factor authentication.
- Verify Button: Implement a "Verify" button to ensure users can authenticate successfully before enabling two-factor authentication.
These components, illustrated in the sample app, offer a minimalistic yet effective approach to enhancing security in your FileMaker solution.
1.2.1. Screenshot for a sample FileMaker App ↑
For a visual representation of the sample app, refer to the provided images.
When the user clicks the "Activate Two-Factor" button, a new card appears with the QR code and OTP secret.
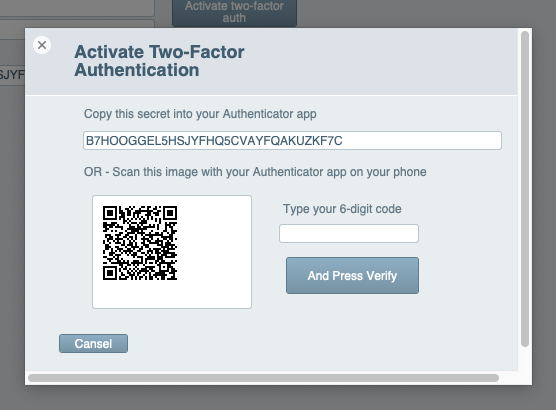
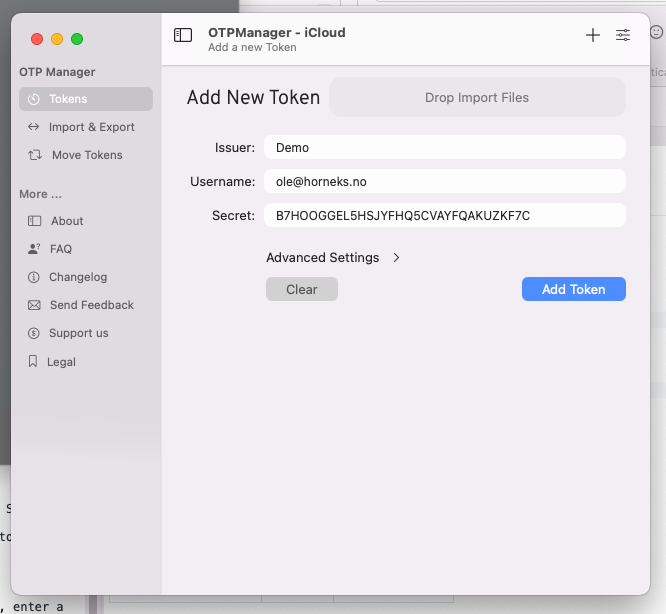
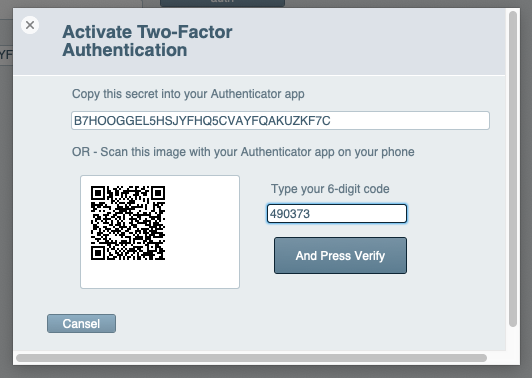
The user then configures the authenticator app using either the QR image or OTP secret. Once done, they receive a 6-digit code to enter into the card for verification.
The authenticator app displays the correct code.

Upon entering the correct code, it verifies that the user has installed and configured the authenticator successfully. The card window is then closed, and two-factor authentication is activated.
Voila, two-factor authentication is now activated, and the button switches to "Deactivate." If needed, the user can deactivate and reactivate it for use with a new phone.
The logon dialog can now either:
If you are using FileMaker Account login, prompt the user for the two-factor code. If it's correct, allow access; otherwise, log them out. If you are not using an account login but instead use a common account with a custom login dialog, you can add a field for the two-factor code. In both cases, use the VerifyOTPcreds ACF function to validate the code.
2. Using OTP for Securing Web Services ↑
Hackers and web bots constantly attempt to breach web services and systems. Log files on servers reveal hundreds of such attempts daily. Therefore, adding an extra layer of security is essential. HTTPS encrypts traffic, but hackers still try various username/password combinations. With the ACF plugin, FileMaker can generate and send OTP codes alongside credentials. Even if a hacker matches the username and password, without the OTP code that changes every 30 seconds, they cannot access your service.
Here is one simple function for producing OTP code from FileMaker:
// ACF function to get a new OTP code for sending to the web service.

function GenOTPcode ( string secret )
    return get_otp_code( secret );
end
Web services must also generate OTP codes for verification. Here's a PHP function for generating and verifying OTP codes:
<?php
// When we verify, you can give $window parameter value of 1, which means
// it will generate codes for the previous slot, this slot, and the next slot.
// If any match, it returns true, otherwise false.

function VerifyOTPcode ($secret, $GivenOTP, $window) {

    for ($i = -$window; $i <= $window; $i++) {
        if ( generate_OTP_code ( $secret, $i ) == $GivenOTP ) {
            return true;
        }
    }
    return false;
}

?>
This function can be used to enhance security for web services.
Here are the generator functions:
<?php

function base32_decode($input) {
    $base32Chars = 'ABCDEFGHIJKLMNOPQRSTUVWXYZ234567';
    $base32Values = array_flip(str_split($base32Chars));

    $output = '';
    $buffer = 0;
    $bufferSize = 0;

    foreach (str_split($input) as $char) {
        $charValue = $base32Values[$char];
        $buffer = ($buffer << 5) | $charValue;
        $bufferSize += 5;

        if ($bufferSize >= 8) {
            $output .= chr(($buffer >> ($bufferSize - 8)) & 0xFF);
            $bufferSize -= 8;
        }
    }

    return $output;
}

function generate_OTP_code($secret, $window = 0, $testcounter = 0) {
    // Decode the base32 secret key
    $decodedSecret = base32_decode($secret);

    // Get the current Unix time as the counter
    $currentTimestamp = time();
    $counter = floor($currentTimestamp / 30); // 30-second time slots

    // Use the test counter if provided (for testing purposes)
    if ($testcounter != 0) {
        $counter = $testcounter;
    }

    $counter += $window;

    // Pack the counter as a 64-bit integer in network byte order (big-endian)
    $packedCounter = pack('N*', 0) . pack('N*', $counter);

    // Calculate the HMAC-SHA1 hash
    $hmacResult = hash_hmac('sha1', $packedCounter, $decodedSecret, true);

    // Extract the 4 bytes at the offset and convert them to a 32-bit integer
    $offset = ord($hmacResult[19]) & 0x0F;
    $truncatedCode = (
        ((ord($hmacResult[$offset + 0]) & 0x7F) << 24) |
        (ord($hmacResult[$offset + 1]) << 16) |
        (ord($hmacResult[$offset + 2]) << 8) |
        ord($hmacResult[$offset + 3])
    );

    // Apply a modulo operation to obtain a 6-digit OTP code
    $otpCode = str_pad(($truncatedCode % 1000000), 6, '0', STR_PAD_LEFT);

    return $otpCode;
}
?>
Example use:
// Example usage:
$secretKey = "YOUR_SECRET_KEY"; // Replace with your actual secret key
$otp = generate_OTP_code($secretKey);

echo "OTP: $otp";
Using this function, you can verify the code by comparing it to the OTP generated.
The Window parameter is used for selecting the previous slot (-1), this slot (0), or the next slot (1). By generating OTP codes for all three slots and verifying that one of them is correct, you can grant valid access to the web service.
Remember that the OTP secret must also be present in the application using the service and the web service itself, along with the credentials.
3. Practical test with OTP and Basic Authentication for the document service ↑
I have made support for both OTP-based authentication to the document service and Basic Authentication to the web service itself.
- Basic Authentication is a server configuration. It means that you simply put a username and password in the folder for the web server. If you navigate to the service with a web browser you will simply be asked for credentials before the web page is shown. Nobody needs to show this web page of the document service, as it is a SOAP service. Having basic authentication on this will give you an added layer of security.
- OTP-based authentication for the SOAP service means that we add an OTP code along with the credentials that the server will verify.
The great news is that we now have implemented this in the document-service functions for accessing the web service. We only need to tell the plugin about the OTP secret, and eventually user and password for the site itself.
The configuration object you can read about on the web service has to be altered to activate this function:
"ENDPOINT-URL:" & Preferences::remDocURL & "¶" &
"USER:" & Preferences::remDocUser & "¶" &
"PASSWORD:" & Preferences::remDocPassword & "¶" &
"DOCENCRYPTION-KEY:" &  $key & "¶" &
If ( Preferences::DocOTPsecret  ≠ ""; "OTP-SECRET:" & Preferences::DocOTPsecret & "¶"; "") &
If ( Preferences::BasicAuthUser  ≠  "";
    "BASICAUTH-USER:" & Preferences::BasicAuthUser & "¶" &
    "BASICAUTH-PASS:" & Preferences::BasicAuthPass & "¶"; "")
Then the result of this is encrypted with the plugin functions, and gives an object like this.
Document Access Package
========== PARAMETERS =========
+wKVV8CWFGYJjHR4BjvHhWomAkw6SRkHLzM/Ghk4kHer7MnOYI30nDwVv+534trQzeluRQkH
yl5wPhdfa4AI2QGLBmDzVbVSmIr+MtJgZKDUOXalkEgVTPn1qRVu+5mFXoWdE7s5MncZykb5
fkl/APNDKR/BoHuCRmZg9H+OsVLrvBqRzni7UK5YQYL+fRt0/l5iqeNS7JIKC6ECFBVjQy1C
JA19VISdQPRtJ/WjbpWLoHfVwZ/fb/gm1aLsYmWrvCHHrEUYHoip949PPzHs98eTlT9wEEQV
RkIDour4y/V5fuBDDLHpxjbpWV55QreBI28Kv+5E3Lqgi0/ObWEb7INiwdSaR47b3+5BYpWj
tkqCxOAg7wdywWSJxclfGezp===
======= END PARAMETERS ======
Using this object in the plugin's authentication function is all, then both saving documents to the web service as encrypted documents and reading documents go automatically.
I have now tested everything, and all works as expected.
The updated files for the SOAP service are available in the download area.
Thank you for reading.
Regards,
Ole Kristian Ek Hornnes