
1. Send an e-mail from The ACF plugin
The ACF plugin has evolved, and now we have the first function in the email functionality in testing. This is the send_email.
- Send an e-mail from The ACF plugin
- A walkthrough of the ACF functions supporting the demo code
- Where can I download the demo?
OK, you can send emails from FileMaker. But this function in the plugin adds new features to send emails, like styled HTML emails made from plain text.
- Easy configuration using the JSON framework.
- Have both HTML and PLAIN text in the same e-mail sent as a "multipart alternative".
- Easy to add one or more attachments to the email.
- Use the markdown to HTML functions to generate good-looking emails from pure text.
- Can add extra mail headers to the email if necessary, like subscription headers and more.
1.1. The demo mail application ↑
We have made a demo mail application to showcase and test the e-mail functions. It contains three tables for this to work. We have one table for the e-mail account setup, one for the messages, and one for the attachments to the e-mails. They are all related.
- Having the account setup table, holding the mail server address, port, credentials, the from address, and two signatures for your mail. One for use in the HTML part, and one for the plain text part.
- The messages table contains fields for to, cc, bcc, subject, and message body. Also sent date-time, and the account relation.
- The attachment table contains fields for the attachment path, the foreign key for the message relation, and some calculated fields for display in a portal in the message window that shows the folder, the filename, and the file type.
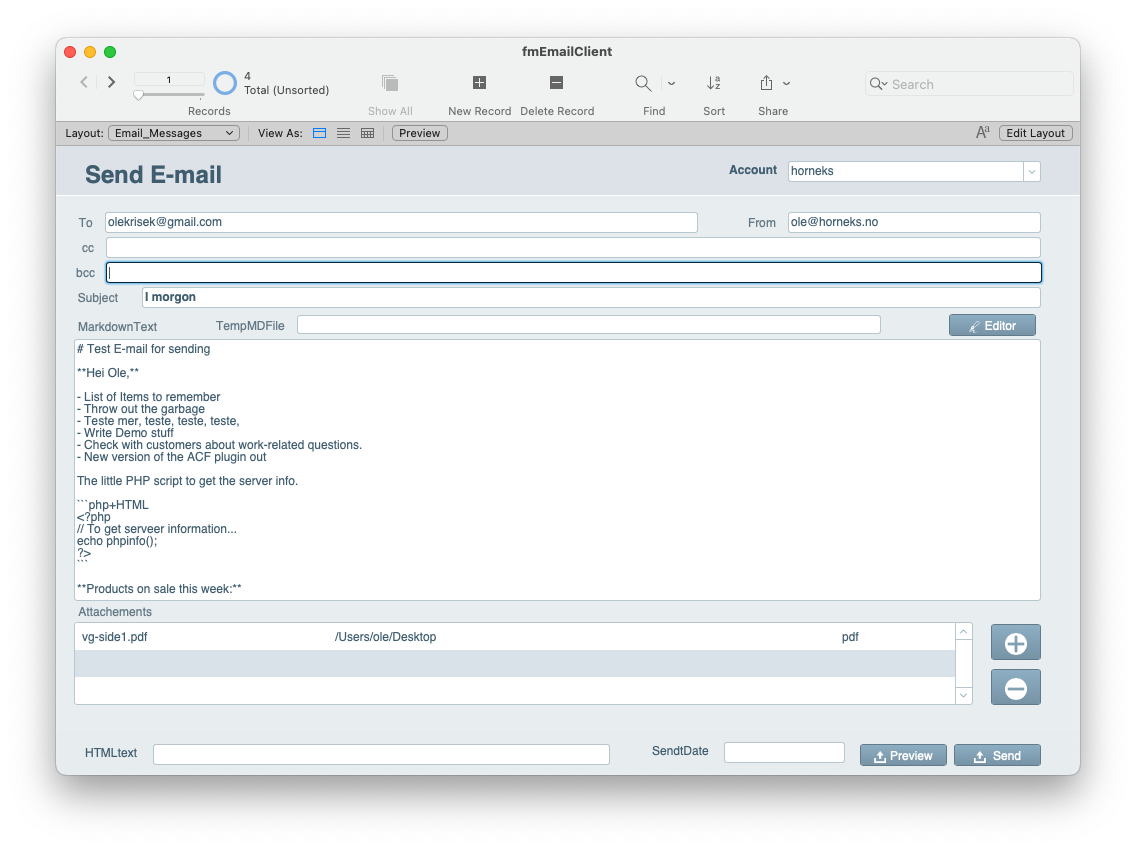
The window has some buttons:
- Editor, that launches an external editor for composing the text. You can write it directly in the message field, but using a MarkDown editor like Typora or similar offers a better writing experience. When hitting that button, a temporary file is made with the text, and, in my case, Typora opens. The button changes to "Load back" so that you can press and load the MarkDown text back to the record.
- A Preview button, that converts the MarkDown text to HTML, and shows the content in a web browser.
- Plus and minus buttons right to the attachment portal, for adding attachments or removing them.
- Then you have the "Send" button, which also converts to HTML, and then composes a JSON object with all the parameters needed for sending. The account parameters, to, cc, bcc, Subject, content of MarkDown text for the plain text part, and the converted HTML document, and any attachments. Then it uses the
Send_emailfunction in the plugin to send it. You get an "OK" text back when complete.
Over 90% of the programming done in this application is done with ACF functions. This means that the button scripts are short 2-3 liners mostly. This makes the functions very easy to implement into any other application where this feature is needed. Maybe your target application already has the needed tables, so it is only possible to change their name in the ACF code to fit your target application.
2. A walkthrough of the ACF functions supporting the demo code ↑
In the following boxes, I will show the source code in the ACF language that is loaded into the plugin to make it work.
2.1. Building JSON with the account parameters. ↑
function emailServerPar (string ShortName)

    ARRAY string SMTP_Host, SMTP_User, SMTP_Password, SMTP_Port, FromEmail,  FromName, Signature, PlainSignature;

    string sql = "SELECT
        SMTP_Host,
        SMTP_User,
        SMTP_Password,
        SMTP_Port,
        FromEmail,
        FromName,
        Signature,
        PlainSignature
    FROM
        Email_Accounts
    WHERE
        ShortName = :ShortName

    INTO  :SMTP_Host, :SMTP_User, :SMTP_Password, :SMTP_Port, :FromEmail,  :FromName, :Signature, :PlainSignature
    ";

    string res = ExecuteSQL (sql);
    if ( sizeof (SMTP_User) == 0) then
        return json("ERROR", "No Data retrieved in SQL query", "shortname", ShortName);
    end if

    JSON server;
    server["server"] = JSON ("host", SMTP_Host[1], "port", SMTP_Port[1], "user", SMTP_User[1],
                        "password",SMTP_Password[1], "Signature", Signature[1],"PlainSignature", PlainSignature[1] );
    return server;
end
ShortName is the key in the account table. We use an SQL query to get the account parameters. Then we create a JSON variable called server, with key/value pairs for all the parameters. This JSON is returned from the function. Calling this function with a valid account name from the account table returns a JSON object with all the necessary mail config data.
2.2. The AddAttachment function ↑
This function is called when you press the "+" button right to the attachment portal. It selects a file, then finds out if it's added already, and if not, inserts a record in the attachment table.
function AddAttachment ()
    string path = select_file ("Select file to add to the e-mail", desktop_directory());
    string primkey, sql, res;
    if ( path != "" ) then
        primkey = Email_Messages::PrimaryKey;
        sql = "SELECT FilePath FROM Email_Attachments WHERE fk_EmailMessage = :primkey AND FilePath = :path";
        res = ExecuteSQL ( sql);
        if ( res != "") then
            alert ( "File already added: " + res);
            return "";
        end if
        sql = "INSERT INTO Email_Attachments (fk_EmailMessage, FilePath) VALUES (:primkey, :path)";
        res = ExecuteSQL ( sql);
        return res;
    end if
    return "";
end
The button script just calls this function and does a "refresh portal" script step to have it update the rows in it.
The Minus button just does a single "delete portal record" script step.
2.3. The Preview Mail function ↑
This function is called when you hit the "Preview" button. The function converts the MarkDown formatted to HTML, saves it to disk, and returns the path to FileMaker. Then the script uses the "Open URL" script step to launch Safari or any other web browser.
function PreviewMail ()

    string acc = Email_Messages::Account;
    string htmlfolder = Email_Accounts::HTML_Folder;

    set_markdown_html_root ( htmlfolder );
    string fileBase = htmlfolder+"/Temp_"+string(now(), "%Y%m%d_%h%i%s");
    string mdFile = fileBase+".md";
    string htmlFile = fileBase + ".html";
    string mdContent = Email_Messages::MarkdownText;

    JSON params = emailServerPar(acc); // the other function returns the server config...
    // print string(params);
    mdContent += params["server.Signature"];
    int x = open(mdFile, "w");
    write(x, mdContent);
    close (x);

    string res = markdown2html (mdFile, "solarized-dark,monokai", htmlFile);

    return htmlFile;

end
We call the emailServerPar to get the config object since it contains the mail signature. The account has configured a folder for temporary storage, and styling in a Themes folder. We use this to create a temporary filename both for the MarkDown file and the HTML file, add the signature to the MarkDown text, and write it to disk. Then it uses set_markdown_html_root command for defining the work dir for the conversion. Finally, we use the ACF function markdown2html to complete the conversion. We return the path of the HTML file to FileMaker.
2.4. The Editor Button ↑
This function is called when we hit the Editor button in the layout. We have a field in the messages containing the path for the temporary MarkDown document edited in an external editor. If this field is empty, we create a temporary file for the text, and set a FileMaker variable $$mdFile for the button script to set in the field. Then we simply return the original text. The function is called in a Set Field Script step, so the markdown text is updated in the record. If the field has a path, it means that we load it back, so we read the file and return the content. The $$mdFile variable is cleared, so the second set field in the button script sets the filename.
function Editor_button()
    string MDText = Email_Messages::MarkdownText;
    string tmpMDfile = Email_Messages::TempMDFile;
    string htmlfolder = Email_Accounts::HTML_Folder;
    string mdContent;
    int x;
    if ( tmpMDfile == "") then
        tmpMDfile = htmlfolder+"/Temp_"+string(now(), "%Y%m%d_%h%i%s")+".md";
        x = open (tmpMDfile, "w" );
        write (x, Email_Messages::MarkdownText);
        close (x);
        $$mdFile = tmpMDfile;
        return Email_Messages::MarkdownText;

    else
        x = open ( tmpMDfile, "r");
        mdContent = read ( x);
        close x;
        $$mdFile = "";
        return mdContent;
    end if
    return "OK";
end
2.5. The SendMail function ↑
This function does the important work of assembling the JSON parameter object. We chose to use this method, as we otherwise would need to have a long list of parameters for the function. With JSON, all the parameters have key names that make it both easier to read and remember when using the function. Also easy to cut and paste it from somewhere else and just change the parameters to what fits for a particular use.
function SendMail ()

    string htmlFile = PreviewMail();
    string sql, primkey, res, acc = Email_Messages::Account;
    JSON params = emailServerPar(acc);
    int x;
    x = open ( htmlFile, "r");
    string htmlContent = read (x);
    close (x);

    string plainContent = regex_replace ("<[^>]*>", Email_Messages::MarkdownText, "") +"\r\n";
    plainContent += params["server.PlainSignature"];
    params["from"] = Email_Messages::From;
    params["to"] = Email_Messages::to;
    if (Email_Messages::cc != "" ) then
        params["cc"] = Email_Messages::cc;
    end if
    if ( Email_Messages::bcc != "") then
        params["bcc"] = Email_Messages::bcc;
    end if
    params["subject"] = Email_Messages::Subject;
    params["body.plain"] = plainContent;
    params["body.html"] = htmlContent;

    // Add attachments
    primkey = Email_Messages::PrimaryKey;
    ARRAY STRING atts;
    sql = "SELECT FilePath FROM Email_Attachments WHERE fk_EmailMessage = :primkey
    INTO :atts";
    res = ExecuteSQL ( sql);
    if (sizeof (atts) > 0) then
        params["attachments"] = atts;
    end if

    return   send_email(params);
end
The function uses the preview function to generate the HTML file and then puts it into the body.html tag in the JSON. The plain content is washed for potential HTML codes that might appear in the MarkDown text. This is done using a regex_replace function.
Finally, we send the mail and return its result, which should normally be "OK".
If any error should occur, like malformatted email addresses, mail-server config issues, or anything like that, there will be raised an exception. If an Exception occurs that will terminate the ACF function, returning the error message instead.
2.6. Screenshots ↑
Typora - External editor composing.

The received e-mail using the chosen theme. It lacks config for the table, but it's OK.
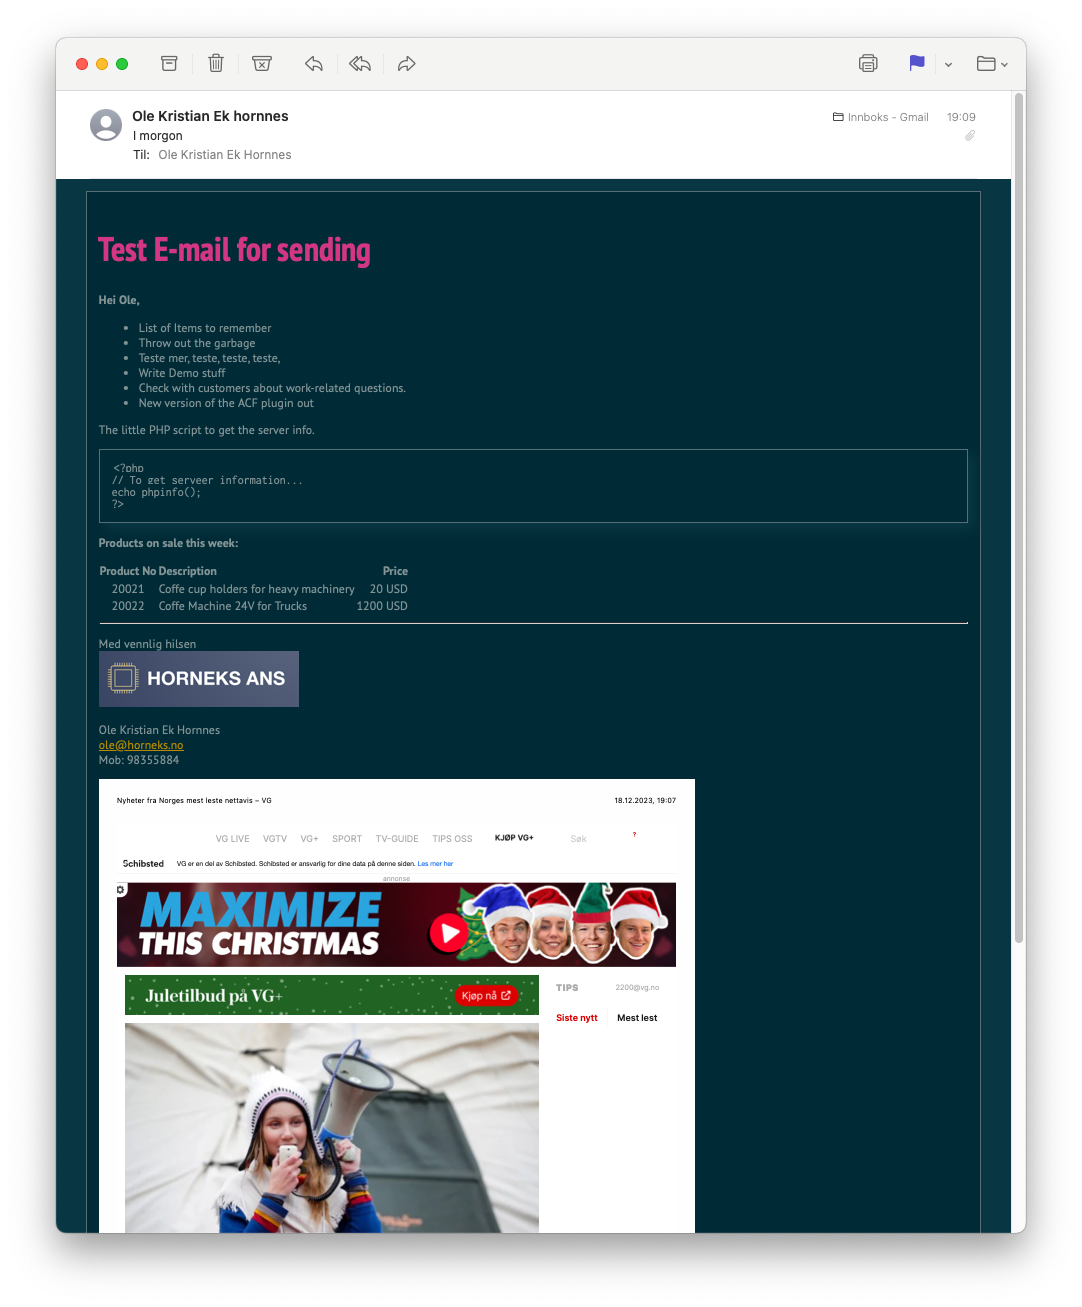
It is of course easy to design the template for anything you like.
You see the logo at the bottom of the mail. It comes from the signature in the account setup, just having an <img src="/path/to/logo/logo.png"/> along with the other texts in the signature. The logo is read by the send_email function and added as a related attachment to the mail and the image tag is changed to reference a content ID that the attachment is labeled with.
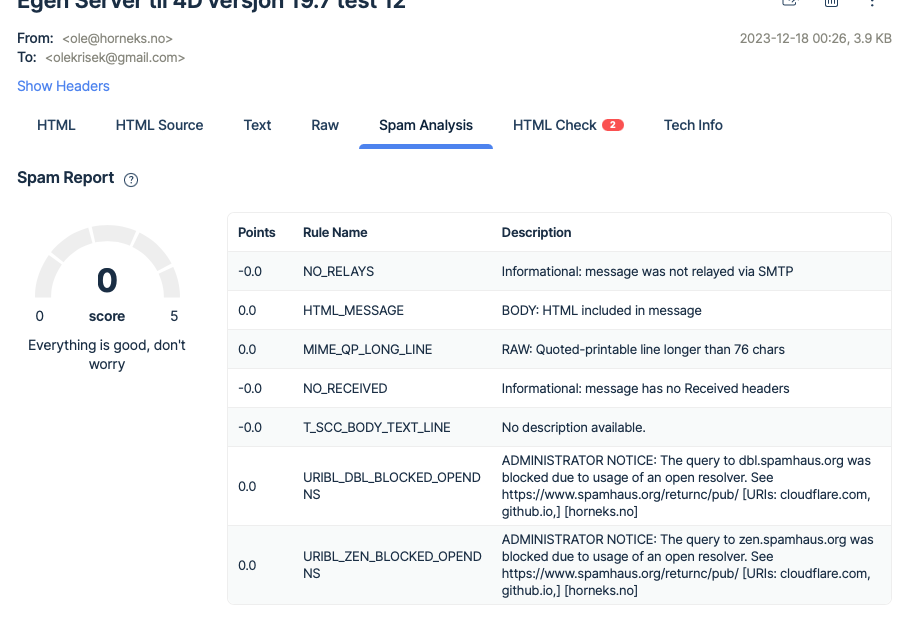
2.7. Deliverability ↑
Of course, one important thing about mail sending is that the mail gets delivered. We have tested against the "MailTrap" email tool suite, to get a spam score report. Here is the result:
2.8. Conclusion ↑
This package can easily be applied in a target application. It can be used for sending offers from a CRM system, invoices, and order confirmations that are looking good. It is easy to have logos for your company. It is also very easy for a FileMaker script to create the MarkDown source for an automated e-mail function since MarkDown is just plain text with some codes in it to define the styling.
You can download the demo from the download section and it will also require Mac until the Windows version is released. The send_email function was introduced in the plugin version 1.7.0.10 which is also available for download.
3. Where can I download the demo? ↑
The demo application is in the ACF-Plugin download package together with the plugin, all the other examples, and documentation.