ACF PLUGIN Function Reference
TABLE OF CONTENT
Introduction
- Quck start guide
- Wy did we develop the ACF plugin
- Advanced Custom Functions Plugin for FileMaker
- When is the ACF plugin useful
- Introduction to the Advanced Custom Functions FileMaker Plugin
- Some syntax differences
- Package Names
- Mac and Windows
- The initial loading script
- The Bootstrap package
- Future Development ideas
- Known issues
NEWS
- Windows beta ver 1.7.1.7 released
- ACF-Plugin Version 1.7.x
- handling SQL in version 1.7.0
- News_URL services in ACF
Basic Operations
- Programming Basics
- Standard functions
- How to install my ACF functions in my FileMaker application
- Inter-package function calls
- Working with ZIP files
- Summary of Data types
- Send_email function
- Create HASH function
- Encryption and decryption
- Sort Array Function
- Set Locale
- Event handling in the ACF plugin
- New functions ver 1.7.0
- Global Variables
- FileMaker Calculations
- Value Converters
- The Format function
- SQL functions
- MySQL functions
- FunctionID
- Regular Expressions
- How to debug your code
Translation
EXCEL Spreadsheet functions
- ACF-Plugin Functions for Excel Spreadsheets
- Styling your spreadsheet
- Formatting numbers, dates, times and timestamps
FileMaker Plugin Calls
- ACF_RegisterPlugin
- ACF_run
- ACF_Compile
- ACF_CompileFile
- ACF_GetAllPrototypes
- ACF_GetConsoleOutput
- ACF_InstallFile
- Run the plugin on the server
- Compiling using literal source code in the calculaton
Arrays, JSON and XML
- JSON datatype in the ACF language
- XML datatype in the ACF language
- About Array Functions
- Explode
- Implode
- SQL Queries and array functions
FileSystem Functions
- An overview of the file-system functions
- File Exists
- directory_exists
- Create_Directory
- Open file
- Read from file
- Readline
- Write to file
- Close file
- save_file_dialogue
- select_directory
- Copy_file and Move_fille
- Character set conversion
MarkDown - HTML
Programming Examples
- Practical Example Calculation distance between cities
- Interacting with a Web Microservice and Updating the Database
- Making an EXCEL report from Claris FileMaker
- ACF Developer tool - XML
- Example: EHF XML directly
- Making Complex XML's Using XML/JSON devtool
- Send an e-mail from The ACF plugin
- Two-Factor authentication in FileMaker
- Dynamic Portal Sorting made easy
- Luhn Algoritm: Generate Mod10 KID control digit
- An example of a standard library
- Updating currencies from a web-service
- Test Arrays as parameters
- Dynamic Value List in FileMaker
- An XML Export example
- MySQL connection from ACF example
- Example - Calculate Invoice Lines using SQL
- Importing timesheet from Kimai to filemaker
- Sending Form Data
- Markdown functions
- Practical Example - Read CREMUL payments file and update database
- Concatenating files for a book
- Prosessing WORD template document with tags
Demo
Technical Details
Introduction
Quick Start Guide
To easily implement some ACF functions in your FileMaker application without merging the DevStarter application, follow these steps:
Create a script step:
Insert Text.- Choose
Select, and for the target, checkVariable, and name it$$Source, for example. - Below the target checkbox, a "Specify..." button appears. that leads to a text dialogue where you can paste in your source code. This preserves the text as-is, without removing any line breaks from it.
- Choose
Add a second script step,
Set Variable, with$res, and set the formula toACF_Compile($$Source).Do some error checking of the Result, as shown below.
After running this once, you can implement calculations with your new functions, using
ACF_run("FunctionName"; parameters if any....)
The script steps you created need to be run before the functions are called, like in some startup scripts for your application, or before you use the functions in it. The compiled binary is not installed permanently so when you restart FileMaker they are gone, so you need to run the steps again.
Here are the script steps:
Insert Text ( Select; $$Source; 'package bootstrap "Functions to facilitate..."')
Set Variable [ $res; Value:ACF_Compile( $$Source ) ]

if [PatternCount ( $res ; "=== START ===" )<=0]
   Show Custom Dialog["Error"; "Compilation error, See the error console"];
   // You can use ACF_GetConsoleOutput to see details.
End If
Images
Here are some images:


Make sure to implement error-checking for compilation without errors.
You can use the DEV-Starter to develop your ACF functions, ensure they compile correctly, and then paste the source code into your target application using the Insert Text script step and the ACF_Compile function.
Upon successful compilation, the ACF_Compile function returns a BASE64 encoded binary output that can be loaded into your application without the need to compile again.
If you plan to write many ACF functions and test long functions, integrating the DEVstarter application into your target is the most efficient workflow.
Back to top
Why did we develop the ACF plugin
It all started after many years of developing a comprehensive system in FileMaker. I have worked with many other systems, such as 4D (Fourth Dimension), PHP, MySQL databases, C, C++, and several others. FileMaker is a very good system, especially for its flexibility in layout design and database integration.
As long as you were comfortable with forms for data entry, database, searching and sorting, reports, and printouts, you found everything you needed directly in FileMaker.
There were some things, however, that I never became entirely comfortable with. Some solutions required either creating a vastly complex relationship graph with corresponding system layouts to use this in scripting to access the data as needed for specific purposes or you could use SQL queries to access data without using the relationship graph and moving around in layouts. SQL works very fine, but working with the result set in FileMaker scripts often became heavy material, as it came out of the queries as a CSV dump of the dataset. This had to be parsed and broken apart to work with the data. The ExecuteSQL function in FileMaker supports neither INSERT nor UPDATE - only SELECT. For such functions, one then relied on plugins that offered this functionality.
Another thing is producing detailed exports to other systems; plugins were needed to work with text files. For accessing WEB-based APIs, another plugin was needed.
My conclusion was that if I wanted to solve this, we needed a plugin with its built-in programming language that could solve the SQL challenges, and at the same time have an efficient way to work with the result set. This included array data types that could hold the results from the SQL query and let us access the individual data cell in the set. The programming language had to have an efficient way to work together with the Script language in FileMaker and be capable of working with algorithms, structured programming, loops of various kinds, and more. It needed good performance and executing functions quickly. I considered PHP but eventually discarded it. I saw someone had made something with it before, but the solution required the installation of external libraries on the users' machines, and the integration with FileMaker was not as simple as I would have liked. JavaScript was also under consideration, but here too, I was not entirely satisfied. That's when I began working with the ACF Plugin and the ACF language. A compiler and a runtime system were created, which has since been developed quite tremendously.
Today, when I create new functionality with FileMaker, 90% of the programming is entirely or partly made as ACF functions and only a few simple scripts call these functions. It's fantastic, and it has impressive performance. In most cases, the functions run 10x as fast as if I had scripted everything.
I wish as many developers as possible would discover the goldmine this plugin has become. It's so easy to reuse code, work with data handling and analysis, and discover the efficiency that lies in this. Just take a look at all the programming examples that exist in the reference manual. Good luck to everyone.
The ACF language features:
- Functions written using a text editor, ability to compile and load compiled code. The functions can be called from standard FileMaker calculations
- Enhanced SQL capability with placeholder logic in SQL statements, and
INTOkeyword to target the result-set into arrays. Both access to native databases in FileMaker or remote MySQL databases. - Structured language, with
IF-THEN-ELSE-ENDIFandCASE-ENCASEstructures. - Loops:
FOR-ENDFORloops,REPEAT-UNTILloops,WHILE-ENDWHILEloops. - Arry datatypes: Access to individual cells in arrays making it easy to process data.
- Strict data types: Declaration of all variables used with simple declaration statements, for String, Float, Int, long, date, time, timestamp, Bool, XML, and JSON. This improves the execution speed. It improves error-checking. It also simplifies operations where functions work differently on different types. For example,
a=a+1increasesawith 1 if it's an int or float number, but gives the next day ifais a date type. - Direct FM environment access: Access to FileMaker script variables, fields, and ability to execute FileMaker calculations inside the ACF functions.
- File system access for reading and writing file-system files, listing or selecting files and directories. The function also works on files inside ZIP archives.
- API Access: HTTP Get and Post functions make it easy to access remote services using REST or SOAP protocols.
- Send E-mail function and MarkDown to HTML functions to facilitate good-looking e-mail sending.
- JSON/XML datatypes make it easy to build or parse such structures.
- Common crypto and Hash functions make it easy to do secure transactions and storage.
- Speed: Impressive speed of up to 10 times compared to similar scripted functions.
- Calling other ACF functions is as easy as writing the name of the function with parameters. This is a good practice to encapsulate common code and improve the readability.
- Easy to learn as the ACF function has many common denominators with other languages, it is easy to learn. Using the many programming examples found in the reference manual.
- Documentation is extensive and describes each function with examples and explanations.
The plugin is available for MacOS both Intel and Arm-based computers. For Windows, the last version will soon be available. An older version is available for Windows today, but it does not provide all the new functions in the ACF plugin.
Complex FM calculations in FileMaker versus The ACF plugin
One of the important features of this plugin is the code-readability when it comes to more complex calculations. As code is less readable, it also promotes bugs. Just because the developer did not catch the bugs due to the inability to see it when the function is a mess.
Here is an example from a system I did some debugging on. The purpose is to create a JSON list used as a parameter to a function that marks orders as delivered and does the invoicing.
Example FileMaker Kalkulation:
While ( [

~key = "1" & OrderHeader::Ordre_nr ;
~query = ExecuteSQL ( "SELECT \"Auto_nr\", \"Lagerførende\", \"Utlever_antall\" FROM OrderHeader_OrderDescriptions_visning WHERE Utlever_relasjon = " & ~key  ; "" ; "") ;
~query2 = ExecuteSQL ( "SELECT \"Auto_nr\", \"Lagerførende\", \"Utlever_antall\" FROM OrderHeader_OrderDescriptions_visning WHERE Utlever_relasjon = " & ~key & " AND \"Lagerførende\" = 'Ja' AND \"Lagerførende\" is not null" ; "" ; "") ;
~count = ValueCount ( ~query ) ;
~count2 =ValueCount ( ~query2 ) ;
~pickCount = 0 ;
~line = "" ;
~line2 = "" ;
~calc = "" ;
~ai = 0 ;
~i = 1

] ;

~i ≤ ~count

; [

~line = Substitute ( GetValue ( ~query ; ~i ) ; "," ; "¶" ) ;
~line2 = Substitute ( GetValue ( ~query2 ; ~i ) ; "," ; "¶" ) ;
~calc = JSONSetElement ( ~calc ; [ "deliver.line[" & ~ai & "]id" ; GetValue ( ~line ; 1 ) ; 2 ] ) ;
~calc = JSONSetElement ( ~calc ; [ "invoice.line[" & ~ai & "]id" ; GetValue ( ~line ; 1 ) ; 2 ] ) ;
~calc = If ( ~pickCount < ~count2 ; JSONSetElement ( ~calc ; [ "pick.line[" & ~ai & "]id" ; GetValue ( ~line2 ; 1 ) ; 2 ] ) ; ~calc) ;
~pickCount = If ( ~pickCount < ~count2 ; ~pickCount + 1 ; ~pickCount ) ;
~calc = JSONSetElement ( ~calc ; [ "deliver.count" ; ~count ; 2 ] ) ;
~calc = JSONSetElement ( ~calc ; [ "invoice.count" ; ~count ; 2 ] ) ;
~calc = JSONSetElement ( ~calc ; [ "pick.count" ; ~pickCount ; 2 ] ) ;
~calc = JSONSetElement ( ~calc ; [ "orderId" ; OrderHeader::Ordre_nr ; 2 ]  ) ;
~calc = JSONSetElement ( ~calc ; [ "total.count" ; ~count ; 2 ] ) ;
~ai = ~ai + 1 ;
~i = ~i + 1

] ;

Case ( ~count < 1 ; JSONSetElement ( ~calc ; [ "total.count" ; ~count ; 2 ] ) ; ~calc )

)
First, after I converted this function to the ACF language - I discovered several bugs in it.
The problem is that it was two SQL queries. The ~query2 is not guaranteed to have the same number of rows as the ~query line. Therefore mixing those in the pickCount calculation is prone to errors. As we pull the "Lagerførende" field from the database, we can use that instead and only have one SQL Query. Also, the last JSON elements are moved to after the loop, as they are not needed in the loop.
Here is the corrected ACF function:
function CalcDeliverJSON ( string ordreNr )

    string res,key = "1" + ordreNr;
    array string Lforende;
    array float UtlevertAntall;
    array int AutoNr;
    res = ExecuteSQL ( "SELECT \"Auto_nr\", \"Lagerførende\", \"Utlever_antall\"
    FROM OrderHeader_OrderDescriptions_visning
    WHERE Utlever_relasjon = :key
    INTO :AutoNr, :Lforende, :UtlevertAntall"  ) ;

    int count = sizeof (AutoNr);

    int pickCount=0;
    JSON result;

    for (i=1 , count )
        result["deliver.line[]"] = JSON ("id", AutoNr[i]);
        result["invoice.line[]"] = JSON ("id", AutoNr[i]);
        if ( Lforende[i] == "Ja" ) then
            result["pick.line[]"] = JSON ("id", AutoNr[i]);
            pickCount++;
        end if
    end for
    result["deliver.count"] = count;
    result["invoice.count"] = count;
    result["pick.count"] = pickCount;

    result["orderId"] = ordreNr;
    result["total.count"] = count;

    return result;
end
Back to top
Advanced Custom Functions Plugin for FileMaker
Updated: 15.09.2023 - Plugin version 1.6.3.0
ACF_Functions introduces a new custom functions language designed to enhance the efficiency of custom function development within FileMaker. This new language is a high-level language, akin to PHP or PASCAL, meticulously integrated into the FileMaker environment. It grants direct access to FileMaker variables, fields, and other built-in functions, all defined within text files external to FileMaker. These files can be compiled or loaded into the FileMaker environment using the plugin's functions. The compiled libraries are encoded in Base64 format, so they can be loaded directly from FileMaker Text fields.
Let us do a small example, where we want to pull the content of a web page and store it on a user-selectable file. This is an example of how this functions looks like:

Before this function can be run, it has to be compiled. This can easily be done with ACF_Compile function. Note: The HTTP_GET is a new command in ver 1.7.0 available for Mac, while earlier versions is available for both Windows and Mac. We will release the Windows version of 1.7.0 in desember / january.
- Either, if you have the source on a file-system file, use the
ACF_CompileFileinstead. - OR The source is copied into a text field in FileMaker.
- OR Use of the
Insert TextScript step to have the source into a variable.
For the last option, this looks like this:
First "Insert Text" Script step:

And then the script. We check for the occurrence of "=== START ===" in it, as this is the start of the base64 encoded binary package, that is already loaded when you have compiled.

Now we altered the script so we can run it too:

Then press run on it, and we get the "save as file dialogue":

And finally, we open it up in safari:

The language
Compared to regular Custom Functions, which are essentially parameterized calculations, much like the calculations you can utilize in a Set Variable statement within a script, ACF functions provide enhanced capabilities. While standard Custom Functions offer the possibility of employing inline "if" and "Case" statements for conditional calculations and are well-suited for simple tasks, they can become challenging for the programmer when nested Ifs and Cases proliferate, making it difficult to decipher the logical flow within the calculation. Consequently, they present challenges in terms of maintenance and debugging. In contrast, the ACF language is intentionally structured in a procedural manner, similar to scripts. ACF functions share similarities with custom functions, featuring parameters and return values, but they also grant direct access to the file system, SQL queries, FileMaker variables, and fields. Moreover, ACF functions execute rapidly since they are compiled. Having used the Plugin we developed for several years, I can attest to its stability. Numerous customers rely on solutions we've created, many of which involve implementing complex logic through ACF functions.
Round up
This example shows how easy it is to implement and run ACF functions in your application. However, integrating the "ACF-DevStarter" application from our website gives you an environment where you can develop the functions, compile them, and later have loading of the compiled binaries into your application in the StartUp script is far more effective, even if it's a little work (10 min) to integrate this. For more information, demos, and such, look at more in this reference manual browsing the left menu for many articles, and programming examples. We also have some videos that showcase the plugin in practical use. In the demo section, you find the videos and also where you can download the plugin for use in your system.
We wish you an enjoyable reading experience.
Ole K Hornnes
HORNEKS ANS
Back to top
When is the ACF plugin Useful
FileMaker is an excellent tool for creating custom database applications with well-designed layouts backed by a relational database. It offers a scripting language for data processing and implementing business logic. So, how does the ACF plugin come into play in this context, especially when FileMaker already has Custom Functions?
The scripting feature in FileMaker serves the purpose of automating steps that would otherwise be executed manually. For instance, if you need to create a new record in a table, a script will navigate to the relevant layout, add a new record, set the required fields, and then return to the original layout. These scripts also support looping, conditional operations via the "IF..." construct, resembling a natural language to some extent. However, one drawback is that these scripts often involve interacting with modal windows to set parameters for each script step.
This has both positive and negative sides:
Simplicity for Beginners: For those new to programming, they don't need to remember script step parameters; the properties window makes it clear.
Code Transparency: Programmers accustomed to working with text-based source code in other languages appreciate the transparency of each line, enabling them to understand intricate details just by looking. Copying and pasting details between lines is more straightforward in text-based source code.
When it comes to implementing algorithms, such as extracting statistics from a solution or adding a modulo-10 control digit to an invoice number, parsing data files (e.g., OCR or Cremul files), generating EDIFACT or EHF format files, or even inserting records in related tables, the ACF language provided by the ACF plugin proves to be faster and more straightforward. You'll find numerous examples in the "Programming Examples" chapter of this manual. Some of these examples are lengthy, but you don't need to understand every detail to use them. They provide syntax and some ready-to-use examples, all drawn from real-world solutions.
In the ACF plugin, tasks like inserting records in related tables become simpler, as you don't need to switch to related table layouts for insertion. You can achieve this with a straightforward SQL query. FileMaker's built-in SQL script (i.e., ExecuteSQL) only supports SELECT, while the plugin's SQL capabilities extend to INSERT, UPDATE, DELETE, in addition to SELECT.
Feel free to explore the "Programming Examples" section, which showcases various real-world scenarios. You'll discover that you can use many of these examples directly or adapt them to your needs.
Happy reading! Also, check out the demo chapter for information on how to access the plugin. Until October 31, 2023, a free license is available. Afterward, you can request a demo license tailored to your organization or inquire about pricing, which is quite reasonable.
Back to top
Introduction
A Brief History of the ACF Language
With over 30 years of experience in the computer industry, and having worked extensively with various programming languages, I have developed the ACF language by drawing inspiration from the syntax of multiple programming languages. The primary objective was to create a language that is both easy to read and write, while also being efficient in performing tasks that I found lacking in conventional scripting or standard calculations. In ACF, you will find elements inspired by PHP, C, old Fortran, Basic, ADA, and other proprietary programming languages.
To enhance code readability, I chose not to implement the curly-bracket block syntax seen in PHP. Instead, in ACF, code blocks are concluded with keywords such as "end if," "end for," or "end while." This approach aligns with the syntax used in FileMaker scripting, making the code more structured and comprehensible.
In regular FileMaker calculations, although they excel at handling simple calculations, nesting "if" constructs can often result in code that is challenging to decipher. While indentation and breaking code into multiple lines can improve readability to some extent, it becomes problematic when calculations end with a multitude of closing parentheses. Let's examine an example from a typical FileMaker calculation:
WashCharacters ( If(DeliveryAddress::l_Company_Name ≠ "" and DeliveryAddress::l_Country ≠ "" ; LeftWords ( DeliveryAddress::l_Country ; 1) ; If( Order::p_Country ≠ "" ; LeftWords( Order::p_Country ;1) ; "NO")))
Is it immediately clear whether this example achieves its intended purpose? Or does it lack clarity and logic? A quick analysis reveals that there might be a logic issue in this calculation. Deciphering its purpose can take several minutes. In contrast, ACF's block structure syntax would have made this issue apparent at a glance, potentially preventing such bugs during development.
Consider the following ACF equivalent of the same calculation. While it may be somewhat longer, its clarity is evident:
function delivery_country ()
    string country;
    If (DeliveryAddress::l_Company_Name ≠ "" && DeliveryAddress::l_Country ≠ "") then
        country = @LeftWords ( DeliveryAddress::l_Country ; 1)@;
    elseif ( Order::p_Country ≠ "" ) then
        country = @LeftWords( Order::p_Country  ;1)@;
    else
        country = "NO";
    end if
    return country;
end
The ACF language aims to elevate code quality, expedite development, enhance code portability, promote code reuse, and ultimately save valuable development time. It prioritizes clear and structured code, which aids developers in writing robust and maintainable software.
The Product
The ACF compiler serves as a compiler designed for use with the ACF FileMaker Plugin, aimed at facilitating the creation of advanced custom functions for FileMaker development. Traditionally, FileMaker primarily relies on scripts and calculations as its core language components. While calculations do include some structural elements such as "if" or "case" structures, they tend to be concise one-liners. However, as complexity increases, the code can become challenging to read and understand. Additionally, FileMaker calculations do not inherently support looping.
The concept of Advanced Custom Functions (ACFs) introduces programming language structures into the realm of FileMaker, creating a proprietary language definition within this project. The syntax of this language draws inspiration from other programming languages while adopting a scripting language-like syntax to expedite FileMaker developers' familiarity with it.
Here's an example of a custom function that calculates the annual interest rate based on the loan value, payment size, payment frequency, and loan duration. This calculation is not achievable through a simple formula and necessitates an iterative "test and fail" approach to converge on the result. When attempting to create such a function within the standard FileMaker custom function framework, recursive methods are typically required starting from FileMaker 17.
To begin, let's define a function that calculates the Payment Value based on the Present Value, interest rate, and the number of payments.
    /*
       AnnuityLoanPayment:
       Calculate the Payment amounth for an annuity loan :
       PV = Present Value
       r  = Interest rate
       n  = number of payments
    */

function AnnuityLoanPayment ( float PV, float r, int n)
    float P = r*PV/(1-(1+r)^(-n));
    return P;
end
Next, we'll create another function that utilizes this calculation for simulation purposes, and we'll include print statements to aid in debugging and testing.
    /*
       CalcAnnuityInterestRate:
       Calculate the Interest rate for an annuity loan by simulation :
       LoanSum = Present Value
       P  = Payment amounth
       Y  = number of years
       nY  = number of payments pr year.
    */

function CalcAnnuityInterestRate ( float LoanSum, float P, int Y, int nY)

float r;
float res;
// We start with High Interest rate.
float rY = 100.0;
float step = rY/2;
float usedrY;
if (P*Y*nY < LoanSum) then
        throw "\nNot enough payment - Payment starts at : " + LoanSum / (nY*Y);
else
    repeat
        usedrY = rY;
        r = rY/100/nY;
        res = AnnuityLoanPayment ( LoanSum, r, Y*nY);
        print "\nInterest: " + rY + "% - Payment: " + res;
        if ((res-P)>0.0) then
            print " diff(+) " + (res-P);
            rY = rY - step;
        else
            print " diff(-) " + (res-P);
            rY = rY + step;
        end if
        step = step / 2;
  until ((abs(res-P)<0.0001) || (step < 0.000001));
end if
return usedrY;
end
Performance and Debugging Insights
During the execution of approximately 26 iterations within the loop, we successfully obtained the desired result. For example, consider the following function call:
CalcAnnuityInterestRate(100000.0, 2000.0, 5, 12);
    Interest: 100.0000% - Payment: 8402.305216 diff(+) 6402.305216
    Interest: 50.00000% - Payment: 4560.474166 diff(+) 2560.474166
    Interest: 25.00000% - Payment: 2935.132338 diff(+) 935.132338
    Interest: 12.50000% - Payment: 2249.793823 diff(+) 249.793823
    Interest: 6.250000% - Payment: 1944.926168 diff(-) -55.073832
    Interest: 9.375000% - Payment: 2094.082735 diff(+) 94.082735
    Interest: 7.812500% - Payment: 2018.677871 diff(+) 18.677871
    Interest: 7.031250% - Payment: 1981.594566 diff(-) -18.405434
    Interest: 7.421875% - Payment: 2000.084452 diff(+) 0.084452
    Interest: 7.226562% - Payment: 1990.826555 diff(-) -9.173445
    Interest: 7.324219% - Payment: 1995.452267 diff(-) -4.547733
    Interest: 7.373047% - Payment: 1997.767550 diff(-) -2.232450
    Interest: 7.397461% - Payment: 1998.925799 diff(-) -1.074201
    Interest: 7.409668% - Payment: 1999.505075 diff(-) -0.494925
    Interest: 7.415771% - Payment: 1999.794751 diff(-) -0.205249
    Interest: 7.418823% - Payment: 1999.939598 diff(-) -0.060402
    Interest: 7.420349% - Payment: 2000.012024 diff(+) 0.012024
    Interest: 7.419586% - Payment: 1999.975811 diff(-) -0.024189
    Interest: 7.419968% - Payment: 1999.993918 diff(-) -0.006082
    Interest: 7.420158% - Payment: 2000.002971 diff(+) 0.002971
    Interest: 7.420063% - Payment: 1999.998444 diff(-) -0.001556
    Interest: 7.420111% - Payment: 2000.000708 diff(+) 0.000708
    Interest: 7.420087% - Payment: 1999.999576 diff(-) -0.000424
    Interest: 7.420099% - Payment: 2000.000142 diff(+) 0.000142
    Interest: 7.420093% - Payment: 1999.999859 diff(-) -0.000141
    Interest: 7.420096% - Payment: 2000.000000 diff(+) 0.000000
    Execution completed in 0.000483 secs: result: 7.4201
The compiled code
It's important to note that the compiled code is not machine code executed directly by the processor core. Instead, it comprises a series of instructions interpreted by a runtime library. These instructions can include both processor-like instructions and library functions.
Why not use PHP or JavaScript
While languages like PHP and JavaScript are undoubtedly powerful, our aim with ACF is to provide tight integration with the FileMaker environment. ACF allows you to reference FileMaker calculations and variables directly within your source code. For example:
string a = @let([v = 22; b=23]; v*b*$$ConstantValue)@;
or
$$OurPartResult = sqrt ( pi*r^2 ) + $$FileMakerVar1;
This approach streamlines development by seamlessly blending code with the FileMaker environment, making it highly efficient.
Another reason for not using PHP or JavaScript is that they are typically interpreted languages, which are not as fast as compiled languages. ACF, being a compiled language, offers performance benefits. Additionally, ACF's compiler checks the source code for syntax errors, ensuring that your code is free from runtime errors due to syntax issues. It also reduces dependency on external libraries, which can be OS-dependent or subject to compatibility issues. Furthermore, ACF's compiled product can be easily installed in FileMaker using a script step, providing a secure way to deploy your solution without exposing the source code.
Example of Compiled Code
This example delves into technical details. If you are not particularly interested in the code's construction, feel free to skip to the next section.
First, let's examine the compiled sequence of the small function. The following mnemonics are presented to represent the assembly-like instructions, which are, in reality, stored as integer representations. Within the runtime environment, a stack is employed to handle arguments, and a variable stack is used for local variables. These variables are assigned a numerical identifier relative to the beginning of the local variable block for the function. The instructions themselves occupy either 1, 2, or 3 memory locations, depending on their parameters.
// 168: function AnnuityLoanPayment ( float PV, float r, int n)
 841:         ENTER 38 3          // AnnuityLoanPayment
 844:         DECL 0 5          // Declare variable PV: DOUBLE
 847:         LDPARX 0          // PV
 849:         DECL 1 5          // Declare variable r: DOUBLE
 852:         LDPARX 1          // r
 854:         DECL 2 1          // Declare variable n: INTEGER
 857:         LDPARX 2          // n

// 169:     float P = r*PV/(1-(1+r)^(-n));
 859:         DECL 3 5          // Declare variable P: DOUBLE
 862:         LDVARL 1          // r
 864:         LDVARL 0          // PV
 866:         MUL_FF            // Multiply 2 doubles
 867:         LDNUM 6           // 1
 869:         LDNUM 6           // 1
 871:         LDVARL 1          // r
 873:         ADD_IF            // Add int and double
 874:         LDVARL 2          // n
 876:         LDNUM 21          // -1
 878:         MUL_II            // Multiply 2 int's
 879:         XupY              // Power
 880:         SUB_IF            // Subtract int and double
 881:         DIV_FF            // Div 2 doubles
 882:         STOREL 3          // P

// 170:     return P;
 884:         LDVARL 3          // P
 886:         RETURN 1
// 171: end
The compiler establishes a table containing all the literals, which can be either strings or numbers utilized in the calculations. Instructions within the code only reference the index associated with these literals in the table. This approach allows literals to be shared among all the functions within the same file, optimizing memory usage and enhancing efficiency.
Why Not Use Processor Core Instructions Directly?
There are several compelling reasons for avoiding direct utilization of processor core instructions:
Hardware Independence: If we were to directly employ processor core instructions, the runtime would become highly dependent on specific hardware configurations. By using the compiled code approach, we achieve hardware independence. The same code can seamlessly run on different types of computer hardware without requiring any alterations. This simplifies the compiler's task, as it only needs to generate a single target code. Additionally, it eliminates the need for maintaining multiple versions of the executable to accommodate diverse Mac and Windows user environments.
Control and Containment: Another significant advantage lies in the degree of control we exert over executions. By encapsulating execution within the program space for the functions we create, we maintain a level of isolation and control that isn't achievable through direct processor core instruction execution.
Enhanced Library Concept: The use of a higher-level language like ACF allows us to employ a more straightforward library concept. Many of the instructions within ACF are, in fact, library functions that perform complex operations. These functions often encompass more functionality than what processor core instructions alone could achieve.
While it's conceivable to further optimize performance by using processor core instructions directly, the example illustrated above demonstrates that the current approach yields remarkably fast execution speeds—beyond initial expectations.
Compare to a FileMaker Script Doing the Same
I created a regular custom function to replicate the first function, followed by a script to execute the simulation. With the inclusion of print statements (using a variable to collect text), the average execution time was approximately seven milliseconds. When I removed the text logging, the execution time occasionally improved to 4, 5, or 6 milliseconds. However, this remains significantly slower than our compiled code, which runs at approximately 500 microseconds with print statements and only 217 microseconds without them. In other words, our compiled code is approximately 23 times faster without print statements and 14 times faster with them. Despite these variations, both approaches ultimately yield the same result.
You can explore this example in the download area under the name "acf-annuity-loan speed demo."
Here is the FileMaker script I used for test
Set Variable [ $ts ; Value: Get(CurrentTimeUTCMilliseconds) ]
Set Variable [ $LoanSum ; Value: 100000 ]
Set Variable [ $Payment ; Value: 2000 ]
Set Variable [ $Y ; Value: 5 ]
Set Variable [ $nY ; Value: 12 ]
Set Variable [ $rY ; Value: 100 ]
Set Variable [ $step ; Value: $ry/2 ]
Set Variable [ $$debLog ; Value: "" ]
If [ $Payment * $Y * $nY < $LoanSum ]
    Show Custom Dialog [ "Not enough payment - Payment starts at : " & ($LoanSum / ($nY*$Y)) ]
Else
    Loop
        Set Variable [ $usedrY ; Value: $rY ]
        Set Variable [ $r ; Value: $rY / 100 / $nY ]
        Set Variable [ $res ; Value: AnnuityLoanPayment ( $LoanSum ; $r ; $Y * $nY ) ]
        // Set Variable [ $$deblog ; Value: $$deblog & "¶" & "Interest: " & $rY & "% - gives Payment: " + $res ]
        If [ ($res-$Payment)>0 ]
            // Set Variable [ $$deblog ; Value: $$deblog & " diff(+) " & ($res-$Payment) ]
            Set Variable [ $rY ; Value: $rY - $step ]
        Else
            // Set Variable [ $$deblog ; Value: $$deblog & " diff(-) " & ($res-$Payment) ]
            Set Variable [ $rY ; Value: $rY + $step ]
        End If
        Set Variable [ $step ; Value: $step / 2 ]
    Exit Loop If [ ((Abs($res-$Payment)<,0001) or ($step < ,000001)) ]
    End Loop
End If
Set Variable [ $te ; Value: Get(CurrentTimeUTCMilliseconds) ]
Show Custom Dialog [ "Finished" ; "We finished this in " &  ( $te - $ts ) & " millisecs, result: " & $usedrY ]
Interaction with the FileMaker Environment
What sets ACF apart from many other high-level language implementations is its seamless interaction with the FileMaker environment, a key aspect that makes ACF functions custom functions.
You can utilize and assign values to standard FileMaker variables by simply referencing their names, such as
$FileNameor$$extraresult. While accessing these variables may not be as fast as using internal local variables, it provides an additional interface to the script executing the functions.ACF allows you to perform FileMaker calculations directly from within the ACF script. Enclose single-line calculations with "@" characters or use double "@@" for multi-line calculations.
You can access field content by employing the "::" notation for field names, such as
table::field, directly within internal calculations. However, it's important to note that you cannot assign values to fields directly. Instead, you can return a value from the function and use the "set field" command to update field values.
Standalone Compiler or Plugin Compiler
Initially, the compiler was developed as a standalone compiler (command-line tool) with the intention of eventually incorporating it into a FileMaker plugin, along with the runtime. Currently, the plugin includes both the runtime and the compiler, and many functions are tightly integrated into the FileMaker plugin environment. Consequently, the standalone compiler is no longer actively maintained. However, if there is a specific need, we can provide a standalone syntax checker for use in integrated development environments (IDEs) to help you syntax-check your code directly from the editor. This would be a separate project.
Conclusion
This package empowers developers to work more efficiently in a language that shares many similarities with traditional programming languages like PHP, C, 4D, BASIC, and FORTRAN. Those with experience in any of these languages should find it easy to adapt to ACF. The product promises faster development, eliminating the need to navigate through multiple modal dialogues when writing scripts in FileMaker's script editor. ACF's source code can be edited using a plain text editor such as TextMate or even Xcode, enabling smooth copy and paste operations without the interruption of modal dialogues.
Furthermore, the compiled code runs swiftly, enhancing the end user's experience with the solution. Additionally, the SQL functions in ACF allow for data retrieval, updates, or inserts without the need to reference the current layout's table occurrence.
Back to top
Syntax Differences Between ACF and Standard Custom Functions
In this chapter, we will explore some key syntax differences that are important to be aware of when coding in the ACF language.
The Use of Commas and Semicolons
In standard custom functions, semicolons are typically used to separate parameters in function calls. However, in ACF, we utilize commas for this purpose. Semicolons, on the other hand, serve as statement terminators. This approach enhances code readability, distinguishing between parameter separators and statement terminators. It's worth noting that either commas or periods can be used as decimal separators for numbers. SQL queries in ACF use periods as decimal separators.
In ACF, each statement must be terminated by a semicolon. Exceptions to this are flow control statements or terminators. Like if, else, elseif, endif, for, endfor, While, end while, repeat, until, Function and end. Look at some of the programming examples to be more familiar with the syntax.
Conditional expressions
In version 1.7.0.15, we introduced conditional expressions, much like the standard calculations in FileMaker. However, the if was already used in structural if then else endif so we had to use something else. Adopting the syntax of conditional expressions in PHP, C, C++ and some other languages was an easy choice. Now this follows this syntax:
variable = <boolean expression> ? <true calculation> : <false calculation> ;
Examples:
int workHours = day >= 6 ? 0.0 : 7.5;
deliveryAddress = orders::deliveryAddress == "" ?
                customer::deliveryAddr :
                orders::deliveryAddress;
Whether to use conditional expressions or structural if...endif structures is up to the programmer to decide what fits the actual case. It can be efficient in some cases, but overuse can make the source code less readable.
If the conditional expression is part of another expression, it might be needed to enclose it in parentheses. Like this:
print "WorkHours: " + (day >= 6 ? 0.0 : 7.5) + " hours";
Inline case:
Unlike standard custom functions, ACF does not support inline case constructs. This design choice aims to improve the legibility of the source code. Instead, we recommend using if-then-elseif-else-endif or the case...end casestructure, which can be nested to any level. These structures can be combined with loop constructs (for-endfor, while-endwhile, repeat-until). For FileMaker calculations in ACF, you can employ the "@" symbol on each side of the expression. The syntax within these constructs remains consistent with FileMaker calculations.
Declaration of Variables and Parameters
In standard custom functions and calculations, variables are always auto-declared. An undeclared variable is treated as non-existent, resulting in a return of a blank or zero value if accessed. However, in ACF, both parameters for function definitions and global or local variables must be explicitly declared. Declarations can be integrated into assignments or declared separately before usage. Importantly, declarations should not be placed inside "if-endif" or loop constructs; they must be declared at the function level. Function return values are typically auto-declared based on the type of the returned expression. In some cases, particularly with recursive functions, explicit declaration of the return type is necessary. This is achieved by declaring the function name as if it were a variable. Undeclared variables will trigger a compiler error, while assignments can auto-declare variables but prompt a warning from the compiler.
In FileMaker, data types include Text, Numbers, Dates, TimeStamps, Time, and Containers (field only). ACF introduces String as the text type, and it offers int, long, float, and double as number types. Date, TimeStamp, and Time data types remain consistent with FileMaker. However, Containers are not available in this version of the plugin. Select the data type that aligns with your specific use case: use int or long for whole numbers, and opt for float or double for numbers with decimal values. Strings in ACF can be up to 2GB in length.
In FileMaker, global variables are declared when used with double $ signs (e.g., $$MyVariable). In ACF, global variables are declared like local variables but are positioned outside functions. Global variables are not initialized with any values, so they must be assigned a value before use. They can be accessed by any other function within the current source file only. Unlike FileMaker, ACF does not have a global level shared across all ACF libraries; for such a purpose, you can use "$$" variables.
Single "$" variables in FileMaker are local to the currently executing script, and they lose their value when the script ends. In ACF, local variables are declared within functions, and they lose their value when the function returns.
Boolean Operators and Data Types
In standard FileMaker, there isn't an explicit boolean data type. Instead, any data type can be treated as a boolean. This means that a non-zero number or a non-empty text is considered true, while a zero value or an empty string is considered false. In ACF, we introduce a dedicated variable type known as bool. This type can only hold values of true or false. You cannot use any other data type as a boolean. For instance, to check if an integer variable i is true or false in ACF, you would write i != 0.
In standard FileMaker, the equality operator is represented as =, whereas in ACF, we use ==. In standard FileMaker, the "not equal to" operator is ≠, while in ACF, we support both ≠ and !=, similar to languages like C, PHP, or JavaScript. In ACF, a single = is used as an assignment operator, distinct from comparison.
Standard FileMaker utilizes the and and or operators in boolean expressions. In ACF, we employ && and || for the same purpose.
The strict datatype in ACF serves to enhance the compiler's ability to rigorously check expressions. When errors in an expression lead to type mismatches, it is more beneficial to receive an error message than to potentially overlook a flawed expression.
Function Return Values
In standard custom functions, the value of the calculation is automatically returned. In ACF, it is imperative to explicitly specify what to return using the "return" statement. A function can have multiple "return" statements, indicating that no code beyond the "return" statement will be executed within that function. If no "return" statement is present, an empty value will be returned. When using multiple "return" statements, the type of expression should be consistent across all "return" statements. For example, if one "return" statement returns a string, all other "return" statements in that function should also return strings.
The Array Type
Standard custom functions in FileMaker lack built-in support for arrays. Repeated fields and variables are the closest alternatives for managing multiple values. In contrast, ACF introduces a comprehensive array type. All data types in ACF can be declared as arrays, utilizing square brackets to specify the array index. If the left side of an assignment includes empty square brackets, a new index is added to the array.
FileMaker supports multiline variables, where each line in the text corresponds to a numbered value. ACF preserves this functionality with the "getValue" function. ACF arrays are effectively employed with functions like "explode" and "implode," facilitating the conversion of CSV-formatted data into arrays and vice versa. This proves particularly useful when handling SQL results and import/export operations.
Managing Multiple Functions in the Same File
In FileMaker, custom functions can be managed under "Manage/Custom Functions," with each function having its separate editor. ACF adopts a different approach. A "Function" statement marks the start of a function, followed by a list of parameters enclosed in parentheses. Each parameter must be prefixed with its data type. The function concludes with the "end" statement.
The ACF file begins with a "Package" statement that specifies the package name. This step is necessary when working with multiple packages in the plugin to determine which package is replaced when reloaded or recompiled. Although ACF supports functions with the same name across several packages, it's generally not recommended. Having multiple packages implement a function with the same name can make it challenging to identify which version of the function is called from FileMaker.
Calling functions convention
In Standard custom functions, other functions can be called just by their name. This is also true for ACF function called from inside the functions. From Filemaker calculations, there is two ways to call ACF functions. Either by ACF_Run("FunctionName"; Parameter1;Parameter2;....), or if the ACF function is given a unique FunctionID, using the FunctionID statement, they can be called using ACFU_FunctionName(Parameter1; parameter2; ....). The Prefix ACFU_ is assigned in order to avoid naming conflicts with other standard functions. From the ACF functions, FileMaker standard custom functions can be called using the @-sign on each side of the function call. Alternatively, using the eval function. For multiline FileMaker calculations, you can use double @ signs on each side.
We hope this clears up some of the differences between standard custom functions and ACF.
Back to top
ACF Source Package Names
The Package Name plays a pivotal role in identifying a package within ACF. You have the flexibility to install multiple packages, but it's imperative that each package possesses a unique name. Should you attempt to compile a package with a name identical to one that's already installed, the new package will overwrite the existing one.
In the plugin function "ACF_GetAllPrototypes," you gain access to a comprehensive list of all installed packages and the prototypes for functions contained within them. The Package name and its description are displayed before listing the functions contained in each package.
It's crucial to note that a package must have a designated name; otherwise, you'll receive a compilation warning, and the Package name will default to "STD." Consequently, several nameless sources cannot coexist within the plugin.
The Package name is the first command in the source file and follows this format:
package <name of package> "<a short description>";

function blabla....
Example:
package MarkDownFunctions "MarkDown funksjoner for dok prosjektet...";

function post_processing (string htmlfile)

    print "post processing\n";
    ..
    ..
    ..
In this example, the package name "MarkDownFunctions" is provided along with a brief description of its purpose.
Back to top
Mac and Windows Compatibility
The ACF Plugin is compatible with both Mac and Windows operating systems. It offers the advantage of running the same compiled code seamlessly on both platforms without the need for any alterations. This cross-compatibility extends to the source code as well, allowing it to be compiled on one platform and executed on the other. However, it's essential to be aware of some platform-specific considerations.
File Paths: Operating systems handle file paths differently. To mitigate this, the plugin automatically converts forward slashes to backslashes on Windows, ensuring that relative paths are handled correctly. For server implementations where a mix of Mac and Windows users is involved, be mindful of differences in file paths, especially if paths are stored for server volumes.
Platform-Specific Code: If your code involves file path manipulation or any other platform-dependent logic, it's advisable to implement code that can handle both Mac and Windows platforms. You can utilize the boolean constants "isMac" or "isWindows" to conditionally execute platform-specific code.
function SaveFile (string filename, string content )
    FunctionID 201;
    int x;
    x = open (filename, "w");
    if ( isWindows ) then
        content = substitute ( content, "\r", "\r\n");
    elseif ( isMac ) then
        content = substitute ( content, "\r", "\n");
    end if
    write (x, content);
    close ( x );
    return 1;
end
Text Encoding: Internally, the plugin uses UTF8 encoded text. Some Windows text editors default to ISO-8859-1 encoding. To ensure seamless code writing on Windows, it's recommended to choose a text editor that supports UTF8 encoding. Notepad.exe may not be the best choice in this regard. Opting for a standard source code editor is a more suitable alternative. When dealing with file I/O, employ text conversion functions to switch between ISO-8859 and UTF8 encoding to handle text requiring this format.
Line Separators: FileMaker uses CR (Carriage Return) internally, whereas text files on Mac and Unix systems use LF (Line Feed), and Windows uses CRLF (Carriage Return Line Feed). Functions that generate text files should account for these differences and provide platform-specific handling. The plugin refrains from automatic processing in this area to grant developers greater control over text generation and parsing according to platform requirements.
Back to top
The Initial Loading Script
To make the most of the ACF Plugin, you need to perform some initialization steps beyond simply placing it in the plugins folder. These steps are crucial for harnessing the plugin's full potential. Here's a breakdown of what you need to do:
Note: An example of this can be found in the "ACF-Devstarter" application, you can simply cut and paste from this instead of making it all, but here is the steps if you prefer to do:
Verification and Installation: First, you should verify whether the plugin is installed. If it's not already installed, you need to install it.
Loading Binaries: Next, load the binaries for your compiled sources.
Bootstrap Package Compilation: Check if you have the Bootstrap package installed. If it's not there, compile it from the source. The Bootstrap package is essential for your development environment.
Plugin License Registration: Lastly, you should register the plugin's license. Without this, the plugin will only work for 30 minutes. Therefore, it's recommended to do this step last. If you only deploy a runtime license (instead of a developer license) too early, it can hinder compilation in step 3.
The code to perform these initialization steps should be placed in your "Startup" FileMaker Script. If you don't already have a startup script, create one. Then, go to File Options and Triggers and select your startup script to run "On First Window Open."
Run this script from the script workspace, and your plugin will be all setup.
In this setup, we assume that you have the Preferences ACF fields from the ACF_Devstarter application defined. For details about this setup, please refer to the first video in the "Demo Videos" section of this manual.
Preparing a Source File for Step 3
If you have the compiled binary for it in one of the ACF_Pack1...ACF_Pack4 fields in your preference table, this step is not needed as it will load in step 2. However, if you start your application without any records in your preference table or the fields are empty, this is a fallback mechanism to ensure the bootstrap package is loaded.
Unfortunately, you can't include the source code directly within a calculation due to FileMaker's new-line behavior in calculations. To work around this, use the the following:
Create a script step:
Insert Text. ChooseSelect, and for target checkVariable, and name it$$Sourcefor example. Below the variable, a text field comes up where you can paste in the source code found in "bootstrap.acf". In this way, the text is pasted as-is, and there is not removed any linebreaks from it.Then a second script step,
Set Variable, and$res, and the formula isACF_Compile($$Source)
If [ ACF_run("bootstrap_AreWeLoaded") ≠ "Yes" ]
    Insert Text ( Select; $$Source; 'package bootstrap "Functions to facilitate..."')
    Set Variable [ $res; Value:ACF_Compile( $$Source ) ]
End If
Here is some images:
Example of a startup script
 # Initialize the ACF Plugin
 # 1. Verify if we have the plugin, if not, install it.
Go to Layout [ “Preferences” (Preferences) ]
If [ dsPD_Version( "autoupdate" ) >= "01060200" ]
    Perform Script [ “Install Plugin” ]
    Pause/Resume Script [ Duration (seconds): ,3 ]
End If

 # 2. Load the binaries for our compiled sources.
Set Variable [ $$ACF;
    Value:Let( [
    v = If (not IsEmpty ( Preferences::ACF_Pack1) ;
        ACF_Install_base64Text( Preferences::ACF_Pack1 ); "") ;
    v = v & If (not IsEmpty ( Preferences::ACF_Pack2) ;
        ACF_Install_base64Text( Preferences::ACF_Pack2 ); "") ;
    v = v & If (not IsEmpty ( Preferences::ACF_Pack3) ;
        ACF_Install_base64Text( Preferences::ACF_Pack3 ); "") ;
    v = v & If (not IsEmpty ( Preferences::ACF_Pack4) ;
        ACF_Install_base64Text( Preferences::ACF_Pack4 ); "")
    ]; v ) ]

 # 3. Checking if we have the bootstrap package, if not, compile it from the source.
 #    (As it is mandatory for our development environment)

If [ ACF_run("bootstrap_AreWeLoaded") ≠ "Yes" ]
    Insert Text ( Select; $$Source; 'package bootstrap "Functions to facilitate..."')
    Set Variable [ $res; Value:ACF_Compile( $$Source ) ]
End If

 #3. Registering the plugin's license. Either from preferences, or from hard-coded license
Set Variable [ $reg;
        Value:ACF_RegisterPlugin( Preferences::ACF_LicenseName; Preferences::ACF_LicenseKey ) ]

 # Verify that the registration went OK, if not show an error.
If [$reg ≠ "OK"]
    Show Custom Dialog ["ACF-Plugin"; "Error registering the plugins license: " & $reg]
End If
 # Any other initialization needed for our application.
You can cut and paste those steps from the dev-starter.
Back to top
The Bootstrap Package
The Bootstrap package is a collection of utility ACF functions used by the development environment to simplify the selection of files, directories, and more. It should be installed as one of the core packages in your application.
Most functions within this package have a FunctionID assigned, allowing you to use them directly in FileMaker calculations without the 'ACF_run' notation. Simply prefix them with 'ACFU_.' Here's a function reference, along with a listing of the package's source.
These functions are primarily intended for the development environment and are designed to serve as a standard ACF package in any application using the ACF-Plugin. They offer versatility and can be employed for various tasks related to operating system files.
bootstrap_AreWeLoaded ()
This is a simple function to tell if we have loaded the bootstrap package. Also, see the Article about the startup script to see a full example of its use.
Example from startup script after loading the ACF compiled packages:
 # The bootstrap package should be in Preferences::ACF_Pack1, but if it's not...
If [ ACF_run ("bootstrap_AreWeLoaded") ≠ "Yes" ]
    # We lack the bootstrap package, compile it from Source....
    ...
End If
LoadFile (filename)
The LoadFile function opens a file and returns its content.
Example from a FileMaker script step:
Set Field [Preferences::SourceCode4; ACFU_LoadFile (Preferences::SourceFile4)]
SaveFile (filename, content)
The SaveFile function saves text to a disk file specified by the filename and its content.
Example:
If the source file does not exist, but you have its name and content, create the file and save the content to it.
Set Variable [$res; ACFU_SaveFile (Preferences::SourceFile4; Preferences::SourceCode4)]
SelectAndGetFile (startPath, Prompt)
The SelectAndGetFile function opens a file selection dialog, retrieves its content, and returns it. You can specify the starting path for the dialog and provide a prompt as the dialog heading. If the user selects a file, the global variable $$FileName is set to the selected file's path.
Here's an example of selecting the source file using a button and then setting the content and the path:
 # Select a file and get its content.
Set Field [Preferences::SourceCode4; ACFU_SelectAndGetFile (Preferences::SourcecodeFolder; "Select the source file")]
If [Preferences::SourceCode4 ≠ ""]
    # The user did not hit Cancel.
    Set Field [Preferences::SourceFile4; $$FileName]
End If
SelectFileOnly (startPath, Prompt)
The SelectFileOnly function works similarly to SelectAndGetFile but returns only the selected file's path without opening it.
Example:
Set Field [Preferences::SourceFile4; ACFU_SelectFileOnly (Preferences::SourcecodeFolder; "Select the sourceFile")]
 # If the SourceFile4 field is blank, the user did cancel the dialog.
SelectFolder (Prompt)
This function opens a directory selection dialog and returns the path to the selected directory.
Example:
Set Field [Preferences::SourcecodeFolder; ACFU_SelectFolder ("Where do you keep your ACF source files?")]
DirectoryExists (DirectoryPath)
The DirectoryExists function checks for the existence of a directory path and returns a boolean value (1 for true, 0 for false in FileMaker scripts).
Example:
If [Not (ACFU_DirectoryExists (Preferences::SourcecodeFolder))]
  # Take appropriate actions for a missing folder configuration.
  # (Select a new folder or present an error...)
End If
FileExists (FilePath)
This function checks for the existence of a disk file and returns true or false (1 or 0 in FileMaker scripts).
Example:
If [Not (ACFU_FileExists (Preferences::SourceFile4))]
   # Take appropriate actions for a non-existent source file.
   # Select the file or present an error, for example.
End If
GetFilenameFromPath (path)
The GetFilenameFromPath function returns only the last part of the filename from a full path.
Example:
 # Suppose our SourceFile4 contains: /Users/ole/MyACFFiles/bootstrap.acf
Set Variable [$SourceFileName; ACFU_GetFilenameFromPath(Preferences::SourceFile4)]
 # The $SourceFileName now contains bootstrap.acf
GetDirectoriesFromPath (path)
The GetDirectoriesFromPath function returns the directory path leading up to the filename of a full path, including the filename at the end.
Example:
 # Suppose our SourceFile4 contains: /Users/ole/MyACFFiles/bootstrap.acf
Set Variable [$SourceDirectory; ACFU_GetDirectoriesFromPath(Preferences::SourceFile4)]
 # The $SourceDirectory now contains /Users/ole/MyACFFiles/
GetExtensionFromPath (path)
The GetExtensionFromPath function returns the extension or file type (what appears after the final dot) of a filename or a full path.
Example:
 # Suppose our SourceFile4 contains: /Users/ole/MyACFFiles/bootstrap.acf
Set Variable [$FileExtension; ACFU_GetExtensionFromPath(Preferences::SourceFile4)]
 # The $FileExtension now contains: acf
SaveFileDialog (Prompt, proposed_folder, proposed_name)
The SaveFileDialog function presents a dialog to the user for saving a new file. You can specify a proposed folder and a proposed name for the file. If the file already exists, the user is alerted and can choose to overwrite it.
Example:
Set Field [Preferences::SourceFile4; ACFU_SaveFileDialog ("Save the file"; Preferences::SourcecodeFolder; "NewName.acf")]
If [Preferences::SourceFile4 ≠ ""]
    # A valid file has been selected; start writing to it...
End If
OpenOutputFile (path)
The OpenOutputFile function opens a file, keeping it open for subsequent write calls. It returns an open file number, which can be used for later writing operations.
For additional write functions and the close function, refer to the combined example below.
WriteOutputMacFileUTF8 (FileNo, data)
This function writes text to an open output file. For example, if you are exporting data, you can open the file with the OpenOutputFile function, write export content to it in a loop, and then close the file.
The file content will be in Mac UTF8 format.
WriteOutputWinFileIso8859_1 (FileNo, data)
This function is similar to the previous one, except it converts the data to ISO-8859-1 format for Windows systems and replaces carriage return codes with Windows Carriage-Return-Line-Feed codes. This is useful for exporting data from a Mac to a Windows system.
WriteOutputWinFileUTF8 (FileNo, data)
This function is also for writing data but produces it in UTF8 format for Windows.
CloseFile (FileNo)
The CloseFile function closes the open file after you have written the content to it.
Here's a combined example:
 # Present a File-Save dialog
Set Variable [$FileName; ACFU_SaveFileDialog ("Save the file"; ""; "NewName.txt")]
If [$FileName ≠ ""]
    # Open the selected file
    Set Variable [$FileNo; ACFU_OpenOutputFile($FileName)]

    # Loop through the records
    Go to record/request/page [First]
    loop


        # Generate and write content to the file
        Set Variable [$LineContent; ... some content for the file]
        Set Variable [$xx; ACFU_WriteOutputWinFileIso8859_1($FileNo; $LineContent & Char(13))]

        Go to record/Request/Page [Next; Exit after last: On]
    end loop
    # Close the file
    Set Variable [$xx; ACFU_CloseFile($FileNo)]
End If
NumFormat ( number, comma )
This function formats a number value to a text string with 1000 separators and two decimals. You specify the type of comma used in your application being a period or a regular comma. The function is used to merge fields in your layout to increase the readability of the numbers.
Example:
Set variable [$$SumInvoice; "$ " & ACFU_NumFOrmat(Invoice::InviceTotal; ".")]
 # Ausme Invoice::InviceTotal contains 10055.35, The $$SSumInvoice now contains "$ 10 055.35"
 # <<$$SSumInvoice>> can now be placed on your layout as a merge-field.
BSBO_SaveDocumentDesktop (DocStore, SubPath, Title)
This function is suited for a document portal in your application. The document record points to some documents in the operating system, a copy "document to desktop" button on the portal row is sometimes desirable. The user is on the way to a customer and needs some documents copied to his desktop or a folder on his customer visit.
If the user holds the "Alt-key" then a Save-File dialog appears where he can select the destination for the document.
The Parameters:
- DocStore - Usually a configuration parameter in your system, where the document store starts. It can be different paths for Mac and Windows users in a mixed environment.
- SubPath - The relative path from the start of the DocStore, including the filename. Sometimes filenames are prefixed and suffixed by date numbers and customer numbers as such.
- The title is the name of the destination file. The title does not need to have a file-type ending, as this is taken from the source file.
Example:
 # Example (Win):
Set variable [$xx;
    ACFU_BSBO_SaveDocumentDesktop ( "\\192.168.1.20\vArchive\myDocArchive";
        "Customers/11213/Contract.docx"; "Customer 11213 Contract" ) ]
 # or (mac)
Set variable [$xx;
    ACFU_BSBO_SaveDocumentDesktop ( "vArchive:myDocArchive";
        "Customers/11213/Contract.docx"; "Customer 11213 Contract" ) ]
GetPlatformString ( MacString, WinString )
The GetPlatformString is used in a mixed environment where you need separate text strings for Mac versus Windows users.
Example:
Set variable [$DocStore; ACFU_GetPlatformString ( Preferences::MacArchive; Preferences::WinArchive ) ]
 # Then the $DocStore is from the field MacArchive for the Mac Users, and WinArchive for the Windows users.
Save_Logg ( LoggText, LoggName )
The Save_Logg function is useful for providing logg files from functions in your application. It creates a folder in your Documents directory called ACFLoggFiles. It adds a timestamp to the name given and writes the LoggText to the file.
Example:
Set Variable [$LoggPath; ACFU_Save_Logg($$ProcessLogg; "ProcessLogg")]
Append_Logg ( loggText , FilePath)
The Append_Logg function is useful for appending some logg text that has already been created. The Save_Logg function above returns a path to the logg-file, and this can be applied to the FilePath parameter in this function.
Example:
Set Variable [$xx; ACFU_Append_Logg($$ProcessLogg2; $LoggPath)]
AddMod10 ( Number )
The AddMod10 generates a Modulo-10 Control-digit to a string of numbers supplied, using the Luhn algorithm.
AddMod11 ( Number )
The AddMod11 generates a Modulo-11 Control-digit to a string of numbers supplied, using the Luhn algorithm.
Source code listing for the Bootstrap package
package bootstrap "Functions to facilitate load and save source and binary files

- Require ACF_Plugin ver 1.6.0.3 as minimum.

";
/*

    Common use ACF functions.
    If you duplicate some of the functions to change, Remember to change or remove the FunctionID that need to be a unique number, between 100 an 32767.
    We have used 200-214 and 229-236 in this package.
    The FunctionID statement makes the functions available as plugin-function directly in the FileMaker calculations using ACFU_FunctionName...
    You can use ACF_GetAllPrototypes to retrieve the prototypes for all the functions, for cut & paste into your calculations.

*/

function bootstrap_AreWeLoaded ()
    return "Yes";
end

function LoadFile (string filename)
    FunctionID 200;
    string content;
    int x;
    x = open (filename, "r");
    content = read (x);
    close ( x ) ;
    return content;
end

function SaveFile (string filename, string content )
    FunctionID 201;
    int x;
    x = open (filename, "w");
    write (x, content);
    close ( x );
    return 1;
end

function SelectAndGetFile (string startPath, string Prompt)
    FunctionID 202;
    string cc = "";
    string filename = select_file (Prompt, startPath);
    if (filename != "") then
         cc = LoadFile(filename);
    end if
    $$FileName = filename;
    return cc;
end


function SelectFolder ( string prompt )
    FunctionID 203;
    string folder = select_directory ( prompt ) ;
    return folder;
end

function DirectoryExists ( string DirectoryPath )
    FunctionID 204;
    if ( isMac ) then
        DirectoryPath = substitute ( DirectoryPath, ":", "/");
        if ( ! directory_exists ( DirectoryPath ) ) then
            if ( left ( DirectoryPath, 1 ) != "/") then
                DirectoryPath = "/Volumes/" + DirectoryPath;
            else
                return false;
            end if
        else
            return true;
        end if
    else
        DirectoryPath = substitute ( DirectoryPath, "/", "\\");
    end if
    return directory_exists ( DirectoryPath ) ;
end

function FileExists ( string FilePath )
    FunctionID 229;
    if ( isMac ) then
        FilePath = substitute ( FilePath, ":", "/");
        if ( ! file_exists ( FilePath ) ) then
            if ( left ( FilePath, 1 ) != "/") then
                FilePath = "/Volumes/" + FilePath;
            else
                return false;
            end if
        else
            return true;
        end if
    else
        FilePath = substitute ( FilePath, "/", "\\");
    end if
    return file_exists ( FilePath ) ;
end

function GetFilenameFromPath ( string path )
    FunctionID 205;
    path = substitute ( path, ":", "/");
    path = substitute ( path, "\\", "/");
    return regex_replace("^(.+)/(.+\..+)$", path, "\2");
end

function GetDirectoriesFromPath ( string path )
    FunctionID 206;
    path = substitute ( path, ":", "/");
    path = substitute ( path, "\\", "/");
    return regex_replace("^(.+)/(.+\..+)$", path, "\1");
end

function GetExtentionFromPath ( string path )
    FunctionID 207;
    path = substitute ( path, ":", "/");
    path = substitute ( path, "\\", "/");
    return regex_replace("^(.+/)(.+\.)(.+)$", path, "\3");
end

function SelectFileOnly (string startPath, string Prompt)
    FunctionID 208;
    string cc = "";
    return select_file (Prompt, startPath);
end

function SaveFileDialogue ( string prompt, string proposed_folder, string proposed_name )
    functionID 209;
    string newfn = save_file_dialogue (prompt, proposed_folder, proposed_name) ;
    return newfn;
end

function OpenOutputFile ( string path )
    FunctionID 210;
    int x = open ( path, "w" );
    return x;
end

function WriteOutputMacFileUTF8 ( int FileNo, string data )
    FunctionID 211;
    write ( FileNo , substitute ( data, "\r", "\n" )) ;
    return "OK";
end

function WriteOutputWinFileIso8859_1 ( int FileNo, string data )
    FunctionID 212;
    write ( FileNo , from_utf ( substitute ( data, "\r", "\r\n" ), "ISO-8859-1" )) ;
    return "OK";
end

function CloseFile ( int FileNo )
    FunctionID 213;
    close ( FileNo ) ;
    return "OK";
end

function WriteOutputWinFileUTF8 ( int FileNo, string data )
    FunctionID 214;
    write ( FileNo , substitute ( data, "\r", "\r\n" )) ;
    return "OK";
end

/*

    Formattering av nummer - med komma og 1000 gruppe-skille.
    Her benyttes fast " " som 1000 gruppe skille
    Eksempel fra FileMaker kalkulasjon: ACFU_NumFormat ( beløp, ",")
    Der beløp er 12345,2 => 12 345,20

*/
function NumFormat  ( float num, string comma )
    functionID 230;
    string sNum;
    if ( comma != ".") then
        sNum = substitute ( format ( "%.2f", num ), ".", comma ) ;
    else
        sNum = format ( "%.2f", num );
    end if

    return regex_replace ( "\d{1,3}(?=(\d{3})+(?!\d))", sNum, "$& ") ;

end

/*
Copy a document from a document store to user's desktop.
DocStore: the start path for the archive
ArchiveSubPath: The relative path starting from DocStore (including the filename). Designed to be a
    common subpath to be used from both Mac and Windows, using :, / or \ as directory seps.
Title: An optional title of the document to be used as the target filename (+ extension of the original file )
Example (Win):
ACFU_BSBO_SaveDocumentDesktop ( "\\192.168.1.20\vArchive\myDocArchive"; "Customers/11213/Contract.docx"; "Customer 11213 Contract" )
or (mac)
ACFU_BSBO_SaveDocumentDesktop ( "vArchive:myDocArchive"; "Customers/11213/Contract.docx"; "Customer 11213 Contract" )

If the user holds the Alt key down while doing this, a File Save dialogue appears for the user to select an alternate name or location.
Else, it will be copied to the user's desktop.
*/

function BSBO_SaveDocumentDesktop (string DocStore, string ArchiveSubPath, string Title)
    functionID 231;
    if ( DocStore == "" ) then
        throw "DocStore for document not set";
    end if
    if ( ArchiveSubPath == "" ) then
        throw "ArchiveSubPath for document not set";
    end if

    if ( isMac ) then
        DocStore = "/Volumes/" + substitute ( DocStore, ":", "/");
    else
        DocStore = substitute ( DocStore, "\\", "/");
    end if
    if ( ! directory_exists ( DocStore ) ) then
        throw "Doc Store volume not available: " + DocStore;
    end if
    if ( right(DocStore, 1)  != "/") then
        DocStore += "/";
    end if

    ArchiveSubPath = substitute ( ArchiveSubPath, ":", "/");
    ArchiveSubPath = substitute ( ArchiveSubPath, "\\", "/");
    string SourceFile = DocStore + ArchiveSubPath;
    string defname;
    if ( Title == "" ) then
        defname = regex_replace("^(.+)/(.+\..+)$", SourceFile, "\2");
    else
        Title = substitute ( Title, ":", "" ) ;
        Title = substitute ( Title, "/", "" ) ;
        Title = substitute ( Title, "\\", "" ) ;

        string ext = regex_replace("^(.+/)(.+\.)(.+)$", SourceFile, "\3");
        defname = Title + "." + ext;
    end if

    string newfn;
    bool abort = false;
    if ( int ( @get(ActiveModifierKeys)@ ) == 8 ) then
        newfn = save_file_dialogue ("Where do you want to save the file?", desktop_directory(), defname) ;
        if ( newfn == "" ) then
            abort = true;
        end if
    else
         newfn = desktop_directory() + defname;
    end if

    print format ( "Source:%s\nDestination:%s\n", SourceFile,newfn ) ;
    if ( ! abort ) then
        string res = copy_file ( SourceFile, newfn ) ;
        return res;
    else
        return "OK";
    end if
end

/* To Simplify the use of alternate strings on Mac and Windows
    Example using the above function from a FM Calculation to work on both platforms
    (Shown using hard coded strings, but normally one would use fields from preference table):
    ACFU_BSBO_SaveDocumentDesktop ( ACFU_GetPlatformString ( "vArchive:myDocArchive"; "\\192.168.1.20\vArchive\myDocArchive"); "Customers/11213/Contract.docx"; "Customer 11213 Contract" )

*/
function GetPlatformString ( string MacString, string WinString )
    FunctionID 232;
    if ( isWindows ) then
        return WinString;
    else
        return MacString;
    end if
end

/*

    To save content of log to a file in users document directory.
    Folder name: ~/Documents/ACFLoggFiles/
    creates directory if it does not exists.
    Returns Path to logg file, to be used in Append_Logg.
    Parameters:
        logg : The content to be written to the logg file.
        name : The name part of the full fulename as: YYYYmmdd_hhmmss_<name>_logg.txt

*/
function Save_Logg ( string logg , string name)
    FunctionID 233;
    string logdir = documents_directory()+"ACFLoggFiles";
    string res;
    if ( ! directory_exists ( logdir )) then
        res = create_directory (logdir );
    end if
    logg = substitute ( logg, "\r", "\n");
    string path = logdir+format("/%s_%s_logg.txt", string ( now()+3600, "%Y%m%d_%H%M%S"), name);
    res = delete_file ( path );
    int x = open ( path, "w");
    if ( isWindows ) then
        write ( x, substitute ( logg, "\n", "\r\n"));
    else
        write ( x, logg);
    end if
    close ( x );
    return path;
end
/*

    Append logg entries to previously created logg with Save_Logg.

*/
function Append_Logg ( string logg , string FilePath)
    FunctionID 234;

    logg = substitute ( logg, "\r", "\n");
    int x = open ( FilePath, "wa");
    if ( isWindows ) then
        write ( x, substitute ( logg, "\n", "\r\n"));
    else
        write ( x, logg);
    end if
    close ( x );
    return "OK";
end
/*

    Add Modulo 10 (Luhn Algorithm) control digit to a string of numbers

*/
function AddMod10 ( string number )
    FunctionID 235;
    array int digits;
    int l = length ( number ) ;
    int i;
// Check only digits.
    if ( regex_match ( "\d+", number ) ) then

    // Build an array of integers.
        for (i=1, l )
            digits[] = ascii ( substring ( number, i-1, 1 ) ) - 48 ;
        end for

    // Back traverse every second and double it. If > 9, subtract 9.
        for ( i = l, 1, -2 )
            digits[i]=digits[i]*2;
            if (digits[i]>9) then
                digits[i] = digits[i]-9;
            end if
        end for

    // Sum of the digits
        int sum;
        for (i=1, l )
            sum += digits[i];
        end for

    // sum multiplied by 9, modulo 10 gives the digit.
        int digx = mod ( sum*9 , 10);

        return number + digx;
    else
        return "ERROR: Expects only digits as parameter: " + number;
    end if
end
/*

    Add Modulo 11 (Luhn Algorithm) control digit to a string of numbers
    This  one might also add "-" at the end, according to the spesifications.

*/
function AddMod11 ( string number )
    FunctionID 236;
    array int digits;
    int l = length ( number ) ;
    int i, mult;
// Check only digits.
    if ( regex_match ( "\d+", number ) ) then

    // Build an array of integers.
        for (i=1, l )
            digits[] = ascii ( substring ( number, i-1, 1 ) ) - 48 ;
        end for

    // Back traverse every one and multiply
        mult = 2;
        int sum;
        for ( i = l, 1, -1 )
            sum += digits[i]*mult;
            mult ++;
            if ( mult > 7) then
                mult = 2;
            end if
        end for

        print sum;
    // difference 11 and mod 11 gives the digit.
        int digx = 11 - mod ( sum , 11);
        string ctrl;
        if ( digx > 9) then
            ctrl = "-";
        else
            ctrl = string ( digx );
        end if

        return number + ctrl;
    else
        return "ERROR: Expects only digits as parameter: " + number;
    end if
end
Back to top
Future Development Ideas
Here are some exciting ideas for future development of the ACF Plugin:
Literal Arrays: Allow the use of literal arrays (e.g., {1, 2, 3}) as parameters for functions.
Enhanced Substitute Function: Improve the substitute function to support arrays in both the "from" and "to" parameters, enabling complex substitution patterns, similar to PHP.
Array Mixed Type: Introduce a mixed type array that can hold values of any data type. Such arrays could be particularly useful in representing record sets.
ImplodeToSQL Function: Implement an ImplodeToSQL function that automatically handles necessary quotations and date syntax in the merged result when working with mixed type arrays.
mySQL Connector: Develop a mySQL connector to enable direct querying or updating of mySQL databases using ACF functions. ( This is allready implemented for the Mac version in version 1.6.3 )
MSSQL Connector: Create an MSSQL connector to facilitate direct querying or updating of MSSQL databases through ACF functions.
ExecuteScript Function: Explore the possibility of adding an ExecuteScript function to launch FileMaker Scripts directly from ACF functions. While immediate execution is not feasible due to PluginAPI limitations, it could allow queuing scripts for execution after the plugin function has finished.
Other Ideas
Here are additional ideas that could enhance the ACF Plugin's functionality and development experience:
Script Debugger: Consider implementing a script debugger for plugin functions. In debug mode during compilation, the debugger could insert "Debug NOOPS" (NOOP = NO Operation) into the code, one per line. These "NOOP <line no>" markers could trigger suspension of execution and transfer control to a debug window displaying the source code with line numbers. Developers could examine variables and set breakpoints, enabling stepping through code and other debugging tasks.
Automatic Debug Mode Activation: If the source is compiled in debug mode, a "Debug" statement could automatically activate the debug window and suspend execution.
Debug Info Generation: When compiled in debug mode, generate a separate debug info file, such as "package_name.deb." This file could include the source code as a table with line numbers and additional debugging information, eliminating the need to include this in the compiled package.
These innovative ideas hold the potential to further enhance the functionality and developer experience within the ACF Plugin.
Back to top
Known Issues
Updated: 17.11.2023 - Plugin version 1.7.0.0
This section provides a list of known issues that are currently being addressed. As these issues are resolved, they will be removed from the list. Please refer to the following issue:
- AMQP Functions: (Advanced Message Queueing protocol) version 1.6.2 has this for Mac only. It is temporarily removed in 1.7.0 but is planned for a later release.
- MySQL functions for Windows: Fixed: Rewritten in 1.7.0.0, is available in windows version 1.7.1.7-beta
- ARM version of the plugin: Fixed in 1.7.0.0 can be downloaded in the download area.
Known bugs
There are no known bugs at the moment.
Notes
- Sortarray and UTF-8 special characters. To obtain correct spring order, it might be needed to use the setlocale function to tell what language to be used for sorting. Example:
set_locale ( "nb_NO.UTF-8"); // Norwegian alphabet is used for sorting. - format function and fixed with strings: Using a format like %20s, the data that goes into that format is a string with UTF-8 characters. The plugin now extend the width by the neccessary extra characters needed for visual correct justification.
Stay tuned for updates and improvements as we continue to enhance the ACF Plugin.
Back to top
NEWS
Windows Beta ver 1.7.1.7 Released
Finally, though a bit later than planned, we are pleased to announce the release of version 1.7.1.7 for Windows. We have meticulously tested the plugin to verify the following:
- The plugin is stable, with no crashes or malfunctions during use.
- All functions work as expected and are fully compatible with the Mac version.
- The plugin is binary-compatible between Mac and Windows, meaning that the same compiled ACF functions work seamlessly in a mixed environment without needing to be recompiled for the other platform, regardless of where they were initially compiled.
To assist with testing, we have developed automated tests to verify all detailed functions and compare them against expected results. These tests also run algorithms written in the ACF language to ensure they produce the correct outputs.
Additionally, we have a comprehensive library of ACF code that has been compiled, tested, and executed on Windows to verify consistent results. To move the plugin out of beta, we need more beta testers. We have launched a beta testing program, offering participants a 50% discount on a permanent license valid for both Windows and Mac installations. This means that your license will remain valid after the beta test period, for both platforms.
The beta version is available for download in our download area at horneks.no.
Need Assistance Getting Started?
Don't hesitate to contact us at any time for help. We will do whatever is necessary to get you up and running smoothly.
The automated tests
The automated tests is collected in one "ACF" file. First we have created a few assert functions. Those have three parameters, the two first is the actual result and the expected result. The third is a message to show if the two first are different.
// Assert strings.
function assert ( string a1, string a2, string message )
    if ( a1 != a2 ) then
        throw "Error: " + format("%s, s1='%s', s2='%s'", message, a1, a2);
    end if
    return true;
end

// Assert Floating point variables
function assertF ( float f1, float f2, string message )
    if ( round(f1,5) != round(f2,5)) then
        throw "Error: " + message + format (", f1=%f, f2=%f", f1, f2);
    end if
    return true;
end

// Assert integer or long integer variables.
function assertL ( long L1, long L2, string message )
    if ( L1 != L2) then
        throw "Error: " + message + format (", L1=%ld, L2=%ld", l1, l2);
    end if
    return true;
end
When we use those, we have the calculation in its first parameter, and the expected result in parameter 2, then a message in the third parameter telling if the test fails. If the parameters are different, we throw an exception with the message.
Testing some math functions is done this way.
First, we need some functions to convert between radians and degrees. As the trigonometric functions operates on radians (2*PI = full circle) instead of degrees (360 = full circle).
function degreesToRadians(double degrees)
    return degrees * (PI / 180.0);
end

function radiansToDegrees(double radians)
    return radians * (180.0 / PI);
end
We are also using the CalcAnnuityInterestRate function as described in the introduction. This function calculates the actual interest rate for a given loan based on a fixed monthly payment. We have verified that this function calculates the correct interest rate.
Next, we proceed to the math tests, using the functions mentioned above.
function test_math ()
    bool a;
    try

        a = assertF(2*3+4*5, 26, "Priority of multiply versus addition failed");
        a = assertF(10/2-3, 2, "Division and subtraction priority failed");
        a = assertF(cos(degreesToRadians(60)), 0.5, "Cosine of 60 degrees failed");
        a = assertF(sin(degreesToRadians(30)), 0.5, "Sinus of 30 degrees failed");
        a = assertF(tan(degreesToRadians(45)), 1, "Tangens of 45 degrees failed");
        a = assertF(radiansToDegrees(acos(0.5)), 60, "Arccos of 0.5 failed");
        a = assertF(radiansToDegrees(asin(0.5)), 30, "ArcSin of 0.5 failed");
        a = assertF(radiansToDegrees(atan(1)), 45, "ArcTan of 1 failed");
        a = assertF(sqrt(16), 4, "SQRT failed");
        a = assertF(mod(10,7), 3, "Modulo failed");
        a = assertF(fact(5), 120, "Faculty failed");
        a = assertF(round(3.141592654, 3), 3.142, "Round failed");
        // We use the annuity interest rate binary search algorithm described in the intro in the manual to test
        // more calculations, repeat-until, if-then-else-endif and more. Let us call this function....
        a = assertF(CalcAnnuityInterestRate(100000, 2000, 5, 12) ,7.4200958013534545898, "Annuity calc test failed");

        ...
        ... (more tests)
    catch
        alert ( "Error: " + last_error);
        a = false;
    end try
    return a;
end
The try/catch block show the message thrown in the assert function if there is some mismatch.
Similarly, here is some test of the string functions.
function test_strings ()
    bool a;
    int i;
    array string arr1 = {"a", "b", "c"}, arr2;
    date d1, d2;
    try

        a = assert(left("abcdef", 3), "abc", "function 'left' failed");
        a = assert(right("abcdef", 3), "def", "function 'right' failed");
        a = assert(trimleft("  abcdef "), "abcdef ", "function 'trimleft' failed");
        a = assert(trimright("  abcdef "), "  abcdef", "function 'trimleft' failed");
        a = assert(trimboth("\r  abcdef   \n"), "abcdef", "function 'trimboth' failed");
        a = assert(upper("abcdefghijklmnopq"), "ABCDEFGHIJKLMNOPQ", "function 'upper' failed");
        a = assert(lower("ABCDEFGHIJKLMNOPQ"), "abcdefghijklmnopq", "function 'lower' failed");
        a = assert(proper("ABCDEFGH IJKLMNOPQ ola normann"), "Abcdefgh Ijklmnopq Ola Normann", "function 'proper' failed");
        a = assertL(pos("abcdefghijklmnopq","def"), 3, "Pos function failed"); // returns 0-based index
        a = assert(substitute("abcdefghijklmnopq", "ghi", "001"), "abcdef001jklmnopq", "Substitute failed");
        a = assert(mid("abcdefghijklmnopq",3,2), "de", "Function mid failed");
        a = assert(substring("abcdefghijklmnopq",3,2), "de", "Function substring failed");
        a = assertL(length("abcdef"), 6, "Function length failed");
        a = assertL(bytes("Bø"), 3, "Bytes on utf-8 string failed"); // 0x42 0xC3 0xB8
        a = assertL(length("Bø"), 2, "Length on utf-8 string failed");
        a = assertL(ascii("@"), 64, "Function ascii failed");
        a = assert(char(65), "A", "Function char failed");
        a = assertL(sizeof(arr1), 3, "Function sizeof failed");
        a = assert(implode(";", arr1), "a;b;c", "Function implode failed");
        arr2 = explode ( ";", "a;b;c");
        a = assertL ( sizeof (arr2), 3, "Dimension after explode is wrong");
        for (i= 1, 3)
            assert (arr1[i], arr2[i], format ("%s, Index %d", "Explode failed", i));
        end for
        a = assert (between ( "[start]abc[end]", "[start]", "[end]"), "abc", "Between failed");
        a = assertL(ValueCount ("a\rb\rc"), 3, "ValueCount failed");
        d1 = date ( "2024-01-02", "%Y-%m-%d");
        a = assert  (string ( d1, "%d.%m.%Y"), "02.01.2024", "Date to string with format failed");
        d2 = date ( "2024-01-10", "%Y-%m-%d");
        a = assertL(d2-d1, 8, "Date difference failed");
        a = assert  (string ( d1+10, "%d.%m.%Y"), "12.01.2024", "Date addition failed");
        a = assert  ("=!"*3, "=!=!=!", "String multiply (repeat) failed");
        a = assert  ("bbb"+"AAA", "bbbAAA", "String Concatenation failed");
        a = assert (testCase("tt"), "ttx3", "TestCase 1 Failed");
        a = assert (testCase("tx"), "txx3", "TestCase 2 Failed");
        a = assert (testCase("cc"), "ccxxccxxccxx3", "TestCase 3 Failed");
        a = assert (testCase("ff"), "defttdefttdeftt3", "TestCase 4 Failed");
    catch
        alert ( "Error: " + last_error);
        a = false;
    end try
    return a;
end
And some Hash/HMAC functions.
function test_hashFunctions ()
    bool a;
    string source = "Hello World!";
    string key = "my_secret_key";
    try
        // MD5
        a = assert(create_hash(md5, source, base64enc), "7Qdih1MuhjZehB6Sv8UNjA==", "MD5/Base64 failed");
        a = assert(create_hash(md5, source, hexenc), "ed076287532e86365e841e92bfc50d8c", "MD5/Hex failed");

        // SHA1
        a = assert(create_hash(sha1, source, base64enc), "Lve95gjOVATpfV8EL5X4nxwjKHE=", "SHA1/Base64 failed");
        a = assert(create_hash(sha1, source, hexenc), "2ef7bde608ce5404e97d5f042f95f89f1c232871", "SHA1/Hex failed");

        // SHA256
        a = assert(create_hash(sha256, source, base64enc), "f4OxZX/x/FO5LcGBSKHWXfwtSx+j1ncoSt3SABJtkGk=", "SHA256/Base64 failed");
        a = assert(create_hash(sha256, source, hexenc), "7f83b1657ff1fc53b92dc18148a1d65dfc2d4b1fa3d677284addd200126d9069", "SHA256/Hex failed");

        // SHA384
        a = assert(create_hash(sha384, source, base64enc), "v9dsDrvQBv7lg0EFR8GIewKSvnbVgtlsJC0qeScj4/1v0GH51c/RO4+WE1jmrbpK", "SHA384/Base64 failed");
        a = assert(create_hash(sha384, source, hexenc), "bfd76c0ebbd006fee583410547c1887b0292be76d582d96c242d2a792723e3fd6fd061f9d5cfd13b8f961358e6adba4a", "SHA384/Hex failed");

        // SHA512
        a = assert(create_hash(sha512, source, base64enc), "hhhE1nBOhXP+w02WfiC8/vPUJM9IvgTm3AjyvVjHKXQzcQFerYkcw88cnTS0kmS1EHUbH/nlN5N7xGtdb/TsyA==", "SHA512/Base64 failed");
        a = assert(create_hash(sha512, source, hexenc), "861844d6704e8573fec34d967e20bcfef3d424cf48be04e6dc08f2bd58c729743371015ead891cc3cf1c9d34b49264b510751b1ff9e537937bc46b5d6ff4ecc8", "SHA512/Hex failed");

        // HMAC MD5
        a = assert(create_hmac(md5, key, source, base64enc), "AYH2AOvu2Cbt3Ef/hR9k7A==", "Failed HMAC MD5/base64");
        a = assert(create_hmac(md5, key, source, hexenc), "0181f600ebeed826eddc47ff851f64ec", "Failed HMAC MD5/hex");

        // HMAC SHA1
        a = assert(create_hmac(sha1, key, source, base64enc), "BwpO356r2gx9SYj3UFVvc/BfdVA=", "Failed HMAC SHA1/base64");
        a = assert(create_hmac(sha1, key, source, hexenc), "070a4edf9eabda0c7d4988f750556f73f05f7550", "Failed HMAC SHA1/hex");

       // HMAC SHA256
        a = assert(create_hmac(sha256, key, source, base64enc), "5z1prOAxmam9lz5nlHgudpxIhksTY8pClCivq7RUytQ=", "Failed HMAC SHA256/base64");
        a = assert(create_hmac(sha256, key, source, hexenc), "e73d69ace03199a9bd973e6794782e769c48864b1363ca429428afabb454cad4", "Failed HMAC SHA256/hex");

       // HMAC SHA384
        a = assert(create_hmac(sha384, key, source, base64enc), "UDZdkjSVyMpFJQu9dmeAlKg+LW97o6yq1pfBj3QZJM4YMmgZxkoUVVUzyMDcP3DT", "Failed HMAC SHA384/base64");
        a = assert(create_hmac(sha384, key, source, hexenc), "50365d923495c8ca45250bbd76678094a83e2d6f7ba3acaad697c18f741924ce18326819c64a14555533c8c0dc3f70d3", "Failed HMAC SHA384/hex");

       // HMAC SHA512
        a = assert(create_hmac(sha512, key, source, base64enc), "x38L+mMFPEM+QqGrPMOzx2l7rTlmNePxPdaYllFiLQm+G9K2Bf/9oQcci861HAF4NTNqsPZS8gPEiQ0KoznMlA==", "Failed HMAC SHA512/base64");
        a = assert(create_hmac(sha512, key, source, hexenc), "c77f0bfa63053c433e42a1ab3cc3b3c7697bad396635e3f13dd6989651622d09be1bd2b605fffda1071c8bceb51c017835336ab0f652f203c4890d0aa339cc94", "Failed HMAC SHA512/hex");


    catch
        alert ( "Error: " + last_error);
        a = false;
    end try
    return a;
end
More test will be updated later.
Testing with existing applications
There is developed quite a lot of applications based on the ACF plugin. Testing all those is an important task. They use all kinds of different functions, and see if they should work as expected.
- Document store application, has customers and document module. The documents are stored using the plugin functions to save encrypted documents on a remote store using a web-service. The functions, to edit a document, retrieves the encrypted document from the web-service, decrypts it, and stores it in a temporary location on your machine - launching WordPress to edit the document. When saved, the document is encrypted back, saved using the web-service. The WEB SOAP service uses Basic auth for access. In addition, The OTP routnes supply a one-time password stored in the request URL, and this is verified on the web-service. The web-service has an encrypted configuration, that is decrypted using a user supplied decryption key. All this automatically handled using the plugin. The tests of this application shown no issues. Everything worked as expected on Windows.
Manual tests
Some tests is more manual, to example the OTP functionality. Here is the test procedure for this.
We need two small functions. One to generate a OTP secret, and the second to generate OTP code based on that secret.
Here is the functions:
/*

    Test OTP functions

*/

function genOTPSecret ()
    return generate_otp_secret();
end

function GenOTPcode ( string secret )
    return get_otp_code( secret );
end
Then, we use the Developemnt tool, compiles it and first run the genOTPSecret function. This gives you a Base32 encoded long string. In my example, I got `KDACNUJVSVGVDOHFJTSHMRZ54VCXBBKU´.
Then I paste this into Parameter 1 in the test tab, and run the GenOTPcode , resulting in a six-digit code in the result field.
To verify this, I installed the OTPManager app, and added a token to it, specifying the secret I got. Then in this app, I now started to get OTP codes, updated each 30 seconds with a new code. I ran the GenOPTcode function again, to see if the code matched what came from the OTPManger app. Testing several times on Windows, and the test matched each time.

Testing ZIP file functions.
This test is about to see that the file system functions works as expected also inside ZIP files.
I test packing a ZIP download for windows users.
Here is the ACF function used to test.
Function makeBetaTesterBoundle ( string name, string zipfile )

    string path = "C:\Users\Ole\Documents\BetaBundles\\"+zipfile;
    string z = open_zip ( path ) ;
    int x;
    string text, res;
    if ( left ( z, 3 ) == "ZIP" ) then
        res = copy_file ( "C:\Users\Ole\Desktop\WIndows-release-ACF-Plugin\ACF_Plugin.fmx64", z+"ACF-Plugin/ACF_Plugin.fmx64");
        print res+"\r\n";
        res = copy_file ( "C:\Users\Ole\Desktop\WIndows-release-ACF-Plugin\horneks-pub.cer",  z+"ACF-Plugin/horneks-pub.cer");
        print res+"\r\n";
        res = copy_file ( "c:\Prosjekter\curl\curl_release\bin\cacert.pem",  z+"ACF-Plugin/ssl/cacert.pem");
        print res+"\r\n";
        res = copy_file ( "C:\Users\Ole\Desktop\WIndows-release-ACF-Plugin\Release-notes.md",  z+"ACF-Plugin/Release-notes.md");
        print res+"\r\n";
        res = copy_file ( "F:\WIndows-release-ACF-Plugin\EditorBundles",  z+"ACF-Plugin");
        print res+"\r\n";
        res = copy_file ( "F:\WIndows-release-ACF-Plugin\Examples",  z+"ACF-Plugin");
        print res+"\r\n";
        res = copy_file ( "F:\WIndows-release-ACF-Plugin\Tools",  z+"ACF-Plugin");
        print res+"\r\n";

        x = open ( "C:\Users\Ole\Desktop\WIndows-release-ACF-Plugin\README.md", "r");
        text = read (x);
        close (x);
        text = substitute ( text, "++name++", name);
        x = open ( z + "ACF-Plugin/README.md", "w");
        write (x, text);
        close (x);
        close_zip ( z ) ;
        return "OK";
    else
        return "FAILED opening zip-file" + path;
    end if
end
- It first opens the ZIP file given in the second parameter, adding the name to a fixed path.
- The variable "z" gets the ZIP prefix, we check that it actually starts with "ZIP", if it does, we start to copy files into it.
- The README file contains a merge code, we open the file, replaces the merge code with the name of the receiver, given in the name parameter of the function.
- We open the file inside the zip archive for write access, as it does not exist yet, it will be created.
- We write the text to the file, and then closes it.
- Finally, an important step is to close the zip archive. An important step to make the rutines flush any content to the zip file.
After that, we inspect the newly created ZIP archive to see if the content are what we expected.
The zip archive is available in the download section.
Back to top
ACF-Plugin Version 1.7.1.7
Version 1.7.1.7 marks a significant upgrade for the ACF plugin. Although still in production, it has crossed many hurdles and is nearing completion.
- Release Date: It is already released, Windows version is in beta, but all the tests we have done so far show it works excellent.
- Pricing: $89, beta-testers can obtain a license for 50% of that price, until November, 15. 2024.
- Plugin Testers: Already licensed for the plugin? You can join our Beta tester program to access early versions of the plugin.
Hardware and Software Compatibility
Version 1.7.1.7 is a universal plugin, compatible with both Mac Intel and Mac ARM (M1, M2, M3) machines, as well as Windows versions. It seamlessly integrates with all FileMaker versions from 12 onwards. For macOS users, it is compatible with macOS 12.3 and later, including the current macOS version. Windows users can enjoy support for Windows 8, Windows 10, and Windows 11, in addition to Windows Server operating systems.
Document Service Functions
The Document service functions have undergone a complete rewrite to enhance stability and flexibility. They are now accessible from within the ACF language in addition to plugin calls made from FileMaker.
MySQL Functions
The MySQL functions have been completely overhauled, ensuring backward compatibility with the previous plugin version (1.6.3) while introducing a range of new features.
- Placeholders in SQL: The MySQL_query command now accepts placeholders (?) in queries, where additional parameters will replace the placeholders before query execution. Parameter data types determine the formatting applied to variables, such as quotes or date element formatting for SQL.
- Multiple SQL Statements in One Query: You can include multiple SQL statements in a single query, separated by semicolons. This feature facilitates constructs where you set SQL variables before executing the primary query, among other scenarios.
FileMaker SQL Functions
The FileMaker SQL Functions now support placeholder logic in SQL statements, allowing additional parameters to fill placeholders. Variable data types determine the formatting used, making SQL statements more versatile and dynamic.
date from, to = now();
from = to - 7;
string col_sep = "||", row_sep = "\r";

string bb = ExecuteSQL("Select Invoice_no, Payable_amounth FROM Invoices
    WHERE Invoice_Date BETWEEN = :from and :to", col_sep, row_sep);

// Before executing this, the final SQL will be:
// Select Invoice_no, Payable_amounth FROM Invoices
// WHERE Invoice_Date BETWEEN DATE '2023-10-31' and DATE '2023-11-06'
New Datatype: XML_Object
Introducing functions that simplify the creation and manipulation of XML documents, as well as parsing XML documents. You can effortlessly build a document, convert it to a string for saving or transmitting, and parse incoming XML documents to extract data for integration into your database or any other purpose.
Example:
Function ExampleFunction()

    XML xmlvar;
    xmlVar["MyRootNode.User"] =
            XML("Name","John Doe","Address","Road 2");
    // Assign attributes to the XML...
    XMLattributes(xmlVar["MyRootNode"], XML("xmlns:ns","http://mynamespace.com/test/");
    XMLattributes(xmlVar["MyRootNode.User"], XML("UserID","20031");

    print string(XmlVar);
    return string(XmlVar);
End
print result;

// This will produce
<?xml version="1.0" encoding="UTF-8" standalone="no"?>
<MyRootNode xmlns:ns="http://mynamespace.com/test/">
<User UserID="20031">
    <Name>John Doe</Name>
    <Address>Road 2</Address>
</User>
</MyRootNode>
New Datatype: JSON_Object
We've introduced functions for effortlessly creating JSON objects to store structured or unstructured data. You can add or extract elements from a JSON object as needed. The implementation is similar as for XML.
New Commands in the ACF Language
We've added several new commands to the ACF language, empowering the plugin and reducing its dependency on other FileMaker solution plugins.
Cryptography Functions
This version introduces a range of cryptography functions in addition to those provided in 1.6.3.
- Encrypt (data, key, algorithm, Return-encoding): Encrypt data using various algorithms, with return types such as base64, Base32, Hex, or raw data.
- Decrypt (Encrypted data, key, algorithm, data encoding): Decrypt data using various algorithms, with data encoding options like Base64, Base32, Hex, or raw data.
- Hashing Algorithms: Generate message digests using MD5, SHA1, SHA2, SHA224, SHA256, SHA384, SHA512, and truncated forms like SHA512-224 and SHA512-256. Output formats can be base64, hex, or raw data.
- From_Base64 (base64 data) and To_Base64 (raw data): Easily convert between Base64 formatted data and text/binary data, with the ability to produce standard base64 or URL-compatible base64 data.
- From_Base32 (base32 data) and To_Base32 (raw data): Convenient conversion between Base32 formatted data and text/binary data.
- OTP Functions: Implement One-Time Passwords (OTP) in your solution. Given a secret, the function generates 6-digit OTPs, ideal for use in a login procedure with an Authenticator app on a smartphone.
Communication over the Internet
- HTTP_Get (URL): Retrieve content from a website or web service.
- HTTP_Post (URL, post_data): Send data to a web service using HTTP POST.
- HTTP Authentication: Functions for performing HTTP Authentication with web services that require it.
Planned dfor 1.7.1 - Send E-mail Functions: A suite of functions for sending emails via SMTP or IMAP servers. - Check E-mail: Retrieve emails from POP or IMAP mailboxes, including messages, attachments, and more. - FTP-Server Connection: Send and retrieve files using the FTP protocol. - SFTP-Server Connection: Send and retrieve files using the SFTP protocol.
Together with the XML_Object and JSON_Object datatypes, and the HTTP methods, this version provides comprehensive functionality for accessing services via REST-API or SOAP-API.
Other Functions
- System Command: Execute system commands (command line). (1.7.1)
- Generate QR-Code/Barcode Image: Create QR code or barcode images directly from the ACF language, suitable for use with OTP functions or product label printing.
- Set Text to PasteBoard / Get Text from Pasteboard: Functions that facilitate interactions with the pasteboard. For example, allowing users to copy content from read-only fields for use elsewhere. (1.7.1)
Bitwise Operators
We've introduced a range of bitwise operators to the language, enhancing its capabilities.
1.7.1
- Bitwise AND:
int x = variable1 & variable2; - Bitwise OR:
x = variable1 | variable2; - Bitwise XOR:
x = variable1 ^^ variable2; - Bitwise NOT:
x = !!variable1- This inverts all the bits invariable1. - Shift Left Operator:
int x = variable1 << 8;shifts the bits invariable8 positions to the left. - Shift Right Operator:
int x = variable1 >> 8;shifts the bits invariable18 positions to the right.
Example:
// Extract the first four bytes from a string into an integer.

int i;
string s = "ABCD";

int variable1 = 0;

for (i = 1, 4)
    variable1 = variable1 << 8 | ascii(substring(s, i, 1));
end for

// variable1 now contains the four letters in 's'.
// Bits 0-31: A in bits 31-24, B in bits 23-16, C in bits 15-8, and A in bits 7-0.
Back to top
Handling SQL in the ACF-plugin for FileMaker version 1.7.0
I am delighted to share more information about handling SQL queries in the ACF-Plugin version 1.7.0 for FileMaker. The focus is on placeholders and managing result data from both FileMaker SQL queries and MySQL database queries.
Placeholders in SQL Construction
Originally, FileMaker's ExecuteSQL function lacked a concept of placeholders in the query. This changed later, with the function now using question marks as placeholders in the SQL sentence, along with additional parameters to replace in the SQL sentence before execution—a useful feature.
While the approach is beneficial for correctly formatting parameter values into the SQL, it can be error-prone due to the need for careful ordering of variables in the parameter list. To address this, we took inspiration from 4th Dimension and introduced placeholders as variable names directly in the SQL, eliminating the need for additional parameters.
To use local variables in the SQL sentence, prefix them with a colon (:), allowing the plugin to pull those variables and replace the placeholders in the SQL before execution. Here's an example for a MySQL database query, applicable to FileMaker SQL:
function TestMySQL_Execute ()

    int db = Mysql_Connect ("localhost", "3306", "root", "ACDF1234", "boost_mysql_examples");

    float minSalary = float(Example::nPar1);
    float maxSalary = float(Example::nPar2);

    string result = ExecuteMySQL ( db,
        "SELECT * FROM employee WHERE Salary BETWEEN :minSalary AND :maxSalary", "\n", ";");

    mysql_close ( db );
    return result;

end
This gave the output from my test database:
// For nPar1 and nPar2 = 0 and 500000 ( all records )
1;Efficient;Developer;30000;AWC;2021-03-13;2022-12-31 10:04:13.000000;
2;Lazy;Manager;80000;AWC;;;
3;Good;Team Player;35000;HGS;;;
4;Enormous;Slacker;45000;SGL;;;
5;Coffee;Drinker;30000;HGS;;;
6;Underpaid;Intern;15000;AWC;;;

// For nPar1 = 30 000 and nPar2 = 50 000
1;Efficient;Developer;30000;AWC;2021-03-13;2022-12-31 10:04:13.000000;
3;Good;Team Player;35000;HGS;;;
4;Enormous;Slacker;45000;SGL;;;
5;Coffee;Drinker;30000;HGS;;;
This approach simplifies the construction of SQL queries, improving human readability and enabling developers to write better code more efficiently.
Handling the Result Set
Building on our efforts to enhance SQL result handling, we introduce a new INTO statement at the end of SQL statements, inspired by 4th Dimension.
In the last line of the SQL, we have "INTO" and a comma-separated list of arrays, each prefixed with a single ":" as you see in the example below.
Example:
function TestMySQL_Execute ()

    int db = Mysql_Connect ("localhost", "3306", "root", "ACDF1234", "boost_mysql_examples");
    array string aFirstNames, aLastNames;
    array float aSalaries;


    float minSalary = float(Example::nPar1);
    float maxSalary = float(Example::nPar2);

    string result = ExecuteMySQL ( db,
        "SELECT first_name, last_name, salary FROM employee
        WHERE Salary BETWEEN :minSalary AND :maxSalary
        INTO :aFirstNames, :aLastNames, :aSalaries");

    int rows = sizeof ( aFirstNames );
    int i;
    if ( result == "OK") then
        // Print a little report !!
        // Heading
        print format "Emplyees with salary between %.0f and %.0f\n", minSalary, maxSalary);
        print format ("%-3s %-20s %-20s %-20s\n", "row", "First Name", "Last Name",  "Salary");
        // Data
        for (i = 1, rows)
            print format ("%-3d %-20s %-20s %20.2f\n", i,
                aFirstNames[i], aLastNames[i],  aSalaries[i]);
        end for
    else
        return result; // Some error.
    end if
    mysql_close ( db );
    return result;

end
And the result printed on the plugin console:
Emplyees with salary between 30000 and 50000
row First Name           Last Name            Salary
1   Efficient            Developer                        30000.00
2   Good                 Team Player                      35000.00
3   Enormous             Slacker                          45000.00
4   Coffee               Drinker                          30000.00
This feature eliminates the need for result parsing, providing ready-to-use data in arrays directly.
Back to top
News: URL services in ACF 1.7.0
To use various API's from you FileMaker solution, there is some points.
- Ability to send and receive data over the internet
We have the new functions in ACF called HTTP_GET and HTTP_POST that will be discussed in this newsletter. Also, the function HTTPBASICAUTH lets you create the authentication you need for accessing password-protected sites.
- Ability to Format the data packages to send
To post data to an API, you need various tools to format the data in the specifications for that API. Various formats like HTTP_FORM, XML, or JSON are most widely used. We will discuss this in this newsletter
- Ability to parse the response from the API
When interacting with APIs, the purpose is to send updates to the other party or retrieve data from the API. All APIs give some response back that needs to be parsed. Usually that can be a special formatted clear-text response, an XML response, or a JSON response. We will also discuss this in this newsletter.
Sending data over the internet.
Most APIs use the HTTP protocol to send data, like POST or GET to the web service. The two functions here make that easy. The API specifications tell if it is a POST or GET that should be applied. The system variable called HTTP_STATUS_CODE contains the last status code and can be examined. The normal value is 200.
- HTTP_POST
The HTTP_POST function in ACF sends a post to the API. The parameters are:
- The URL ( WEB address for the service )
- The POST DATA
- Optional headers, each separated by a
\r, like Content-Type: text/xml - Optional authentication header. We can use the function HTTP_BASIC_AUTH to generate this header for this parameter if that is the authentication method. It can be included in the headers parameter too, but for simplicity, we have added this as a fourth optional parameter.
Example:
Function UpdateWebService ()
    string post_data = "Here is the prepared post data we send to the web-service";
    String response = HTTP_POST ( "https://example.com/webService/", post_data,
        "Content-Type: text/plain", HTTP_BASIC_AUTH("ole", "dole"));

    if ( HTTP_STATUS_CODE = 200 ) then
// Do the parsing of the response....
...
...
    else
        return "Some Error, " + response;
    end if
End
- HTTP_GET
HTTP GET is mostly used for APIs that do not need much input, but retrieve data from the API. The URL contains the paramters to send, and we get the data in the response.
The parameters are:
- The URL (with parameters encoded)
- Optional headers, each separated by a
\r - Optional authentication header.
Example:
Function GetDataFromAPI ()

    string url = format('%s?Year=%s&month=%s', "https://example.com", "2023", "11");
    string response = HTTP_GET ( url, "", HTTP_BASIC_AUTH("ole", "dole"));

    if ( HTTP_STATUS_CODE = 200 ) then
// Do something with the responce...
...
...
...
    else
        return "Some Error, " + response;
    end if

End
- URL encoding
Some parameters in the URL can have values that are not compatible with the URL, like spaces or special characters. They need URL encoding. To do that, we can use the function URL_ENCODE that returns the encoded parameter. Like this.
string textpar = URL_ENCODE ( "This is the parameter that needs
encoding, because of Line break, The ?, / and other" ) ;

string url = format('%s?Year=%s&month=%s&text=%s',
                "https://example.com", "2023", "11", textpar);

string response = HTTP_GET ( url, "", HTTP_BASIC_AUTH("ole", "dole"));

...
...
XML data used in the APIs
Often, an API requires some XML-formatted data as input. For this, we have defined XML as a new data type in ACF. There is a couple of function that goes with this data type that makes both the creation of XML objects and parsing XML objects a breeze.
This example shows how easy it is to create an XML document.
    XML xmlvar;
    xmlVar["MyRootNode.User"] =
            XML("Name","John Doe","Address","Road 2");
    // Assign attributes to the XML...
    XMLattributes(xmlVar["MyRootNode"], XML("xmlns:ns","https://mynamespace.com/test/");
    XMLattributes(xmlVar["MyRootNode.User"], XML("UserID","20031");

    print string(XmlVar);


// This will produce
<?xml version="1.0" encoding="UTF-8" standalone="no"?>
<MyRootNode xmlns:ns="https://mynamespace.com/test/">
<User UserID="20031">
    <Name>John Doe</Name>
    <Address>Road 2</Address>
</User>
</MyRootNode>
Back to top
Basic Operations
Programming Basics
In this chapter, you will find the basic constructs and some basics for programming in the ACF-language.
Structure
The structure in the source file is as follows:
Package <package name> "Description - can be several lines"

<global declarations within the package>

function firstfunction ( <declaration of parameters, comma-separated> )
    <Declarations and statements>
end

function nextfunction ( <declaration of parameters, comma-separated> )
    <Declarations and statements>
end

...
...

function lastfunction ( <declaration of parameters, comma-separated> )
    <Declarations and statements>
end
Function Declaration
The function declaration consists of the keyword "function" followed by a parameter declaration list enclosed in parentheses. All the parameters must be declared by type.
function abc ( int a, float b )
It is usually not necessary to declare the return parameter since the return statement in the function auto-declares the return value. However, if needed, you can have a standard declaration of the function name itself below the initial function declaration.
To register the function as a plugin function, you can use the FunctionID command inside the function, generally near the top.
Variable Declarations
Declarations are the same for local and global, with one exception. Global declarations cannot have an initial value. All program execution takes place inside functions, and thus, they have to initialize the globals they use. The types can be found in the Datatypes document.
Variable names are not case-sensitive, start with a letter between 'a' and 'z,' can contain numbers and underscores. Variables cannot start with a '$'-sign, as those are FileMaker variables, and the FileMaker evaluation engine is used to evaluate them. It's faster to use local or global variables where you can, as the plugin evaluates them, and we do not need the extra time to call the FM evaluation engine to get or set their value.
Global variables:
<type> global1, global2, global3;
Local variables:
<type> local1, local2, local3;
Or local variables with initializers (can be mixed with non-initializers) - integer variables in this example:
int local1 = 1, local2 = 33 * 4, local3 = 200, local4;
Strings with initializers. The variable svar2 will contain 80 dashes as a string multiplied by a number that repeats that string the given number of times.
string svar = "abc", svar2 = "-" * 80, svar3, svar4;
Local variables that do not have any initializers will be set to zero. Variables can be declared anywhere before they are used. However, they cannot be declared inside if- or loop constructs. Move the declaration outside such constructs to ensure that they are initialized before use.
Parameter Declarations and Local Declarations
Declaration of a parameter-list (cannot have initializers) are locals. You can write to them, but this will not affect the value of the variable in the calling program. Parameters are then read-only but can be modified locally in the function. Local variables are gone when you come to the end statement. The scope of locals is inside the function where they are declared, after the declaration.
Auto Declarations
In assignment or loop control variables, they can be auto-declared. The type of the variable will be that of the calculation result. The compiler will issue a warning about auto declarations. The purpose of this warning is to alert about potentially misspelled variables.
Example of misspelled variable:
int default_size;
defalt_size = 23;
WARNING Auto declared 'defalt_size' as INTEGER at Line 254, pos 22.
Here you see that the assignment statement warns about the auto declaration, where the variable was misspelled. Variables on the right side of "=" must be declared or previously auto-declared. Undeclared identifiers used here will give fatal errors (no produced code).
Loops
There are three types of loops.
- For loops
- While loops (while)
- Repeat until loops.
For loops
for (<loop control identifier> = <start value>, <end value>, <optional step value>)
    <statements>
end for
The "end for" can also be spelled "endfor."
Example:
int i;
for (i = 1; i <= 10)
    a = b * c + i;
    c++;
end for
Here, the loop runs ten times, with 'i' running from 1 to 10, and 'a' is always calculated.
While loops
While loops are much like the FileMaker script step "loop - end loop."
while (<while expression>)
    <statements>
end while
Example 1:
bool finished = false;
while (!finished)
    <some statements>
    ...
end while
Example 2:
int a, b = 3, c = 4;
while (a < c)
    a = b * c;
    c = 4 * a;
end while
Repeat...Until loops
Repeat until loops differ from while loops in having the condition at the end instead of the beginning, meaning that the variables of the condition do not need to have a value before the loop.
repeat
    ...
    <some statements>
    ...
until <exit expression>;
Currently, there is no equivalent to the "exit loop if" statement in FileMaker scripts. Instead, use if-constructs to avoid execution of the remainder of the loop if you find you are finished somewhere in the middle. Some languages have a "break" statement feature, which is planned for a later release of the plugin.
Conditionals
IF...THEN...ELSE...END IF
The IF structure is pretty standard and found in most programming languages. Note the "then" at the end of the lines of "if" and "elseif" statements.
Syntax:
if ( <boolean expression> ) then
    <statements>
    ...
elseif ( <boolean expression> ) then
    <statements>
    ...
elseif ( <boolean expression> ) then
    <statements>
    ...
...
else
    <statements>
    ...
end if
The elseif and the else parts are, of course, optional. You can have as many elseif statements as needed. You can nest "if" constructs to any desired number of levels, along with other structural parts.
Conditional expressions
Introduced in Plugin version 1.7.0.15
( Packages otherwise source compatible with 1.6 version can run this in the runtime but must be compiled in 1.7.0.15 )
Like in standard custom functions in FileMaker, we now have inline if constructs as a shorthand for if-else-endif constructs. They are typically used in assignment statements but can be part of any expressions. We have decided to adopt the syntax for this found in C, C++, and PHP.
variable = <bool expression> ? <expression for true> : <expression for false> ;
The runtime will either evaluate the expression for true or false, dependent on the outcome of the boolean expression. The statement terminator ";" is needed for terminating the expression, but if it is a part of an expression in parenthesis, the end parenthesis will act as an expression terminator. Like this:
variable = 20 + (<bool expression> ? <expression for true> : <expression for false>)*3;
As you see above, 20 adds the result of the conditional expression multiplied by 3.
CASE Statements
Introduced in Plugin version 1.7.0.15
( Packages otherwise source compatible with 1.6 version can run this in the runtime but must be compiled in 1.7.0.15 )
Syntax:
case
  :(<boolean expression>)
    <statements>
    ...
  :(<boolean expression>)
    <statements>
    ...
  :(<boolean expression>)
    <statements>
    ...
  default
    <statements>
    ...
end case
The default section is optional. Each branch should not be terminated by "break" as in many other languages. Each boolean expression will be evaluated in sequence until one expression evaluates to true. Then the statements in that branch will be executed, and finally continue after the end-case. If none of the boolean expressions evaluates to true, the default branch is executed.
The construct can be nested with any other constructs or other case constructs.
Calling Other ACF Functions
Other ACF functions in the same package can be called by using their name and parameters directly. The function needs to be defined before it is used (above in the package). For recursive calls, it might be necessary to declare the type of return value explicitly. We have planned to also allow this calling convention for functions in other packages too, but for now, the @ACF_run(....)@ method must be used for functions in other packages. The
type and number of parameters must match the declaration of the function.
All the ACF functions are functions. They return values using the return statement and must be called as functions. There is no procedural call convention where the return value is not stored or used. Even if you don't intend to use the return value, it must be assigned to a variable.
Example:
function abc ( int a )
   ...
   ...
  return a * ....;
end

function def ( ... )
   int z, f;
   f = 33;
   z = abc ( f ); // This is OK
   z = 3 * abc ( f ) - 32; // This is also OK
   // But this procedural method will fail
   abc ( f);
   ...
   return ...;
end
There is very little overhead in calling other ACF functions in the same package, and it can be a good programming practice to put repeating segments of code into separate functions. As they appear in the same source file, it is easy to follow the program logic where the use and the definition are close to each other.
Such internal functions will also appear in the ACF_GetAllPrototypes and thus can be called from FileMaker calculations directly. If this is not desired, we encourage you to use the output from this function in your package documentation, and edit this list to remove the entries that you don't want to make available from FileMaker Calculations.
Functions and the Return Value
The function returns its value with the return statement.
return myresultvariable;
The return statement must be inserted before the END, but you can have as many as you like. However, the type of result is essential and should be the same for all return statements in a single function.
When one function invokes another function as part of a calculation, the compiler needs to know the result type to create the correct code. The return statement implicitly declares the return type of the function.
For example:
int a = 2, b = 4;
return a / b;
As a divide operation always creates a DOUBLE result, this function will have DOUBLE as its return type.
int a = 2, b = 4;
return a * b;
This one returns an INTEGER result, so the return type is INTEGER.
Return Value and Recursion
If you create a recursive function, the compiler does not know the return type before it comes to the recursive call. To solve this, you can declare the return type of the function explicitly.
The standard custom functions in FileMaker do not have loops, so loop techniques were created using recursion instead. Each iteration in the loop was a new recursive call. This technique is not necessary here, as we have loops. Loops are far more efficient and easier for the human eye to follow.
However, recursion used wisely can have its advantages in some special cases, like backtracking algorithms or dealing with hierarchical data structures, and so on. It is often used in conjunction with loops.
function calcthisandthat (int bb, float cc, string abc)
    float calcthisandthat;
    ...
    cc = calcthisandthat ( bb + 1, cc - 1, "next rec..");
    ...
    return bb * cc;
end
Error Handling
There are two main methods for aborting a function due to invalid parameters or other error conditions. In the middle of some function, you find that there is an error, and further execution of the function is impossible.
One way to do it is to use the RETURN function with an error code/string.
However, that only returns the current function. If this is the function called from FileMaker directly, it's, of course, good enough. If you have a call hierarchy: Let's say you have function 'a', calling 'b', that then calls 'c'; the function 'c' discovers an error and wants to call off the whole thing. Instead of having 'b' check the result of 'c', and then 'a' check the result of 'b', you could use the "throw" statement, which discards the whole call hierarchy and returns the error to the FileMaker ACF_run function.
Example:
function c (...)
    ...
    ...
    if ( abc > 10000 ) then
        throw "ERROR: Too great value of abc";
    end if
    ...
    ...
end

function b ( ...)
    ..
    ..
    c ( ... );
    ..
    ..
end

function a ( ...)
    ...
    ...
    b ( ... );
    ...
    ...
end

// From the FileMaker Script:
Set Variable ( $xx ; ACF_run ( "a"; .....))
if ( LeftWords ( $xx; 1) = "ERROR" )
    Show Custom Dialog ( ....)
    Halt Script
end if
Try / Catch
Provides structured exception handling in user code.
- TRY: Starts a block of code where exceptions are handled.
- CATCH: Catches exceptions thrown in the TRY block.
- TRY AGAIN: Optionally retries the TRY block.
- END TRY: Ends a catch block.
Read more about this topic in the Event handling section
Back to top
Function: Standard Functions
The standard function repertoire includes various mathematical, date-related, and utility functions. These functions are calculated by the plugin itself, eliminating the need to rely on the FileMaker calculation engine. While these functions can be part of a formula, they are calculated within the plugin.
It's worth noting that the FileMaker calculation engine provides additional functions, which can be used alongside ACF functions by using the "@...@" notation, including calls to other plugin functions. Additionally, type names can be used as functions to convert between different data types. You can also work with date and timestamp formats by using format strings with the date and timestamp functions. For more complex operations, the string functions can be used to convert between date, timestamp, and string representations.
Here's the general prototype for these functions:
x = <function name>(<argument expression>);
Examples:
float x = sqrt(44);
// x will be: 6.6332495807108

// Calculate the length of the hypotenuse using the Pythagorean theorem:
float sidea = 14.0, sideb = 10.0; // These are in inches. We want sidec in cm.
float sidec = 2.54 * sqrt(sidea^2 + sideb^2);
// sidec will be 43.6998123565767 cm.

// If retrieving a field value in the calculation, type conversion is necessary as all variables and fields from FileMaker are treated as strings.
float x = 2.54 * sqrt(float(preferences::sidea)^2 + float(preferences::sideb)^2);
Functions
Here is a listing of the functions available in the current version of the plugin (1.6.3).
| Function Name | Argument Type | Result Type | Number of Parameters | Description | ||||
|---|---|---|---|---|---|---|---|---|
| Array Functions | ||||||||
| explode | String Delimiter, String Src | Array String | 2 | Split a string into an array using the specified delimiter. | ||||
| implode | String Delimiter, Array String | String | 2 | Combine an array of strings into a delimited string using the specified delimiter. | ||||
| sizeOf | Array Types | Int | 1 | Return the size of an array (the number of indexes). | ||||
| Cryptography functions | V1.7.0.x | |||||||
| create_hash | int method, string data, int encoding | string | 3 | use the constants md5, sha1, sha256 or sha512 to specify the method, and base64enc or hexenc to specify encoding | ||||
| create_hmac | int method, string key, string data, int encoding | string | 4 | use the constants md5, sha1, sha256 or sha512 to specify the method, and base64enc or hexenc to specify encoding | ||||
| encrypt | int method, string key, string data, int encoding | string | 4 | See documentation page for details | ||||
| decrypt | int method, string key, string data, int encoding | string | 4 | See documentation page for details | ||||
| Date and Time Functions | ||||||||
| date | string {, string format} | Date | 1, 2 | Convert a string formatted date to a date value | ||||
| time | string | time | 1 | Convert a time string to a time value | ||||
| timestamp | string {, format string} | timestamp | 1, 2 | Convert a timestamp string to a timestamp value | ||||
| now | - | Timestamp | 0 | Get the current timestamp in UTC. | ||||
| usec | - | Long | 0 | Get the number of microseconds since ACF_run started. | ||||
| Internet Functions | V1.7.0.x | |||||||
| http_get | string url, string headers, string auth header | String | 3 | creates a get request | ||||
| http_post | string url, string post_data, string headers, string auth header | String | 4 | creates a post request | ||||
| http_basic_auth | string user, string password | string | 2 | Creates a basic auth header | ||||
| Get_cookies | string | 0 | Used after http_get or http_post to get the cookies set by the server. | |||||
| Set_cookie | string cookie | string | 1 | returns the header formatted cookie string, to be used in subsequent http_get or http_post | ||||
| Send_email | JSON parameters | string | 1 | See the documentation page for details | ||||
| File System Functions | ||||||||
| close | Int File Number | - | 1 | Close a previously opened file. | ||||
| copy_file | String From, String To | String | 2 | Copy a file from one location to another and return "OK" on success. | ||||
| create_directory | Path | String | 1 | Create one or more directories recursively and return "OK" on success. | ||||
| delete_directory | String Path | String | 1 | Delete a directory at the specified path and return "OK" on success. | ||||
| delete_file | String Path | String | 1 | Delete a file at the specified path and return "OK" on success. | ||||
| desktop_directory | - | String | 0 | Return the path to the user's desktop directory. | ||||
| directory_exists | String Path | Bool | 1 | Check if a directory at the specified path exists (true or false). | ||||
| documents_directory | - | String | 0 | Return the path to the user's Documents directory. | ||||
| file_exists | String Path | Bool | 1 | Check if a file at the specified path exists (true or false). | ||||
| file_size | Numeric Types | String Path | 1 | Return the number of bytes in a file at the specified path. | ||||
| list_files | String Path | String | 1 | List files in a directory at the specified path. | ||||
| move_file | String From, String To | String | 2 | Move or rename a file from one location to another and return "OK" on success. | ||||
| open | FileName, AccessMode | Int | 2 | Open a file with the specified access mode. | ||||
| read | Int File Number | String | 1 | Read the content of an opened file. | ||||
| readline | Int File Number | String | 1 | Read the next line from an opened file. | ||||
| save_file_dialogue | See save_file_dialogue | String | 3 | Present a Save file dialog and return the selected file's path without creating the file. | ||||
| select_directory | String Prompt, String Start Directory | String | 3 | Present a directory selection dialog and return the selected directory's path, or an empty string if canceled. | ||||
| select_file | String Prompt, String Start-Path | String | 2 | Present a file selection dialog and return the selected file's path, or an empty string if canceled. | ||||
| temporary_directory | - | String | 0 | Return the path to the temporary directory. | ||||
| FileMaker Functions | ||||||||
| eval | String | String | 1 | Evaluate a FileMaker expression. | ||||
| Markdown to HTML Functions | ||||||||
| markdown2html | String, String, String | Double | 3 | See Markdown functions. | ||||
| mdsnippet | - | - | - | See Markdown functions. | ||||
| Math Functions | ||||||||
| abs | Numeric Types | Double | 1 | Calculate the absolute value. | ||||
| acos | Numeric Types | Double | 1 | Calculate the arccosine. | ||||
| asin | Numeric Types | Double | 1 | Calculate the arcsine. | ||||
| atan | Numeric Types | Double | 1 | Calculate the arctangent. | ||||
| cos | Numeric Types | Double | 1 | Calculate the cosine. | ||||
| fact | Numeric Types | Double | 1 | Calculate the factorial. | ||||
| floor | Numeric Types | Long | 1 | Remove decimals and convert to a long integer. | ||||
| mod | Numeric Types | Double | 1 | Calculate the remainder (modulo). | ||||
| round | Numeric Types, Int Dec | Double | 2 | Round a number to a specified number of decimal places. | ||||
| sin | Numeric Types | Double | 1 | Calculate the sine. | ||||
| sqrt | Numeric Types | Double | 1 | Calculate the square root. | ||||
| tan | Numeric Types | Double | 1 | Calculate the tangent. | ||||
| MySQL External Database Functions | ||||||||
| executemysql | - | - | - | See MySQL functions | ||||
| mysql_close | - | - | - | See MySQL functions | ||||
| mysql_getcolumncount | - | - | - | See MySQL functions | ||||
| mysql_getrow | - | - | - | See MySQL functions | ||||
| mysql_getrowcount | - | - | - | See MySQL functions. | ||||
| mysql_query | - | - | - | See MySQL functions | ||||
| Regular Expressions | ||||||||
| regex_extract | - | - | - | See Regular Expressions. | ||||
| regex_match | - | - | - | See Regular Expressions. | ||||
| regex_replace | - | - | - | See Regular Expressions. | ||||
| regex_search | - | - | - | See Regular Expressions. | ||||
| String Functions | ||||||||
| ascii | String | Int | 1 | Return the ASCII code of the first character in the argument. | ||||
| between | String Source, String From-String, String To-String | String | 3 | Return the string between two specified substrings. | ||||
| char | Int | String | 1 | Return a string containing one character with the specified ASCII code. | ||||
| format | String Format, ... | String | n | Create a string with mixed content using the format function. | ||||
| from_utf | String | String | 1 | Convert from UTF8 to other character set encodings. | ||||
| GetValue | String, Int n | String | 2 | Retrieve line number n from a string. | ||||
| left | String, Int n | String | 2 | Retrieve the left part of a string with n characters. | ||||
| length | String | Int | 1 | Calculate the length of a string. | ||||
| lower | String | String | 1 | Convert the argument to lowercase letters. | ||||
| mid | String, Int start, Int n | String | 3 | Retrieve a middle part of a string, starting at a specified position and including n characters. | ||||
| pos | String Source, String Substr | Int | 2 | Get the position of a substring in the source string. | ||||
| right | String, Int n | String | 2 | Retrieve the right part of a string with n characters. | ||||
| substitute | String Src, String A, String B | String | 3 | Substitute occurrences of A with B in the source string. | ||||
| substring | String Source, int from pos{, int length} | String | 2, 3 | return a substring from the source string | ||||
| to_utf | String | String | 1 | Convert from other character set encodings to UTF8. | ||||
| ValueCount | String | Int | 1 | Return the number of lines in a string. | ||||
Back to top
How to Install Your ACF Functions in a FileMaker Application
When developing ACF functions, they must be installed into the target FileMaker application in order to run. This article describes a few different approaches to accomplish that, depending on your development and deployment setup.
🔹 The Minimal Way
If you compile your functions using the Sublime Text Build feature (and have installed the
ACFcompilercommand-line utility), the resulting.dsCompfile (located next to your ACF source file) can be loaded directly in FileMaker using this script step:Set Variable [$res; ACF_InstallFile( "path to .dsComp file" )]However, this method is not practical in a multi-user environment, since the file must be accessible to all users. A more robust approach is to use a text field in a single-record table (e.g.,
Preferences). Since the.dsCompfile is a base64-encoded binary, it can be stored in a regular text field.The developer uploads the package:
Set Field [Preferences::ACFpack1; ACFU_LoadFile( "path to .dsComp file" )]All users can then install it with:
Set Variable [$res; ACF_Install_base64Text( Preferences::ACFpack1 )]This method is convenient, but it lacks debugging facilities. To inspect console output (such as print statements or errors), you can use:
Set Field [Preferences::console; ACF_GetConsoleOutput]Note: This clears the console each time it’s called.
If your functions do not depend on the target application's data, you can also use the app
new-acf-devtool.fmp12to define your ACF package, load and compile the source, test the functions, and—when you're satisfied—load the resulting binary into your target app using one of the methods above.
🔹 Full Development Environment
If your ACF functions need access to live application data (e.g., using SQL), it’s recommended to embed the development environment inside your FileMaker solution.
Copy/paste components from
new-acf-devtool.fmp12into your solution. This includes:- One table
- A folder of scripts
- Two value lists
- One layout
You can launch the dev layout in a new window from a menu item or button.
For each ACF package, create a record, load the source, and compile.
The
InitACFscript will:- Loop through all saved packages
- Load each binary
- Register your license key (if available)
This method allows for smooth in-app ACF development with full access to your solution’s data.
🔹 Sublime Text Integration
No matter which installation method you choose, it's strongly recommended to install:
- Sublime Text Editor
- The standalone compiler
- The ACF syntax files for Sublime Text
This combination streamlines your development cycle. When the source code compiles successfully in Sublime Text, you can be confident it will also compile inside your FileMaker-based dev tools.
🔹 Windows Users
The stand-alone ACF compiler is currently only available for macOS. However, the ACF plugin itself is fully compatible with Windows, so you can still develop and deploy ACF functions for Windows-based FileMaker solutions.
As a Windows developer, you can compile ACF source code directly within FileMaker using the plugin’s built-in compiler. This allows you to edit your code in FileMaker fields or load it from files, then compile and test it without needing the standalone compiler.
Additionally, Sublime Text is available on Windows, and all syntax highlighting and auto-completion features will work as expected. The only limitation is that the Build feature (which relies on the stand-alone compiler) will not function on Windows until a Windows version of the compiler is released.
Back to top
Calling functions in other packages.
In version 1.7.1.0, we have included the feature of calling functions in other ACF packages from the ACF package you are currently working with. As it always has been possible to use eval (ACF_run("other acf function in a different package";params)) , it is not very effective and introduces a significant overhead. The new efficient way to do it is our new inter-package calling scheme that makes us able to have libraries of ACF functions that can be used from new packages. This simplifies the implementation of new features using standard ACF libraries, for example, an EXCEL library that makes it much simpler to produce EXCEL reports.
The USE statement
Right below the package declaration (and before any function declaration), write:
USE package_name;
The other package needs to be loaded when you compile your source code. In this way, the compiler can syntax-check your function call against the function in the other package.
After that, you can simply call the functions in that package as it is a local function. Just write the name and the parameter list. In this way, the calling scheme induces very little overhead.
Let's say, in the bootstrap library that comes pre-installed, there is a function to return the filename from a full path:
package bootstrap "bootstrap library";
...
...
...
function GetFilenameFromPath ( string path )
    FunctionID 205;
    path = substitute ( path, ":", "/");
    path = substitute ( path, "\\", "/");
    return regex_replace("^(.+)/(.+\..+)$", path, "\2");
end
...
...
...
Now we are working on a different package, so we need this function.
package testnewstuff "test some new stuff";

USE bootstrap; // tell us that all functions in that package are available here...

Function test_ext_functions ( string path )
    string cc = GetFilenameFromPath ( path );
    return cc;
end
In the FileMaker Calculation:
Set Variable [$fn; ACF_Run("test_ext_functions";"/Users/peter/Desktop/MyFile.txt")]
Now, the $fn will contain MyFile.txt
Performance metrics
To see how the inter-package calls perform compared to local functions. I did a small test. I wrote some functions to trim away white space left, right, and both sides of a given string. Like this:
Function leftTrim (string s)
    FunctionID 240;
    return regex_replace ("^\s+", s, "");
end

function rightTrim (string s)
    FunctionID 241;
    return regex_replace ("\s+$", s, "");
end

function Trim (string s)
    FunctionID 242;
    return leftTrim(rightTrim(s));
end
Then I made a test-function to see the performance:
function testTrim (string s, int z)
    int i;
    string x;
    for (i=1,z)
        x = Trim(s);
    end for
    return x;
end
When called from FileMaker calculation, with a given string with some spaces on each side, and the z-value of 10 000; The time including the call from FileMaker was about 155 mS.
Then I moved the trim functions to a different package and used the "USE" statement. With the same string and z-value, the time increased to 165 mS.
The difference was also 10mS for a loop with 10,000 rounds, which tells that the overhead with inter-package calls is only 1µS.
An overhead of 1µS per call for inter-package communication is typically considered negligible in most application contexts, especially considering the benefits of modularity, code reuse, and separation of concerns that come with organizing functionality across packages.
Compared to the standard custom function
Brian Dunning's CF site has a Trim4 standard custom function. I did the same test with this, repeating the call to it 10.000 times: The execution time increased to 1718 ms ( or 1,718 seconds ). This is 0,1718 mS for each call. Compared to the ACF trim function that runs 10.000 Trim calls in 155mS/10000 = 0,0155 ms or 15,5 uS. for each call. That makes our function 11 times faster. Our Trim function uses two regex operations that are probably not the fastest. Later we will have a trim function as an optimized plugin function.
I tried, both as a calculation with a while statement, a script with a loop, and an ACF function using the FileMaker calculation engine with the @....@ notation. They all executed in the range 1708 to 1730 ms.
function testTrim4 (string s, int z)
    int i;
    string x;
    $$val = s;
    for (i=1,z)
        x = @Trim4($$val)@;
    end for
    return x;
end
Can we optimize it some more?
Well, I actually did implement the trim functions into the ACF-language as standard native functions to see the effect of using this instead. I created three native functions for this that is now a standard function in the ACF language:
- TrimLeft - Trims away white space on the left side of the string
- TrimRight - Trims away white space on the right side of the string
- TrimBoth - Trims away white space on both sides of the string.
Then I changed the function in this way:
function testTrim (string s, int z)
    int i;
    string x;
    for (i=1,z)
        x = TrimBoth(s);
    end for
    return x;
end
And the result was really impressive, with 11,64 mS for all 10000 operations all together. This means that each trim operation both sides used only 1,164 uS. That is 148 times faster than the standard FileMaker Custom Function implementation.
Some points to notice
- When compiling or loading binary for a package that uses other packages, the other packages need to be loaded first. The compiler checks the existence of the functions in the other package and will issue an error if they are not available, or have different parameters. Likewise, when loading the binary for a pre-compiled package, the link stage in the loading will issue an error and refuse to load if the dependencies are not met.
- Two packages cannot reference each other. Having cross-dependencies makes it impossible to load the first package.
- The automatic link stage when loading or compiling a package will update references both for references to other packages, and other packages referencing the current package.
- If you change the parameters - or the return type of a library function that is called from some other loaded packages, you will have a broken dependency issue. You will get a linker error and the plugin refuses to load the package.
- The change must be performed in all packages that use the library package. Do not compile them yet.
- Clear the packages using the
ACF_ClearPackagesplugin command. This will automatically install the bootstrap library after clearing so the dev-tool functions work. - Compile the changed library.
- Finally, compile the other packages that use this library package.
- If you just added new functions to the library, or change the code for the existing functions without changing the parameters or the return type. There will be no dependeny issue and the automatic linking will handle the linking.
A new version of the development tool
We have created a new version of the development tool that better supports this new function. The new tool will soon be released.
Easier implementation of the development tool into any target application project to make it easy to develop ACF functions and libraries.
Instead of implementing fields in a preference table, we have a brand new table that comes with one layout. Each record in this table is the home of an ACF library. In this way, you can have smaller more manageable libraries and use the inter-package calls instead of having it all in a huge library.
At the start of FileMaker, you can just call the script "InitACF", which loops records in this table and loads the binary packages.
this implementation makes it unnecessary to alter any of the existing tables. This new table does not need any relations and as such a stand-alone service table.
The new dev-tool has functions to assist dependency issue solving, making it possible to deactivate the packages that use a library temporarily, then run the initACF button, and do the changes neccessary to the library package. Then you can compile and activate the other packages after changing the parameters or calls.
Back to top
Working with ZIP files
Since version 1.7.0.20 - the ACF-plugin has now extended its filesystem functions to also work with files inside ZIP archives. Two new functions have been added:
- open_zip (string zip-file-path) - returning a prefix string to be applied to all file paths inside the archive.
- close_zip (zip prefix) closes the zip archive.
The open-zip opens the zip archive and returns a short prefix string to be in front of file paths inside the archive. The prefix string is in the form: ZIP<0>: where the zero can be any number or digits. this string is returned from open_zip and should never be tampered with.
All the other file-system functions now work on this new prefix system. If you open a file with this prefix in the path, it will open it in the archive.
Ensure that you use the close_zip function, especially after you have done some modifications to the archive. Otherwise, the archive or the files you added/modified might get corrupted.
The following file-system functions work with both zip paths and regular OS paths.
- open
- close
- read - read the content of a file, whether in a Zip or the OS file system.
- write - write to the content of a file, whether in a Zip or the OS file system.
- copy_file - copy between zip files, between os-files and zip in either direction. It is also for directories.
- move_file - move between zip files, between os-files and zip in either direction. It is also for directories.
- list_files
- file_exists
- directory_exists
- Create_directory - directories are automatically created in zip files, so this is not needed for zip-file paths. Just open a file in the directory, and it will be created.
- delete_file
- delete_directory
The markdown functions are not sensitive for zip paths, but the result can be put in a zip file with copy_file afterward.
Note: The filesystem inside ZIP archives has some different properties from the OS filesystem. The files are not organized in folders in the same way. It is just a list of files complete, with directory separators / - like the full path is part of the filename. There are no directory entries in the zip archive. Therefore, functions like directory_exists loop through the file list to find any matches. list_files function uses the path in the argument to filter the list like every file is listed that starts with the path given.
Note: copy_file and move_file can copy files and folders. If copying to or from the zip archive and the OS filesystem, the path in the zip archive is defined as a folder when it ends with a slash / If the destination is a folder, the files copied will be given the name of the source name.
Examples:
The example below, using the following FileMaker script triggered by a button:

function test_zip_archive (string archive, string filename, string content)
    int x, y, z;
    string path, xcontent;

    // Open the ZIP archive
    string zip = open_zip ( archive );

    // Check if we got a prefix
    if ( left (zip, 3) == "ZIP") then

    // open two files in the arcive
        x = open ( zip + filename, "w") ;
        y = open ( zip + "ZipDirectory/Mytestfile6.txt", "w");

        // Write some content to them .
        write (x, content);
        write (y, "content into file6");
        write (x, "\nSome more content in line two...");
        write (y, "\nSome more content in line two into file6");

        // close the files.
        close (x);
        close (y);

        // Ask for a third file to include in it.
         path = select_file ( "Select a file to include");

        // If the user did not hit cancel, but selected a file:
        if ( path != "") then
            z = open ( path, "r"); // Regular OS file
            xcontent = read (z);
            path = Get_FilenameFromPath(path);
            close (z);

            // Write the content to a file in the archive,
            z = open ( zip + "ZipDirectory/"+path, "w");
            write (z, xcontent);
            close (z);
        end if

        close_zip(zip);
    else
        alert ( zip );
    end if
    return "OK";
end
Here is the ZIP file, and unpacked directory to show the files we made.

Some Use cases
- If you generate several files like some reports, it can be good to pack the files into a ZIP archive to easily have them grouped as belonging to the same run.
- The EXCEL format (.xlsx) is a zip file. If you need to modify, create, or read data from it, you can do so by opening the file as a zip archive and working with the files in it. Using the XML functions on the XML files in it is also possible.
- Some web services expect files to be transferred as a ZIP archive. You can automate this process by preparing it and sending it to the web service or retrieving it from the service and working with it directly in an ACF function.
Working with EXCEL .xlsx files from FileMaker
As mentioned above, EXCEL spreadsheet files in the .xlsx format are zip archives. This means that we can use the zip functionality described here to open those files directly and work with the content.
if we use the list_files function on such an EXCEL file, like this ACF code:
string path = "~/Desktop/MyExcelFile.xlsx";
string zip = open_zip ( path );
print list_files(zip);
close_zip (zip);
This results in the following list:
[Content_Types].xml
_rels/.rels
xl/_rels/workbook.xml.rels
xl/workbook.xml
xl/sharedStrings.xml
xl/styles.xml
xl/worksheets/sheet1.xml
xl/theme/theme1.xml
docProps/app.xml
docProps/core.xml
xl/calcChain.xml
Now, By looking at the spreadsheet, there are some numbers we want to extract from this sheet.
After a little digging - the file xl/worksheets/sheet1.xml contains what we are looking for. The data is in a structure like this (a little simplified):
<worksheet>
    ...
    <sheetData>
    ...
        <row>
            <c><v>some value</v></c>
            <c><v>some value</v></c>
            <c><v>some value</v></c>
            <c><v>some value</v></c>
        </row>
        <row>
            <c><v>some value</v></c>
            <c><v>some value</v></c>
            <c><v>some value</v></c>
            <c><v>some value</v></c>
        </row>
        ...
        etc
We want Row 5 to Row 9, Column 5
Then the following snippet does exactly that:
string path = "~/Desktop/MyExcelFile.xlsx";
int x, i;
string content;
XML sheet1;

// Open EXCEL file
string zip = open_zip ( path );
// Retrieve the sheet data
x = open ( zip + "xl/worksheets/sheet1.xml","r");
content = read (x ) ;
close  (x);
close_zip (zip);

// parse XML
sheet1 = content;

// Extract the content into an array:
ARRAY STRING colE5_9;
for (i=5,9 )
        colE5_9[] = string(sheet1["worksheet.sheetData.row["+i+"].c[5].v"]);
end for

// Return as comma separated values.
return implode (",", colE5_9);
Running this function, resulted in the following:
6300,239519,74335,14500,108521
This is exactly what we can see in the spreadsheet.

Back to top
Literals
There are five kinds of literals in ACF:
String literals: These consist of any text enclosed in single or double quotes. If the same kind of quotes are included within the literal, they must be escaped. String literals can span multiple lines.
Number literals - Integer: These are represented by any series of digits, optionally prefixed with a "-" for negative values. Large numbers are automatically treated as long integers.
Float literals: Float literals are represented by any series of digits that include a decimal point ".". They can also use scientific notation, such as "E06". Float literals use a decimal point, not a comma, as the decimal separator.
Array literals: An array can be initialized with a comma-separated list of string or number literals, enclosed in curly brackets. The list can also contain variables or expressions, and other array variables to merge the arrays. The type of the elements must be the same as the array type, as we cannot have mixed types in an array.
Example:
ARRAY STRING abc = {"row1", "row2", "row3", any_string_var};JSON and XML literals JSON and XML literals are string literals starting with
{or<- the JSON and XML engine will try to parse the string to create a JSON or XML variable. The notation is only used in an assignment operation to assign a JSON or an XML variable as that specific type. Otherwise, the start character will have no such meaning and will be treated as ordinary text.Example:
JSON jsonvar = '{"a":"abc"}';Example:
XML xmlvar = '<root>myRootElement</root>';
Literals with Special Meaning:
Some literals have special meanings and trigger the FileMaker evaluation engine to retrieve their content. These literals are in addition to the "eval" function, which takes a string expression as an argument. The literals with special meaning are:
FileMaker evaluate literal: Any text enclosed by "@" symbols on each side will be evaluated as a FileMaker expression. They must be on the same line. For multiline evaluations, use "@@" on each side instead.
FileMaker evaluates variable name literal: Any identifier prefixed with one or two "$" symbols will be evaluated as a FileMaker expression to retrieve its value.
FileMaker evaluates field name: Any table::field notation will be evaluated as a FileMaker expression to retrieve its value.
Data Types
In ACF, various data types are used to represent different kinds of values. Here is a list of ACF data types along with their corresponding C++ types and descriptions:
| Type Name | C++ Type | Description |
|---|---|---|
| int | int | Integers, hardware-dependent 32-bit or 64-bit integer values. The actual size can be obtained with the size(a int variable) function in bytes. |
| long | long | Long integers. The actual size can be obtained with the size(a long variable) function in bytes. |
| float | double | Floats (these are actually represented as doubles). |
| double | double | Double-precision floating-point numbers. |
| string | std::string | String datatype, with maximum length depending on the implementation (can be very large). |
| date | time_t | Timestamp with only the date part. |
| time | time_t | Timestamp with only the time part. |
| timestamp | time_t | Full timestamp including date and time. |
| bool | int | Boolean values represented as 0 (false) or 1 (true). |
| JSON | nlohman::json | Structured data on JSON format (v 1.7.0.x) |
| XML | internal structural data | Structured data on XML format (v 1.7.0.x) |
Operands
Operands are values or variables operated on by operators to produce a result. Here are the operators available in ACF, along with their left and right operand types and the resulting data type:
| Operator | Left Type | Right Type | Result Type | Description |
|---|---|---|---|---|
| +, -, * | Numeric Types | Numeric Types | Float, Long, Int | Basic arithmetic operations. |
| / | Int, Long, Float | Int, Long, Float | Float | Division always results in a float. |
| ++ | Numeric Types | - | Same | Increment left operand by one. |
| -- | Numeric Types | - | Same | Decrement left operand by one. |
| + | String | All | String | Concatenate strings or convert non-string values to strings and concatenate. |
| + | Date | Numeric | Date | Add days to a date. |
| + | Time | Numeric | Time | Add seconds to a time. |
| * | String | Int, Long | String | Repeat the left string right times. |
| ^ | Int, Long, Float | Int, Long, Float | Float | Exponentiation (power). |
| && | Bool | Bool | Bool | Logical AND. |
| || | Bool | Bool | Bool | Logical OR. |
| == | All | All | Bool | Equal comparison. |
| < | All | All | Bool | Less than comparison or string alphabetical order. |
| > | All | All | Bool | Greater than comparison or string alphabetical order. |
| <= | All | All | Bool | Less than or equal comparison. |
| >= | All | All | Bool | Greater than or equal comparison. |
| != | All | All | Bool | Not equal comparison. |
| ≠ | All | All | Bool | Not equal comparison (alternative syntax). |
Priority of Operands
The priority of operands defines the order of evaluation in expressions. Higher-priority operands are evaluated first. To change the priority, you can use parentheses in expressions. A factor can be negated with a "-" symbol in front of it, or "!" for boolean types, affecting only the next factor in the evaluation. For negating an entire expression, you must use parentheses.
Example:
a = !a || b;
This negates "a" but not the entire expression. To negate the whole expression:
a = !(a || b);
Here's the priority list of operands, from highest to lowest:
- Power (^)
- Multiplication (*) and Division (/)
- Addition (+) and Subtraction (-)
- Comparison operators (<, >, <=, >=, ==, !=, ≠)
- Logical AND (&&)
- Logical OR (||)
Conversion between data types
Most declaration type names can also be used as type converter functions. Some conversions allow additional parameters to specify the format to be applied. Here are some examples.
- Convert a date to a string:
string(date_variable, "%Y/%m/%d"); - Convert a string to date:
date(string variable, "%Y-%m-%d");The format specifier describes the existing format of the date. - Convert a float to int (floor):
int(float variable) - Convert a float to a string:
- With format:
format("%.2f", float_variable); - Standard format:
string(float_variable)
- With format:
- Convert int to bool:
bool(int_variable) - Convert bool to int:
int(bool_variable) - Convert string to float:
float(string_variable) - Structural type converters: The simple assignment will do the conversation automatically, as the type name as function is used for key/value pair converters,
- Convert JSON to XML:
xml_variable = json_variable - Convert XML to JSON:
json_variable = xml_variable
- Convert JSON to XML:
Back to top
Function: Send_email
The send_email function uses a JSON object to specify all parameters needed to complete the email sending. This implies server connect parameters as well as the recipients, the subject, body text, and attachments. The idea is to make it easier to set up the mail-sending instead of specifying numerous parameters to the function call.
Prototype:
string result = send_email(JSON object);
Parameters:
| Object key | Type | Description |
|---|---|---|
| server.host | string | The host name of the SMTP server to use |
| server.user | string | Username for the logging in to the SMTP server |
| server.password | string | Password |
| server.port | string | Port number for connection: default 587 |
| from | string | From email address |
| to | string | To: comma separated strings of e-mail addresses, or an array of recipients |
| cc | string | Copy to: comma separated strings of e-mail addresses, or an array of recipients (optional) |
| bcc | string | Hidden copy to: comma separated strings of e-mail addresses, or an array of recipients (optional) |
| subject | string | The subject of the email |
| body.plain | string | The plain text version of the body (optional) |
| body.html | string | The HTML version of the body (optional) |
| body | string | as an alternative to the two above, only the HTML version. |
| attachements | array | array of attachments, as strings. Use posix path. |
Return value: Type string : "OK" if sending went well, otherwise an error message.
Example:
JSON email;
email["server"] = JSON ( "host", "smtp.example.com",
                        "user", "myUser",
                        "password", "myemailpassword",
                        "port", "587");
email["from"] = "john.doe@example.com";
email["to"] = "ola.normann@example.com";
email["cc"] = "kari@example.com";
email["bcc"] = "bcc.copies@example.com";
email["subject"] = "Order confirmation";
email["body.plain"] = "Dear Ola, thank you for your order.....";
email["body.html"] = "<html>
<body>
<h1>Thank you for your order</h1>
...
...
</body>
</html>";
email["attachements[]"] = "/Users/john/Desktop/orderconf.pdf";
email["attachements[]"] = "/Users/john/Desktop/mySecondAtt.pdf";

// Send the email
string res = send_email(email);
if ( res != "OK") then
    alert ("Mail sending error: " + res);
end if
HTML with inline images
Having HTML image tags in your HTML version of the body text requires the source to be a file:// type URL. The send mail searches the body text for such image tags, add them as attached files, and rewrites the image tag to reference the attachment. The attached images are stored in a "multipart/related" section of the email content.
From html content before sending:
<p>Best Regards,<br/>
<img src="file:///Users/ole/.../mylogo-2.png"/>
After sending (What arrives at the recipient's mailbox: )
<p>Best regards,<br/>
<img src="cid:7aee0606-4614-4d83-b4a2-8dbc3368b8a5"/>
...
...
</body>
</html>
--=REL_aaa93cb9-511c-4d67-8748-ea337e440449_
Content-Transfer-Encoding: base64
Content-Disposition: inline; filename="mylogo-2.png"
Content-Type: image/png; name="mylogo-2.png"
Content-ID: <7aee0606-4614-4d83-b4a2-8dbc3368b8a5>

iVBORw0KGgoAAAANSUhEUgAAAMgAAAA4CAIAAAA3qCDQAAAKrmlDQ1BJQ0MgUHJvZmlsZQAA
...
...
The email part handling
The function creates a multipart email automatically based on the content in the various JSON elements supplied.
- Only plain text body, no attachment: Only one part.
- Only HTML body, no attachments: The function makes a plain part removing all HTML tags, sending it as "multipart/alternative" with the plain version and the HTML version in separate parts.
- Both plain and HTML body: The function sends it as a multipart/alternative, with the plain and HTML version in two separate parts.
- HTML part with
<img src="file://....">image tags: The function makes a multipart alternative, with the plain content in one part. Then the HTML part becomes a multipart/related part, where the HTML with rewrittenimgtags goes into the first part, and each file goes into related attachments for that part. - Any attachments: The function creates a "multipart/mixed" structure, with the multipart/alternative structure inside it as one mixed part, and all the attachments, each as a part of the mixed structure.
The most comprehensive content would be an HTML mail with related images and attachments, it looks like this:
mail header fields (to, cc, subject, date, X-mailer, etc)
Multipart/mixed:
        mixed Multipart/alternative:
                alternative Plain content
                alternative Multipart/related:
                    related HTML-content
                    related image-1
                    related image-2
        mixed attachement-1
        mixed attachement-2
        ...
Use of the function together with markdown text
It is a good idea to produce the HTML content using the markdown2html ACF function. It requires a work folder containing the themes for the HTML generation. The themes folder is available in the demo download of the email download. The work folder usually resides on the user's local disk, but can also be on a shared volume. Its path is set up using the set_html_root_path ACF function before applying the markdown2html function. The markdown content is stored on a temporary file, and the name of the HTML file along with the style names are parameters to the markdown2html.
The produced HTML can be tweaked to make the desired result. For example, if you want to set a maximum width of inline images, you could use a regex function like this:
htmlContent = regex_replace("(<img[^>]*)(>|\\/>)",
            htmlContent, "$1 style=\"max-width: 95%; max-height: 95%;\"$2");
This will insert the styles before the closing tag of all images in the htmlContent, ensuring it's not wider than the enclosing container.
Why do we send a plain version of the e-mail as an alternative?
Most modern e-mail clients can correctly display HTML e-mails. However, some simpler e-mail clients or some web-mail clients cannot, and they will display the plain version instead. It will also improve the deliverability of the email, making the email composition adhere to the standards for sending email. Many spam robots use a simpler mail-sending system that does not make all the required parts.
References:
Back to top
Function: Create_HASH function
This function creates a md5, sha1, sha256, sha384, or sha512 hash of a source string. This is used in security functions to protect data; to avoid storing clear text passwords, and in some API calls a hash key is required. When sending data and a hash key, the receiver can verify if the data has been tampered with in transit.
Hashing is not encryption, as it is impossible to decrypt and get the original data. However, the slightest change in the data will produce a completely different hash.
A note about MD5
The MD5 hashing function is considered outdated and should not be used for new cryptographic applications, particularly where security is a concern. This is because MD5 is no longer considered cryptographically secure due to vulnerabilities that allow for collision attacks (where two different inputs produce the same hash).
While MD5 is deprecated for secure applications, it is still used in some contexts where cryptographic security is not a primary concern, such as checksums for file integrity verification in non-security-critical situations. However, for any new development, especially in security-related applications, it's recommended to use more secure hash functions like SHA-256
Prototype:
string hash = create_hash ( hash method, data, encoding);
Parameters:
| Parameter name | Type | Description |
|---|---|---|
| Hash method | Int | Use the constants: md5, sha1, sha256, sha384 or sha512 |
| data | string | any string containing file content, encrypted text, or anything you want to create a hash from |
| encoding | Int | Output encoding, use the constants: hexenc or base64enc |
Return value: Type String : The hash value
Example:
I set up a test based on the works of myiako (4d Common crypto plugin). He has a test for his plugin, which I adopted to test and validate the functions based on an external source.
// helper function to validate the tests.
function assert ( string a1, string a2, string message )
    if ( a1 != a2 ) then
        throw "Error: " + message;
    end if
    return true;
end

// The main test function.
function test_hashFunctions ()
    bool a;
    string source = "Hello World!";
    try
        // MD5
        a = assert(create_hash(md5, source, base64enc), "7Qdih1MuhjZehB6Sv8UNjA==", "MD5/Base64 failed");
        a = assert(create_hash(md5, source, hexenc), "ed076287532e86365e841e92bfc50d8c", "MD5/Hex failed");

        // SHA1
        a = assert(create_hash(sha1, source, base64enc), "Lve95gjOVATpfV8EL5X4nxwjKHE=", "SHA1/Base64 failed");
        a = assert(create_hash(sha1, source, hexenc), "2ef7bde608ce5404e97d5f042f95f89f1c232871", "SHA1/Hex failed");

        // SHA256
        a = assert(create_hash(sha256, source, base64enc), "f4OxZX/x/FO5LcGBSKHWXfwtSx+j1ncoSt3SABJtkGk=", "SHA256/Base64 failed");
        a = assert(create_hash(sha256, source, hexenc), "7f83b1657ff1fc53b92dc18148a1d65dfc2d4b1fa3d677284addd200126d9069", "SHA256/Hex failed");

        // SHA384
        a = assert(create_hash(sha384, source, base64enc), "v9dsDrvQBv7lg0EFR8GIewKSvnbVgtlsJC0qeScj4/1v0GH51c/RO4+WE1jmrbpK", "SHA384/Base64 failed");
        a = assert(create_hash(sha384, source, hexenc), "bfd76c0ebbd006fee583410547c1887b0292be76d582d96c242d2a792723e3fd6fd061f9d5cfd13b8f961358e6adba4a", "SHA384/Hex failed");

        // SHA512
        a = assert(create_hash(sha512, source, base64enc), "hhhE1nBOhXP+w02WfiC8/vPUJM9IvgTm3AjyvVjHKXQzcQFerYkcw88cnTS0kmS1EHUbH/nlN5N7xGtdb/TsyA==", "SHA512/Base64 failed");
        a = assert(create_hash(sha512, source, hexenc), "861844d6704e8573fec34d967e20bcfef3d424cf48be04e6dc08f2bd58c729743371015ead891cc3cf1c9d34b49264b510751b1ff9e537937bc46b5d6ff4ecc8", "SHA512/Hex failed");


    catch
        alert ( "Error: " + last_error);
        a = false;
    end try
    return a;
end
All the tests worked as expected, and the function returned true. I also tested to modify one of the result values to see that the assert logic worked as expected and it did.
A practical example
Let's say, you have a password stored in the database. As this is treated as insecure, let's modify the logic to make it secure. Instead of storing the clear text password in the database, let's store a sha512 version of the password instead, to make it secure. We use the create_hash function to hash the clear text password and store its result in the database. When we verify the password, we hash again the given clear password and compare the hashed result with the database.
Lets make an small ACF function to generate the hash:
function PasswordHash ( string clearPW )
    return create_hash(sha512, clearPW, hexenc);
end
Then in the change password FileMaker script:
Set Field [Users::hashPassword; ACF_Run("PasswordHash";Users::ClearPW)]
Set Field [Users::ClearPW; ""]
Then to verify, lets say we have the given password in $GivenPassword
if [ACF_Run("PasswordHash";$GivenPassword) = Users::hashPassword]
# The password match, access granted
Else
# Wrong Password
    show custom dialog ["Wrong Password"; "Access denied"]
    Exit Application
End If
Function Create_HMAC
What is HMAC?
HMAC, short for Hash-based Message Authentication Code, is a specific construction for creating a message authentication code (MAC) involving a cryptographic hash function in combination with a secret cryptographic key. As an integral part of various security protocols and applications, HMAC provides both data integrity and authentication. The process involves applying a hash function to both the data to be authenticated and the secret key. The strength of HMAC lies in its use of the key, which makes it resistant to certain types of cryptographic attacks such as collision attacks. HMAC can be used with a variety of hash functions, such as MD5, SHA1, and SHA256, adapting to their respective length and strength. Commonly, HMAC is utilized in scenarios requiring secure message transmission over untrusted channels, digital signature implementations, and ensuring the authenticity and integrity of transmitted data. Its widespread adoption is a testament to its effectiveness in contemporary cryptographic practices.
Prototype:
string hash = create_hmac ( hash method, string key, string data, encoding)
Parameters:
| Parameter name | Type | Description |
|---|---|---|
| Hash method | Int | Use the constants: md5, sha1, sha256, sha384 or sha512 |
| key | string | The key |
| data | string | any string containing file content, encrypted text, or anything you want to create a hash from |
| encoding | Int | Output encoding, use the constants: hexenc or base64enc |
.
As we did with the HASH functions above, we implemented similar tests as in the test function above. We added these lines to the test:
// HMAC MD5
        a = assert(create_hmac(md5, key, source, base64enc), "AYH2AOvu2Cbt3Ef/hR9k7A==", "Failed HMAC MD5/base64");
        a = assert(create_hmac(md5, key, source, hexenc), "0181f600ebeed826eddc47ff851f64ec", "Failed HMAC MD5/hex");

        // HMAC SHA1
        a = assert(create_hmac(sha1, key, source, base64enc), "BwpO356r2gx9SYj3UFVvc/BfdVA=", "Failed HMAC SHA1/base64");
        a = assert(create_hmac(sha1, key, source, hexenc), "070a4edf9eabda0c7d4988f750556f73f05f7550", "Failed HMAC SHA1/hex");

       // HMAC SHA256
        a = assert(create_hmac(sha256, key, source, base64enc), "5z1prOAxmam9lz5nlHgudpxIhksTY8pClCivq7RUytQ=", "Failed HMAC SHA256/base64");
        a = assert(create_hmac(sha256, key, source, hexenc), "e73d69ace03199a9bd973e6794782e769c48864b1363ca429428afabb454cad4", "Failed HMAC SHA256/hex");

       // HMAC SHA384
        a = assert(create_hmac(sha384, key, source, base64enc), "UDZdkjSVyMpFJQu9dmeAlKg+LW97o6yq1pfBj3QZJM4YMmgZxkoUVVUzyMDcP3DT", "Failed HMAC SHA384/base64");
        a = assert(create_hmac(sha384, key, source, hexenc), "50365d923495c8ca45250bbd76678094a83e2d6f7ba3acaad697c18f741924ce18326819c64a14555533c8c0dc3f70d3", "Failed HMAC SHA384/hex");

       // HMAC SHA512
        a = assert(create_hmac(sha512, key, source, base64enc), "x38L+mMFPEM+QqGrPMOzx2l7rTlmNePxPdaYllFiLQm+G9K2Bf/9oQcci861HAF4NTNqsPZS8gPEiQ0KoznMlA==", "Failed HMAC SHA512/base64");
        a = assert(create_hmac(sha512, key, source, hexenc), "c77f0bfa63053c433e42a1ab3cc3b3c7697bad396635e3f13dd6989651622d09be1bd2b605fffda1071c8bceb51c017835336ab0f652f203c4890d0aa339cc94", "Failed HMAC SHA512/hex");
The test executed with no error, returning a as true.
References:
Back to top
Functions: Encrypt and decrypt
Available in plugin version 1.7.0.17.
There are two functions to encrypt and decrypt data using the AES algorithm. The functions support AES-128-CBC, AES-192-CBC, and AES-256-CBC.
The plugin also has encryption/decryption as FileMaker Plugin commands available from FileMaker scripts directly, but the functions here are available directly from the ACF language. The plugin commands dsPD_EncryptParBlock2Base64 and dsPD_DecryptBase64_2ParBlock use aes-256-cbc only, and handle only base64 encoding. The encrypt and decrypt functions described here have some more flexibility.
- The string datatype in the ACF language handles binary content well and therefore the
encryptfunction can be used to encrypt files in binary format. - The document service uses aes-256-cbc for its encryption service. Having the key, one can use those functions to decrypt encrypted documents stored in the document service as a fallback if the web server has issues.
Note: The key used to encrypt data must be kept safe and secure. The only way to decrypt data is using the key, and a lost key is non-recoverable. Also, the key must not fall into the hands of people not authorized to decrypt the content.
Prototype:
string encrypted = encrypt ( int method, string key, string data, int output_encoding);
string decrypted = decrypt ( int method, string key, string encrypted, int source_encoding);
Parameters:
| Parameter name | Type | Description |
|---|---|---|
| method | Int | Use one of the constants: aes128cbc, aes192cbc, or aes256cbc |
| key | string | A string of hexadecimal numbers or a password. See the note below about Key encoding. |
| data/encrypted | string | For encrypt: Raw data to be encrypted. for decrypt: encrypted data with given source encoding |
| output_encoding/ Source encoding |
int | Use one of the following constants: base64enc, hexenc or binary for not encoded. |
Return value:
Type String: for encrypt, encrypted data. For decrypt, decrypted data.
Key encoding
The key can either be a password string or a string of hexadecimal values. For hex strings, the length of the string must match the encoding algorithm selected. If the key is not entirely composed of hex digits (0-9, A-F) or the length is not correct, it will be taken as a password, and a new key will be produced based on it and used internally. The use of hex keys would be to match another system's keys. Having the hex keys means that other systems using OpenSSL can use it for encryption or decryption that is compatible. Even command-line decryption. The whole idea with this compatibility is to be able to secure transactions to other systems not running the ACF-plugin. The plugin function dsPD_GetPHPSampleEncryptDecryptCode can be used to generate hex keys for a given password that match the aes256cbc algorithm.
- aes256cbc : 64 hex digits.
- aes196cbc : 48 hex digits
- aes128cbc : 32 hex digits
Example:
string encrypted = encrypt (aes256cbc, "MyPassword", "myData", base64enc);
string decrypted = decrypt (aes256cbc, "MyPassword", encrypted, base64enc);
// decrypted will be: myData
Example 2
This example shows two functions for encrypting and decrypting a file on disk. The key is hard-coded but could be set in preferences or supplied as a parameter to the function.
/*

    Encrypt a file on disk. Function asks for file,
    and create a new file with .encrypted as extention.

*/
function EncryptFile ()
    string path, opath, key;
    int x;
    string content, encrypted;
    path = select_file ( "Select a file to encrypt");
    if ( path != "") then
        key = "SablaBabla029c";
        x = open ( path, "r");
        content = read ( x );
        close (x);
        encrypted = encrypt ( aes256cbc, key, content, binary);
        opath = path + ".encrypted";
        x = open ( opath, "w");
        write ( x, encrypted ) ;
        close (x);
        // delete_file (path);
    end if
    return "OK";
end
/*

    Decrypt a file on disk. Function asks for file,
    and create a new file removing .encrypted as extention.
    the function verifies that the filename has .encrypted in it.

*/
function DecryptFile ()
    string path, opath, key;
    int x;
    string content, decrypted;
    path = select_file ( "Select a encrypted file to decrypt");
    if ( path != "") then
        if ( pos ( path, ".encrypted")>0) then
            key = "SablaBabla029c";
            x = open ( path, "r");
            content = read ( x );
            close (x);
            decrypted = decrypt ( aes256cbc, key, content, binary);
            opath = substitute (path,  ".encrypted", "");
            x = open ( opath, "w");
            write ( x, decrypted ) ;
            close (x);
            // delete_file (path);
        end if
    end if
    return "OK";
end
Back to top
Function: Sort_Array
The Sort_Array function performs a multi-level sorting of an array or a group of arrays. You can choose sorting order, and direction for each array in the sort operation. Each of the arrays needs to have the same size, but you can mix arrays of different types. The sorting keeps the rows across all the arrays synchronized.
You can prefix each array with "<" for ascending, and ">" for descending. No prefix indicates that the array has no sort option, but will follow in the result.
Prototype:
sort_array (<array1, >arrays2, array3,....,arrayN);
This will sort the arrays, ascending for array1, descending for array2, and array 3 is not sorted, but just follows the other arrays along with the rest of the arrays up to arrayN.
Parameters:
| Parameter | Type | Description |
|---|---|---|
| array1.....arrayN | Array, any type | Comma-separated list of arrays |
| prefix < | Ascending sort | |
| Prefix > | Descending sort | |
| No Prefix | Values is not part of the sorting algorithm, but the array is synced with the other arrays. |
Return value: No return value
Example:
In this example, we pull some fields from a database table, load them into arrays, and sort the arrays. The content of the arrays is printed before and after the sort. We also do some performance metrics that are returned from the function.
The line below is the sorting of arrays in the example:
sort_array ( < Department, < salary, < last_name, first_name);
Here is the full example:
function array_sort_test ()

    long uS1, uS2, uS3;
    // declare the arrays
    ARRAY STRING first_name;
    ARRAY STRING last_name;
    ARRAY FLOAT salary;
    ARRAY STRING Department;
    uS1 = uSec(); // measure time for start

    // Perform SQL on the employee table, and load the result into arrays.
    string res = executeSQL("SELECT first_name, last_name, salary, Department FROM employee
    INTO :first_name, :last_name, :salary, :Department");

    uS2 = uSec(); // measure the time after SQL

  // Print a table with the content before sort.
    print format ("\n%-20s | %-20s | %-15s | %-10s |", "First Name", "last_name", "salary", "Department");
    print "\n" + "-"*76+"\n";
    int i;
    for (i =1, sizeof (first_name))
        print format ("\n%-20s | %-20s | %15.0f | %-10s |", first_name[i], last_name[i], salary[i], Department[i]);
    end for

    // perform sorting on department, salary and last name. First name just follows.
    set_locale ( "nb_NO.UTF-8"); // Norwegian alphabet is used for sorting.
    sort_array ( < Department, < salary, < last_name, first_name);

    uS3 = uSec(); // measure time after sort

    // print the table after sorting.
    print "\n\nAfter sorting (Department, salary, last_name)";
    print format ("\n%-20s | %-20s | %-15s | %-10s |", "First Name", "last_name", "salary", "Department");
    print "\n" + "-"*76+"\n";
    for (i =1, sizeof (first_name))
        print format ("\n%-20s | %-20s | %15.0f | %-10s |", first_name[i], last_name[i], salary[i], Department[i]);
    end for

    // return the metrics.
    return format ( "Sql %ld, Sort %ld, Total %ld", uS2-uS1, uS3-uS2, uS3-uS1);
end
This gave the following output:
First Name           | last_name            | salary          | Department |
----------------------------------------------------------------------------
Efficient            | SQL Developer        |           30000 | DEV        |
Good                 | Teamplayer           |           35000 | SALE       |
Enormous             | Slacker              |           45000 | ADM        |
Coffee               | Drinker              |           30000 | DEV        |
Shiny                | Outfit               |           60000 | DEV        |
Lazy                 | Officeworker         |           20000 | ADM        |
Good                 | Driver               |           15000 | TRANSPORT  |
Smart                | Analyst              |           32500 | ADM        |

After sorting (Department, salary, last_name)
First Name           | last_name            | salary          | Department |
----------------------------------------------------------------------------
Lazy                 | Officeworker         |           20000 | ADM        |
Smart                | Analyst              |           32500 | ADM        |
Enormous             | Slacker              |           45000 | ADM        |
Coffee               | Drinker              |           30000 | DEV        |
Efficient            | SQL Developer        |           30000 | DEV        |
Shiny                | Outfit               |           60000 | DEV        |
Good                 | Teamplayer           |           35000 | SALE       |
Good                 | Driver               |           15000 | TRANSPORT  |
Then the return value from the function (number of microseconds for each operation) :
Sql 1802, Sort 170, Total 1972
.
Optimized sorting
We have optimized the sorting in two different ways to make this as quick as possible. The challenge is the UTF-8 characters in different countries and language settings. To make it sort correctly we have added a command to specify the language settings. The command set_locale do this. A very central function is to compare strings to determine their order. We have a two-step method for this. First we compare for pure ascii non-utf8 characters. If the order can be determined by this, we dont need the step-two. Usually the compare find the difference in the strings very early, often after det very first characters. If we hit a utf8-multi-byte sequence before the order is determined, we resort to the much more comprehensive compare where we use the locale to determine their order. As this happens rarely this is a valid optimization.
As you can have many grouped arrays to sort together, we make an index that we sort based on the selected criteria and direction first. Then when we have this index, we reorder all the arrays according to the index in the end. In this way, we reduce the need for moving data more than necessary.
The above example, we sorted four arrays with 8 rows in each. The function used only 170 uS, that is pretty fast. We then added some records with utf8 characters in the main sorting criteria. The sort time increased to 1600 uSec. Bøhaugen, Bøsvingen, Borgeresen - even that is pretty fast. Then we tried the same example on a table with Norwegian postal codes, names, Municipality nr, name, Category, containing 5 arrays of 5146 records in each, with mixed UTF-8 characters in many of the records. The sort time for this was 18 mS. That is also really fast.
SQL Sorting
SQL sorting by ORDER BY is an easy and effective approach. However, often data comes from other sources, like an import. Also, sometimes some processing of the data is needed before you can sort, so therefore we have the sort_array
Notes:
- It is important to include all the arrays in the group to keep consistency. It is easy to forget new arrays when adding fields to the query.
- Boolean arrays will be sorted as 0 and 1's
- Array types can be STRING, INTEGER, LONG, FLOAT, BOOL, DATE, TIME, TIMESTAMP, JSON, or XML. The JSON and XML type arrays will not be sorted but will follow.
- If the arrays are of different sizes, this will trigger an exception.
Back to top
Function: Set Locale
Introduced in ver 1.7.0.18
The set locale function is used to determine the sort order for strings that contain multi-byte UTF8 characters. Below is a table of the most used locale codes.
The ACF-Plugin handles UTF-8 text which is the standard FileMaker uses, without specifying the locale. However, in the case of sorting and comparing strings to determine order, the locale setting is important where multi-byte UTF8 characters are involved. If only ASCII strings (A-Z, 0-9 codes 0-127) are used, the locale setting is not important. The defaut locale is en_US.UTF8
Prototype:
set_locale (string language code);
Parameters:
| Parameter name | Type | Description |
|---|---|---|
| Language code | string | The language code on the format: <language>_<COUNTRY>.UTF-8 |
Often used language codes
When specifying language codes in the set_locale function with a UTF-8 suffix, it's important to use the correct syntax, which typically follows the pattern <language>_<COUNTRY>.UTF-8. This pattern specifies the language, country, and character encoding (UTF-8 in this case). It's important to use this format to ensure proper handling of character encoding, especially for non-ASCII characters.
| Language Code | Country | Language |
|---|---|---|
| en_US.UTF-8 | United States | English |
| en_GB.UTF-8 | United Kingdom | English |
| fr_FR.UTF-8 | France | French |
| de_DE.UTF-8 | Germany | German |
| es_ES.UTF-8 | Spain | Spanish |
| it_IT.UTF-8 | Italy | Italian |
| pt_PT.UTF-8 | Portugal | Portuguese |
| pt_BR.UTF-8 | Brazil | Portuguese |
| ru_RU.UTF-8 | Russia | Russian |
| ja_JP.UTF-8 | Japan | Japanese |
| zh_CN.UTF-8 | China | Chinese |
| zh_TW.UTF-8 | Taiwan | Chinese |
| ar_SA.UTF-8 | Saudi Arabia | Arabic |
| ko_KR.UTF-8 | South Korea | Korean |
| nl_NL.UTF-8 | Netherlands | Dutch |
| sv_SE.UTF-8 | Sweden | Swedish |
| nb_NO.UTF-8 | Norway | Norwegian Bokmål |
| nn_NO.UTF-8 | Norway | Norwegian Nynorsk |
| da_DK.UTF-8 | Denmark | Danish |
| fi_FI.UTF-8 | Finland | Finnish |
| pl_PL.UTF-8 | Poland | Polish |
| tr_TR.UTF-8 | Turkey | Turkish |
| el_GR.UTF-8 | Greece | Greek |
| he_IL.UTF-8 | Israel | Hebrew |
| hi_IN.UTF-8 | India | Hindi |
| zh_CN.UTF-8 | China | Chinese |
| zh_TW.UTF-8 | Taiwan | Traditional Chinese |
| ja_JP.UTF-8 | Japan | Japanese |
There are a lot more codes available. If you don't find yours in the list, send an email and we will find out.
Return value: No return value
Example:
// For Norwegian settings
set_locale ( "nb_NO.UTF8");
<br><hr>[Back to top](#toc_0)
<a id="A39956BB-0CFE-488E-9A13-4BA9DDE6A2DE"></a>
# Exception handling in the ACF plugin
Errors can occur in general from time to time. Being a file path the system uses that is not valid anymore, or a misformed SQL statement, a FileMaker calculation with errors in it returns the usual "?" as a function value instead of the expected content.
Some of the user-friendliness of an application is defined in how we deal with such errors.
In the ACF plugin, we have introduced a new construct for dealing with this, as you find in many other programming languages.
**The TRY / CATCH** error handler.
Take a look at this function:
- In the ACF language, if the `TRY` block executes without any errors, the `CATCH` block is bypassed. However, if an exception occurs—either due to an error in a function within the `TRY` block or a `THROW` statement—the execution immediately jumps to the `CATCH` block of the current function. This behavior effectively halts the call hierarchy and shifts control to the `CATCH` section where the TRY block is implemented, ensuring that exceptions are handled at the highest level in the call hierarchy where there is an exception handler.

The `WriteReport` function in the ACF language is working as intended with the `try/catch` and `try again` logic:
1. When an exception occurs in `open`, the catch block is triggered.
2. The `confirm` dialog lets the user decide whether to select a new file.
3. If the user chooses a new file and the `path` is not empty, `try again` is invoked to retry the file opening.
4. If the user cancels the file selection (resulting in an empty `path`), the function throws a new error and aborts.
This implementation correctly handles file opening errors and gives the user a chance to rectify the problem by choosing a new file path. The `try again` mechanism, along with a user-friendly confirm dialog, enhances the robustness of the function. The additional throw at the end ensures that the function does not proceed with an invalid file path.
<br><hr>[Back to top](#toc_0)
<a id="CE1A6D1E-F185-4915-BDD6-FADF3B87B4FF"></a>
# New functions in Plugin version 1.7.0
On this page, we document the additions to the ACF language presented in the current release or pre-release of the plugin available on our download area
The page will be updated with new functions as soon as they are released.
Current version: 1.7.0.1
## ACF-Language Built-in Function Reference for new plugin functions.
**HTTP\_GET**
- Description: Performs a GET request to the specified HTTP or HTTPS URL.
- Prototype: `string HTTP_GET(string url, string extraheaders, string authentication_header)`
- Parameters:
- `url`: The URL for the HTTP GET request.
- `extraheaders` (optional): Multiline string with one header per line for additional request headers.
- `authentication_header` (optional): Header for authentication.
- Return value: The text returned from the request or an error message.
**HTTP\_POST**
- Description: Performs a POST request to the specified URL with provided data.
- Prototype: `string HTTP_POST(string URL, string postData, string extraheaders, string authentication_header)`
- Parameters:
- `url`: The URL for the HTTP POST request. May use both http or https URLs
- `postData`: Data to be sent in the POST request.
- `extraheaders` (optional): Additional headers for the request.
- `authentication_header` (optional): Header for authentication.
- Return value: The text returned from the request or an error message.
**http\_basic\_auth**
- Description: Creates a basic authentication header, for use in HTTP\_GET and HTTP\_POST
- Prototype: `string http_basic_auth(string user, string password)`
- Parameters:
- `user`: Username for authentication.
- `password`: Password for authentication.
- Return value: Authentication header for use in HTTP\_GET and HTTP\_POST.
**base64\_encode**
- Description: Encodes text or binary data to Base64.
- Prototype: `string base64_encode(string TextOrBinaryToEncode, int options)`
- Parameters:
- `TextOrBinaryToEncode`: The text or binary data to encode.
- `options` (optional): Encoding options (0=default, 1=without line separators, 2=Base64URL with line separators, 3=Base64URL without line separators).
- Return value: string as base64 encoded text.
**base64\_decode**
- Description: Decodes Base64 encoded text.
- Prototype: `string base64_decode(string base64_encoded_text)`
- Parameters:
- `base64_encoded_text`: The Base64 encoded text to decode.
- Return value: Decoded text or binary as a string.
**base32\_encode**
- Description: Encodes text or binary data to Base32.
- Prototype: `string base32_encode(string TextOrBinaryToEncode)`
- Parameters:
- `TextOrBinaryToEncode`: The text or binary data to encode.
- Return value: string as base32 encoded text.
**base32\_decode**
- Description: Decodes Base32 encoded text.
- Prototype: `string base32_decode(string EncodedText)`
- Parameters:
- `EncodedText`: The Base32 encoded text to decode.
- Return value: Decoded text or binary as a string.
**confirm**
- Description: Displays a confirmation dialog with a message.
- Prototype: `bool confirm(string message, string YesButtonText, string NoButtonText)`
- Parameters:
- `message`: The message to display in the dialog.
- `YesButtonText` (optional): Text for the 'Yes' button.
- `NoButtonText` (optional): Text for the 'No' button.
- Return value: bool true or false, Yes button = true, No button = false.
**request**
- Description: Displays a request dialog with a message and input field.
- Prototype: `string request(string message, string defaultValue, string OKButton, string cancelButton)`
- Parameters:
- `message`: Message to display in the dialog.
- `defaultValue` (optional): Default value in the input field.
- `OKButton` (optional): Text for the 'OK' button.
- `cancelButton` (optional): Text for the 'Cancel' button.
- Return value: The user-supplied text or the defualtValue if only OK is pressed. If cancel is pressed, returns an empty string.
**ALERT**
- Description: Displays an alert dialogue with a message and a single OK button.
- Prototype: `ALERT ( string message )`
- Parameters:
- `message`: Message to display in the dialog.
- Return value: None, Use alert as a command.
**generate\_otp\_secret**
- Description: Generates a random 160-bit OTP secret as BASE32 encoded text.
- Prototype: `string generate_otp_secret()`
- Return value: The OTP secret.
**check\_otp\_code**
- Description: Verifies a 6-digit OTP code.
- Prototype: `bool check_otp_code(string secret, string UserSuppliedOTPcode, int windowSize)`
- Parameters:
- `secret`: The secret for OTP generation.
- `UserSuppliedOTPcode`: The user-supplied OTP code to verify.
- `windowSize` (optional): Window size for time slots validation. 1 gives the previous slot, the current slot, and next slot. 2 gives two previous slots, the current and the two next slots.
- Return value: true or false whether correct or wrong user-supplied code.
**get\_otp\_code**
- Description: Retrieves the current OTP code from a secret.
- Prototype: `string get_otp_code(string secret)`
- Parameters:
- `secret`: The secret for OTP generation.
- Return value: The code as a string.
## New Language Elements
**TRY/CATCH/TRY AGAIN/END CATCH**
- Provides structured exception handling in user code.
- `TRY`: Starts a block of code where exceptions are handled.
- `CATCH`: Catches exceptions thrown in the TRY block.
- `TRY AGAIN`: Optionally retries the TRY block.
- `END TRY`: Ends a catch block.
**LAST_ERROR**
- A system variable `LAST_ERROR` is available within a CATCH block that contains the last error message.
<br><hr>[Back to top](#toc_0)
<a id="866B731D-D8C2-4821-BB26-A62C5F0596A3"></a>
# Global Variables
Global variables are variables declared outside of functions and are accessible throughout the entire package. While they have specific use cases, it's generally discouraged to overuse them. Global variables can lead to issues when multiple processes access them simultaneously, potentially causing bugs in your application.
One common problem arises when a field calculation uses an ACF function that modifies global variables, and another function references this field directly or through a SQL function. In this scenario, the field calculation triggers while still within your ACF function, leading to changes in the global variables.
Here are some important considerations regarding global variables:
- Global variables are local to a package, which means different packages cannot share them.
- Global variables cannot be of array types because there is no initializer code to build arrays.
- Globals cannot be initialized in their declaration, as there is no initializer code. When the package loads, they are initialized to zero values.
- If you have several FMP12 files running in the same FileMaker process, function calls from different files will share global variables. The same applies to packages; once loaded from one file, the functions in it will be available to other databases running in the same FileMaker process.
## Alternatives to Using Globals
One alternative to global variables is to use FileMaker's `$$` variables. These variables can be set and read by script steps directly and can also be viewed in the Data Viewer. However, accessing `$$` variables from ACF functions may be slower than using built-in globals, as it involves the FileMaker calculation engine to set and get values. Therefore, using `$$` variables in loops with a high loop count is discouraged. While `$$` variables are shared between packages, they are local to the FMP file. FileMaker variables persist even after the ACF package is reloaded, while ACF globals do not.
ACF globals can be used to transfer global FileMaker variables from one FileMaker file to another running in the same process. This can be achieved by having setter and getter functions in ACF called from each file. Alternatively, you can traditionally share globals between files using global fields in tables.
## Example
```acf
package test_globals "Here we test the globals";
// Some global declarations.
string g_test1, g_test2;
// Functions using them.
function aa (string a)
// And some local variables inside the function:
string cc2 = "TestString local";
g_test1 = a;
g_test2 = a*2 + cc2;
return g_test2;
end
function bb ()
// g_test1 and g_test2 are available here, but cc2 is not.
print g_test1+"\n"+g_test2;
return "OK";
end
// Transfer globals between files
// ----------------------------------------------
string UserID, UserName, Initials;
// Setter:
function SetUserInfo ()
UserID = $$sys_user_id;
UserName = $$sys_user_name;
Initials = $$sys_initials;
return "OK";
end
// Getter - called from the other file.
function GetUserInfo ()
$$sys_user_id = UserID;
$$sys_user_name = UserName;
$$sys_initials = Initials;
return "OK";
end
This example demonstrates the use of global variables within an ACF package, including their declaration, usage within functions, and a mechanism for transferring global FileMaker variables between files running in the same process.
Back to top
Function: FileMaker Calculations
The core idea behind creating the ACF language is to seamlessly integrate FileMaker calculations into the language. This integration includes the following aspects:
- Access to FileMaker Variables
- Access to Field content in the current relationship graph
- Explicit handling of calculations by passing them over to the FileMaker Calculation engine to call custom functions or other types of calculations.
- Setting values to FileMaker variables.
- Note: Directly setting field content is not possible, but it can be achieved using SQL functions.
Examples:
// Get value from a FileMaker variable:
string fileName = $$FileName;

// Set a value back to a FileMaker variable:
$$FileName = fileName;

// Get Value from a field:
string rootPath = preferences::docRootPath;

// Get value from a field by constructing the table occurrence:
string PreferencesTable = "Orders_preferences";
rootPath = eval(PreferencesTable + "::docRootPath");

// Perform a FileMaker Calculation
string tempfolder = @Get(TemporaryPath)@;
// Alternatively, we have our own function.
tempfolder = temporary_directory();  // tempfolder already declared above....

// Performing a multi-line FileMaker calculation; if the calculation contains the @-sign,
// one must use this for One-liners as well.
string SQLresult = @@ExecuteSQL ( "Select blabla.....
WHERE blabla....
ORDER BY bla bla...."; "||"; "|*|")@@;

// Or - we could simply use the plugin's SQL-function directly without using the FM-engine:
string SQLresult = ExecuteSQL ( "Select blabla.....
WHERE blabla....
ORDER BY bla bla....", "||", "|*|");

// If you need to construct the calculation, you must use the "eval" function.
// as the @-notation expects a constant string.
int day = 14, month = 11, year = 2018;
string result = eval ( "Date(" + month + ";" + day + ";" + year + ")");

// or easier using the format function.
result = eval ( format ( "Date(%d;%d;%d)", month, day, year) ) ;
When working with FileMaker calculations, it's advisable to use the data viewer to construct the calculation. You can then paste it into your ACF code. This allows you to test and verify the expected results before integrating it into your code.
Regarding the @-notation or @@-notation, the content between the @ symbols is treated as a string literal and evaluated as a calculation by FileMaker when used in ACF functions. You cannot manipulate the content at runtime as it is executed immediately. To construct something for evaluation or include parameters, you can use the eval function, which evaluates a string expression.
One method to deal with variable content in these notations is to set FileMaker variables with the content you want and then use those variables in the calculation.
Error Handling:
FileMaker evaluations sometimes return a "?" if something goes wrong. In such cases, ACF will throw a runtime exception, aborting the function call, and returning a proper error message. This message includes the function it attempted to execute in plain text. These errors can sometimes be easy to overlook in regular scripting until you notice that something isn't working. It's essential to catch and handle these errors appropriately in your code.
Example:
ERROR: The FileMaker Evaluation returned an error (?) for the expression: Date ( 2018; 12; 9)
This section provides guidance on integrating FileMaker calculations seamlessly into your ACF code, highlighting important considerations and error handling practices.
Back to top
Function: Value Converters
ACF includes a set of common value converters that perform inline calculations. These converters are used just like functions, allowing you to easily convert values between different units and scales. Here are some examples of how to use value converters:
Example
// Calculate the distance to the moon - assuming it's 30 light seconds away
function moon_distanceKm()
    return lighty2m(1 / (365 * 24 * 60 * 2)) / 1000;  // 30 seconds
end

// Show temperature in three different units
function displayTemp(float temp)
    return format("Temp Celcius: %.1f, Farenheit: %.1f, Kelvin: %.1f", temp, c2f(temp), c2k(temp));
end
Value Converters
Here is a list of commonly used value converters in the ACF language:
Distance
| Function Name | Type of Argument | Type of Result | Formula | Description |
|---|---|---|---|---|
| in2cm | numeric | double | arg*2.54 | Inches to Centimeters |
| cm2in | numeric | double | arg/2.54 | Centimeter to Inches |
| chain2m | numeric | double | arg*20.1168 | Chain to Meters |
| fathom2m | numeric | double | arg*1.8288 | Fathom to Meters |
| furlong2m | numeric | double | arg*201.168 | Furlong to Meters |
| leage2m | numeric | double | arg*4828.032 | Leage to Meters |
| lighty2m | numeric | double | arg*9460730472581000.0 | Light year to Meters |
| m2chain | numeric | double | arg/20.1168 | Meters to Chain |
| m2fathom | numeric | double | arg/1.8288 | Meters to Fathom |
| m2furlong | numeric | double | arg/201.168 | Meters to Furlong |
| m2leage | numeric | double | arg/4828.032 | Meters to Leage |
| m2lighty | numeric | double | arg/9460730472581000.0 | Meters to Light year |
| angstrom2m | numeric | double | arg*1.0E-10 | Angstrom to Meters |
| m2angstrom | numeric | double | arg/1.0E-10 | Meters to Angstrom |
| au2m | numeric | double | arg*149597870700.0 | Astronomical unit to Meters |
| m2au | numeric | double | arg/149597870700.0 | Meters to Astronomical unit |
Volume
| Function Name | Type of Argument | Type of Result | Formula | Description |
|---|---|---|---|---|
| fldr2ml | numeric | double | arg*3.696691195313 | Fluid dram (fl dr) to milliliter (ml) |
| floz2l | numeric | double | arg*0.0295735295625 | Fluid ounce (fl oz) to liter (l) |
| UKfloz2l | numeric | double | arg*0.0284130625 | Fluid ounce (UK)(fl oz) to liter (l) |
| gal2l | numeric | double | arg*3.785411784 | Gallon (gal) to liter (l) |
| UKgal2l | numeric | double | arg*4.54609 | Gallon (UK)(gal) to liter (l) |
| gill2l | numeric | double | arg*0.11829411825 | Gill to liter (l) |
| USdryPk2l | numeric | double | arg*8.80976754172 | Peck (US dry) (pk) to liter (l) |
| pt2l | numeric | double | arg*0.473176473 | Pint (liquid) (pt) to liter (l) |
| UKpt2l | numeric | double | arg*0.56826125 | Pint (UK) (pt) to liter (l) |
| USdryPt2l | numeric | double | arg*0.5506104713575 | Pint (US dry) (pt) to liter (l) |
| qt2l | numeric | double | arg*0.946352946 | Quart (liquid) (qt) to liter (l) |
| UKqt2l | numeric | double | arg*1.1365225 | Quart (UK) (qt) to liter (l) |
| USdryQt2l | numeric | double | arg*1.101220942715 | Quart (US dry) (qt) to liter (l) |
| ml2fldr | numeric | double | arg/3.696691195313 | Milliliter (ml) to fluid dram (fl dr) |
| l2floz | numeric | double | arg/0.0295735295625 | Liter (l) to fluid ounce (fl oz) |
| l2UKfloz | numeric | double | arg/0.0284130625 | Liter (l) to fluid ounce (UK)(fl oz) |
| l2gal | numeric | double | arg/3.785411784 | Liter (l) to gallon (gal) |
| l2UKgal | numeric | double | arg/4.54609 | Liter (l) to gallon (UK)(gal) |
| l2gill | numeric | double | arg/0.11829411825 | Liter (l) to gill |
| l2USdryPk | numeric | double | arg/8.80976754172 | Liter (l) to peck (US dry) (pk) |
| l2pt | numeric | double | arg/0.473176473 | Liter (l) to pint (liquid) (pt) |
| l2UKpt | numeric | double | arg/0.56826125 | Liter (l) to pint (UK) (pt) |
| l2USdryPt | numeric | double | arg/0.5506104713575 | Liter (l) to pint (US dry) (pt) |
| l2qt | numeric | double | arg/0.946352946 | Liter (l) to quart (liquid) (qt) |
| l2UKqt | numeric | double | arg/1.1365225 | Liter (l) to quart (UK) (qt) |
| l2USdryQt | numeric | double | arg/1.101220942715 | Liter (l) to quart (US dry) (qt) |
Temperature
| Function Name | Type of Argument | Type of Result | Formula | Description |
|---|---|---|---|---|
| c2f | numeric | double | arg*9/5+32 | Celsius to Fahrenheit |
| f2c | numeric | double | (arg-32)*5/9 | Fahrenheit to Celsius |
| c2k | numeric | double | arg+273.15 | Celsius to Kelvin |
| f2k | numeric | double | (arg+459.67)*5.0/9.0 | Fahrenheit to Kelvin |
| k2c | numeric | double | arg-273.15 | Kelvin to Celsius |
| k2f | numeric | double | arg*9.0/5.0-459.67 | Kelvin to Fahrenheit |
Weight
| Function Name | Type of Argument | Type of Result | Formula | Description |
|---|---|---|---|---|
| amu2g | numeric | double | arg*1.6605402E-24 | Atomic mass unit (amu) to gram (g) |
| carat2g | numeric | double | arg/5.0 | Carat (metric) to gram (g) |
| cental2kg | numeric | double | arg*45.359237 | Cental to kilogram (kg) |
| dram2g | numeric | double | arg*1.771845195312 | Dram (dr) to gram (g) |
| grain2g | numeric | double | arg*0.06479891 | Grain (gr) to gram (g) |
| hundredwt2kg | numeric | double | arg*50.80234544 | Hundredweight (UK) to kilogram (kg) |
| N2kg | numeric | double | arg*0.1019716212978 | Newton (earth) to kilogram (kg) |
| oz2g | numeric | double | arg*28.349523125 | Ounce (oz) to gram (g) |
| dwt2g | numeric | double | arg*1.55517384 | Pennyweight (dwt) to gram (g) |
| lb2kg | numeric | double | arg*0.45359237 | Pound (lb) to kilogram (kg) |
| quarter2kg | numeric | double | arg*12.70058636 | Quarter to kilogram (kg) |
| stone2kg | numeric | double | arg*6.35029318 | Stone to kilogram (kg) |
| troyOz2g | numeric | double | arg*31.1034768 | Troy ounce to gram (g) |
| g2amu | numeric | double | arg/1.6605402E-24 | Gram (g) to atomic mass unit (amu) |
| g2carat | numeric | double | arg*5.0 | Gram (g) to carat (metric) |
| kg2cental | numeric | double | arg/45.359237 | Kilogram (kg) to cental |
| g2dram | numeric | double | arg/1.771845195312 | Gram (g) to dram (dr) |
| g2grain | numeric | double | arg/0.06479891 | Gram (g) to grain (gr) |
| kg2hundredwt | numeric | double | arg/50.80234544 | Kilogram (kg) to hundredweight (UK) |
| kg2N | numeric | double | arg/0.1019716212978 | Kilogram (kg) to newton (earth) |
| g2oz | numeric | double | arg/28.349523125 | Gram (g) to ounce (oz) |
| g2dwt | numeric | double | arg/1.55517384 | Gram (g) to pennyweight (dwt) |
| kg2lb | numeric | double | arg/0.45359237 | Kilogram (kg) to pound (lb) |
| kg2quarter | numeric | double | arg/12.70058636 | Kilogram (kg) to quarter |
| kg2stone | numeric | double | arg/6.35029318 | Kilogram (kg) to stone |
| g2troyoz | numeric | double | arg/31.1034768 | Gram (g) to troy ounce |
These value converters allow you to easily perform unit conversions within your ACF scripts, making it convenient to work with different units and scales.
Back to top
Function: The Format Function
The FORMAT function is used to create strings with mixed content. It takes a format string and a list of parameters to fill in the format specifiers. This function is similar to the C and C++ "sprintf" function and uses the same format specifiers. You can refer to the reference for sprintf for detailed documentation about the format specifiers.
Prototype:
<string> = format(<format string>, var1, var2, ...var-n);
Parameters:
| Parameter Name | Type | Description |
|---|---|---|
| format string | string | A string literal or variable containing the format string. |
| mixed list | any | A list of variables or constants separated by commas. The number of parameters must match the number of format specifiers in the format string. |
Return Value: Type String: A formatted string according to the format specifiers and the variables.
Commonly Used Format Specifiers:
| Format Specifier | Data Type | Options and Description |
|---|---|---|
| %s | string | The length of the string can be specified and padded using a number between the % and s. |
| %d | int | The length of the string can be specified and padded using a number between the % and d. %10d means space-padded right-justified field of ten positions. %010d means the same but zero-padded. %-10d means space-padded left-justified string of 10 positions. |
| %ld | long | Similar to %d, but for long integers. |
| %f | float or double | %10.2f means a float with ten positions and two decimal places, right-justified. %10f means no specified length but with two decimal places. |
Note: For variables of the types of date, time, and timestamp needing several format codes for each variable, the best option is to use the %s format specifier, and then use the string function to format the variable individually, using the spec found under that heading below.
Typical Use Cases:
The FORMAT function is commonly used for constructing return values, building SQL statements, creating FileMaker calculations, generating messages, and forming strings for data exports.
Example:
string s1 = "one", s2 = "two";
print format("This is a fixed string with three other strings in it 1:%s, 2:%s, 3:%s", s1, s2, "last is a constant string");

// Output to the console:
// This is a fixed string with three other strings in it 1:one, 2:two, 3:last is a constant string

// Format with dates in d.m.y format.
date today = now();
string formatted = format("Today is %s and tomorrow is %s", string(today, "%d.%m.%Y"), string(today + 1, "%d.%m.%Y"));
print formatted;

// Output to the console:
// Today is 12.11.2018 and tomorrow is 13.11.2018

// Converting SQL dates and using them in the format.
string sqlDate = "2018-11-12";
date myDate = date(sqlDate, "%Y-%m-%d");
print format("The SQL date is: %s, or in US format %s.", string(myDate, "%d.%m.%Y"), string(myDate, "%m/%d/%Y"));

// Output to the console:
// The SQL date is: 12.11.2018, or in US format 11/12/2018.
The FORMAT function allows you to create formatted strings with various data types and is useful for a wide range of applications, including working with dates, generating SQL statements, and formatting messages.
Formatting Date and Time values
For variables of type date, time, and timestamp, they can be formatted using the string function. The string function converts any data type to a string representation, and for date and time types you can have a second parameter: the format string. This adds flexibility to create strings in the desired format, like SQL format or any other format needed.
The following types of format specifiers can be used:
| specifier | Replaced by | Example |
|---|---|---|
| %a | Abbreviated weekday name * | Thu |
| %A | Full weekday name * | Thursday |
| %b | Abbreviated month name * | Aug |
| %B | Full month name * | August |
| %c | Date and time representation * | Thu Aug 23 14:55:02 2001 |
| %C | Year divided by 100 and truncated to integer (00-99) | 20 |
| %d | Day of the month, zero-padded (01-31) | 23 |
| %D | Short MM/DD/YY date, equivalent to %m/%d/%y | 08/23/01 |
| %e | Day of the month, space-padded ( 1-31) | 23 |
| %F | Short YYYY-MM-DD date, equivalent to %Y-%m-%d | 23.08.2001 |
| %g | Week-based year, last two digits (00-99) | 1 |
| %G | Week-based year | 2001 |
| %h | Abbreviated month name * (same as %b) | Aug |
| %H | Hour in 24h format (00-23) | 14 |
| %I | Hour in 12h format (01-12) | 2 |
| %j | Day of the year (001-366) | 235 |
| %m | Month as a decimal number (01-12) | 8 |
| %M | Minute (00-59) | 55 |
| %n | New-line character ('\n') | |
| %p | AM or PM designation | PM |
| %r | 12-hour clock time * | 2:55:02 pm |
| %R | 24-hour HH:MM time, equivalent to %H:%M | 14:55 |
| %S | Second (00-61) | 2 |
| %t | Horizontal-tab character ('\t') | |
| %T | ISO 8601 time format (HH:MM:SS), equivalent to %H:%M:%S | 14:55:02 |
| %u | ISO 8601 weekday as number with Monday as 1 (1-7) | 4 |
| %U | Week number with the first Sunday as the first day of week one (00-53) | 33 |
| %V | ISO 8601 week number (01-53) | 34 |
| %w | Weekday as a decimal number with Sunday as 0 (0-6) | 4 |
| %W | Week number with the first Monday as the first day of week one (00-53) | 34 |
| %x | Date representation * | 08/23/01 |
| %X | Time representation * | 14:55:02 |
| %y | Year, last two digits (00-99) | 1 |
| %Y | Year | 2001 |
| %z | ISO 8601 offset from UTC in timezone (1 minute=1, 1 hour=100) ** | 100 |
| %Z | Timezone name or abbreviation *, ** | CDT |
| %% | A % sign | % |
* The specifiers marked with an asterisk (*) are locale-dependent.
** If the timezone cannot be determined, no characters
Using format strings for parsing date, time, and timestamp
When you have a date, time, or timestamp value, it can be parsed using the function's date, time, or timestamp. Those functions convert a string into the appropriate format. Those functions have an optional second parameter: The format string. If the source string is a SQL formatted date, having "%Y-%m-%d" as the second parameter to the date function will parse the date correctly.
Back to top
Function: SQL Functions
The SQL functions in ACF come in two flavors. The first one is ExecuteSQL, which is similar to FileMaker's ExecuteSQL. While ACF does not use placeholders like "?," you can use the format function to create SQL statements with placeholders. ExecuteSQL returns a text result with column and row separators, similar to the FileMaker version. You can specify these separators as optional parameters (2nd and 3rd), with the default being a tab character for column separation and a carriage return (CR) for row separation.
New in Plugin version 1.7.0: You can instead of returning the data as a CSV, you can return a set of arrays, one for each column in your dataset. In this way, its easier than ever to work with the result set of exequteSQL. End the SQL with the keyword "INTO", and a comma separated list of declared arrays, each array prefixed with a colon.
Palceholders in SQL
(1.7.0 feature)
Sometimes when performing SQL queries, you need to have parameters in your SQL. Especially in the "WHERE" clause, but also in the "VALUES" part of an "INSERT" statement.
Instead of merging those values, checking that they are correctly formatted, you can simply use a variable prefixed with colon directly in the text of the SQL query. The variable type determines the formatting applied to the value when the plugin replace the placeholder in your SQL. Like this: (Also look at the Import data from Kimai articel, chapter 2 for illustrated use of this Placeholder logic and also the INTO statement
float salary = 10000.0;
$res = executeSQL ( "SELECT Name, Nr, Salary FROM Emplyees WHERE Salary > :salary");
One important difference:
The ExecuteSQL function supports SELECT, UPDATE, INSERT, and DELETE operations. It's ideal for cases where you want to select a single value or perform UPDATE, INSERT, or DELETE operations.
Working with the result set one record at a time
The second flavor consists of four functions:
- SQL_query: Executes the query and returns a handle to the result set.
- SQL_getRowCount (handle): Retrieves the number of rows found, typically used in a for-loop.
- SQL_getRow (handle, row_number): Retrieves a specific row from the result set as an array, allowing you to access individual columns.
- SQL_close (handle): Closes the result set and frees up memory.
A handle is an integer that identifies the SQL result set. It's important to understand that it's the integer value that identifies the result set, not the handle variable itself. You can return handles to FileMaker and use them in other functions or script steps. Always remember to close the handle when you're finished with it to avoid exceptions.
Prototypes:
string resultset = ExecuteSQL (string sql {, string column_sep {, string row_sep}});
int handle = SQL_query(string sql);
int number_of_rows = SQL_getRowCount(int handle);
array string row = SQL_getRow(int handle, row_number);
SQL_close(handle);
Definition of Parameter Types:
| Parameter name | Type | Description |
|---|---|---|
| sql | string | The SQL string to be executed. |
| handle | int | The identifier of the result set. |
| row_number | int | The row number, starting from 0. |
Example:
package SQLtest1 "Test SQL Functions"

/*
    In this test, we query the Contacts table for all rows, then loop through the recordset to
    update the "x" column with the loop counter.
    Then, we print to the console the ID, FirstName, LastName, the update statement,
    and the result from the update statement.
*/
function test_listitems()

    // SQL_query executes the SQL and provides us with a handle to the result.
    // This handle must be closed at the end.
    int x = SQL_query("SELECT ID, FirstName, LastName FROM Contacts");

    int num_rows = SQL_getRowCount(x);

    print format("Number of Contacts: %d\n", num_rows);

    int i;
    string res, upd;
    array string row;
    // We avoid declaring variables inside the loop.

    for (i = 1, num_rows, 1)

        // SQL_getRow returns an array, allowing us to access each column in the recordset individually.
        // The first parameter is the handle, and the second is the row number, starting with "0".
        row = SQL_getRow(x, i - 1);

        // Create the update SQL statement with placeholders using the format function.
        upd = format("UPDATE Contacts SET x=%d WHERE ID=%s", i, row[1]);

        res = ExecuteSQL(upd); // Execute the UPDATE; no need to close with this function.
        print format("ID: %s, First name: %s, Last name: %s - SQL='%s',  Result: %s\n", row[1], row[2], row[3], upd, res);

    end for

    // Close the handle.
    SQL_close(x);

    return "OK";
end

/* Test Result:
Number of Contacts: 2032
ID: 1000, First name: Ole Kristian Ek, Last name: Hornnes - SQL='UPDATE Contacts SET x=1 WHERE ID=1000',  Result:
ID: 1001, First name: Roffe, Last name: Hansen - SQL='UPDATE Contacts SET x=2 WHERE ID=1001',  Result:
ID: 10001, First name: Trond Harald, Last name: Hansen - SQL='UPDATE Contacts SET x=3 WHERE ID=10001',  Result:
...
...
*/
NOTE: When updating large datasets in a loop, the process can be time-consuming, and FileMaker may appear unresponsive until finished. To improve user experience, consider using a progress bar function before starting this function. This allows you to display a progress indicator during the operation. Typically, it's better to run the progress bar in a separate script step outside the ACF function. Starting the progress bar outside of ACF allows the script engine to control its display properly.
Getting the Insert-ID of Newly Inserted Records
To retrieve the insert-ID of a newly inserted record (useful when inserting related records into another table), consider the following methods:
- Use the
GetNextSerialValue(Get(FileName); "ID")function just before the insert if your table has a serial number as the key (works only for FileMaker tables, not ODBC data sources). - Insert a UUID into a separate field and use it in a new query to retrieve the ID.
- If the ID is UUID-based (e.g., PrimaryKey in new FMP17 tables), set the UUID in your insert and use it for related records.
- Avoid using
MAX IDas it can be resource-intensive and may not work if the table has records with higher IDs than the current serial number.
The first method may have concurrency issues if two processes insert into the same table simultaneously, so consider using the second or third method to avoid such problems.
References:
- FileMaker 17 SQL Reference
Back to top
mySQL Functions
Available in version 1.6.3.0 and up. Rewritten in 1.7.x for Windows.
The mySQL functions are similar to the SQL functions but connect to an external MySQL database instead of the internal FileMaker database. Those functions also come in two flavors. The first one is ExecuteMySQL, which is similar to the ExecuteSQL. The same parameters as ExecuteSQL, except an additional first parameter which is the connection handle returned from "mysql_connect". The other flavor is the four functions used for working on the SQL result set described below.
Both flavors have full support for SELECT, INSERT, UPDATE, and DELETE along with other MySQL commands. It uses these commands for connection:
- mySQL_Connect: Open a connection to an external MySQL database. Return a DB handle.
- mySQL_close (DB-handle): Closes the result set and Database connections and frees up memory.
The second flavor consists of four functions:
- mySQL_query(DB-Handle, sql): Executes the query and returns a handle to the result set.
- mySQL_getRowCount (handle): Retrieves the number of rows found, typically used in a for-loop.
- mySQL_getRow (handle): Retrieves a specific row from the result set as an array, allowing you to access individual columns.
- mySQL_close (DB-handle): Closes the result set and Database connections and frees up memory.
A DB-handle is an integer to identify the connection itself and is neccesary for the query. It is also the first parameter of the "ExecuteMySQL" function. The other handle that is named only "handle" is an integer that identifies the SQL result set. It's important to understand that it's the integer value that identifies the result set, not the handle variable itself. You can return handles to FileMaker and use them in other functions or script steps. Always remember to close the handles when you're finished with it to avoid exceptions.
The mySQL_getRow function differs a bit from the corresponding SQL_GetRow used for FileMaker database queries: It has no record number as the second parameter, as the records are fetched from start to end through a series of calls. For this command, you only supply the result-set variable.
Prototypes:
int DB_Handle = mysql_connect (string host, string port, string user, string password, string database_name );
string resultset = ExecuteMySQL (int DB_handle, string sql {, string column_sep {, string row_sep}});
int handle = mySQL_query(int DB_handle, string sql);
int number_of_rows = MySQL_getRowCount(int handle);
array string row = MySQL_getRow(int handle);
MySQL_close(DB_handle);
Definition of Parameter Types:
| Parameter name | Type | Description |
|---|---|---|
| sql | string | The SQL string to be executed. |
| handle | int | The identifier of the result set. |
| DB_handle | int | The identifier of the Database connection. |
| row_number | int | The row number, starting from 0. |
Example:
// One function to do the connection, so we don't have to scatter database credentials all over the source code.

function connect_support_db ()
    int db = mysql_connect ("<host>", "3306", "<user>", "<password>", "<database name>");
    return db;
end

// Testing just prints to console some content from a Support DB.

package MySQLtest1 "Test MySQL Functions"

function print_support_emails ()
    int db;
    db = connect_support_db (); // The function at the top

    int x = mysql_query ( db, "SELECT * FROM c1support.ost_email;");
    int i, y = mysql_getrowcount ( x );
    print "row count: " + y + ", res-set id: " + x;
    array string row;
    for ( i=1, y)
        row = mysql_getrow ( x );
        print  row['email'] + "\n";
    end for
    mysql_close ( db );
    return "OK";
end
References:
- MySQL reference found on Oracle's website.
- See the example section for "MySQL connection from ACF" for additional examples.
Back to top
Command: FunctionID
The FunctionID command allows you to register a function as a plugin function, making it accessible using just ACFU_function_name instead of ACF_run("function_name"). This is particularly useful for frequently used functions as it provides the prototype as an autocomplete option when used in FileMaker. Functions used internally as helper functions within another ACF function do not require FunctionID; it's mainly for functions intended to be used directly in FileMaker calculations.
When functions are used within another ACF function, no prefixing is necessary. The prefixing only applies when calling functions from FileMaker calculations.
Parameters:
| Parameter name | Type | Description |
|---|---|---|
| ID | Number constant | A unique constant between 200 and 32767 that identifies the function. |
It's essential to manage these function IDs systematically, maintaining a record of them in a database or spreadsheet. Avoid sharing the same function ID among different functions. Changing the function ID can break script steps that use it, so stick with the function ID once it's assigned.
When you receive ACF sources from another developer, check that their function IDs don't conflict with yours. Renumber functions from external sources if needed to prevent overlap. Avoid accepting binary packages from other developers, as it can make maintenance challenging. Future plugin releases might require you to recompile sources. Binary packages are suitable for deployment in end-user applications.
We automatically prefix all function names with ACFU_ when they are used in FileMaker script steps. This serves several purposes:
- It prevents accidental naming conflicts with other FileMaker functions or plugin functions, ensuring a unique namespace for your functions.
- In the calculation editor, it provides an autocomplete feature with a shorter list, making it easy to find and select your functions.
- When reviewing the source code of your FileMaker script, it makes it straightforward to identify calls to ACF functions.
Screenshots:


Return value:
No return value
Example:
function abc ( int a, int b )
    functionID 10232;

    return format ( "The value of a is %d, and b is %d", a, b);
end
Then later, the function can be called using:
Set Variable ($x; ACFU_abc (2, 3) )
Pros and Cons:
There are pros and cons to registering functions with a "FunctionID." The most obvious benefit is easy access to functions in the FileMaker development environment, along with convenient access to function prototypes to fill in parameters. However, you need to ensure that your code is loaded in the startup script so that it's available during development.
The cons include the need to have functions loaded continuously while developing. If you edit a script without loading your ACF code and save it, the script will display "ACF_run, such issues result in a runtime error only when running the script.
The ACF_GetAllPrototypes function provides a handy list of loaded prototypes, allowing you to copy and paste them into an accessible document for reference.
References:
- No references
This section explains how to use the FunctionID command to register functions as plugin functions, the benefits of doing so, and considerations when working with function IDs. It also provides examples and discusses the pros and cons of this approach.
Back to top
Function: Regular Expressions
There are four regex functions:
regex_match: Compares a string with a regular expression, returning true if the entire string matches, otherwise false.regex_search: Searches a string for a regex pattern and returns the position of the found string or -1 if not found.regex_extract: Retrieves an array of extracted content. If the expression contains groups, the function returns all the groups as a delimited list. The first line is the full match, and the groups follow on successive lines. The default delimiter is a line-feed character, but another can be specified.regex_replace: Replaces a match with specified content. The replace string may contain\1,\2, etc., to refer to groups in the match. If the pattern is not found, the original subject is returned.
Prototypes:
bool = regex_match ( <regex string>, <subject> );
int = regex_search ( <regex string>, <subject> );
array string = regex_extract ( <regex string>, <subject>{, <group delimiter>} );
string = regex_replace ( <regex string>, <subject>, <replace> );
Parameters:
| Parameter Name | Type | Description |
|---|---|---|
| regex string | string | A string containing a regular expression pattern. |
| subject | string | The text to search in. |
| replace | string | Only for regex_replace: The new string to replace, which can contain references to the groups. |
| group delimiter | string | When using regex_extract, the return value is an array with matches. If the pattern contains groups, the groups are delimited with this delimiter. This parameter is optional, and the default value is "\n" (line-feed character). |
Return values:
regex_match: Returns true or false if found or not.regex_search: Returns the position of the string.regex_extract: Returns an array with the query result.regex_replace: Returns the modified string.
Example:
// Replace a path with a standardized new path, keeping the filename.
string fn = "/users/ole/Documents/mytestfile.txt";
string newfn = regex_replace("^(.+)/(.+)\..+$", fn, "/users/ole/result/\2.restype");

// The newfn now contains: /users/ole/result/mytestfile.restype
Example 2: Check Email Address (RFC 5322 Official Standard):
function check_email(string email)
    string regex = "(?:[a-z0-9!#$%&'*+/=?^_`{|}~-]+(?:\.[a-z0-9!#$%&'*+/=?^_`{|}~-]+)*|\"(?:[\x01-\x08\x0b\x0c\x0e-\x1f\x21\x23-\x5b\x5d-\x7f]|\\[\x01-\x09\x0b\x0c\x0e-\x7f])*\")@(?:(?:[a-z0-9](?:[a-z0-9-]*[a-z0-9])?\.)+[a-z0-9](?:[a-z0-9-]*[a-z0-9])?|\[(?:(?:25[0-5]|2[0-4][0-9]|[01]?[0-9][0-9]?)\.){3}(?:25[0-5]|2[0-4][0-9]|[01]?[0-9][0-9]?|[a-z0-9-]*[a-z0-9]:(?:[\x01-\x08\x0b\x0c\x0e-\x1f\x21-\x5a\x53-\x7f]|\\[\x01-\x09\x0b\x0c\x0e-\x7f])+)\])";
    return regex_match(regex, email);
end
Normalize Name Using Regex_Replace:
In this example, we normalize a name. If it's written as last name, first name(s), we reverse it and remove any commas. If there is no comma, we don't modify it.
The regex contains two capture groups: the first word and the remaining words. However, there must be a comma in between for the regex to match. If matched, we replace the whole thing with \2 (meaning the second group) and \1 (meaning the first).
function NormaliseName(string Name)
    Name = regex_replace("(\w+),\s?(.+)", Name, "\2 \1");
    return Name;
end

// Hornnes, Ole Kristian => Ole Kristian Hornnes
// Hornnes Ole Kristian => Hornnes Ole Kristian
Example RegEx_Extract:
In this example, we extract some emails and names from a list. Each entry in the resulting array has a delimited list of groups. The first is the whole match, followed by the groups. We have chosen "::" as the group delimiter in this example, but it can be anything. If you are looping through the array, you can use the explode function to create a new array for each iteration in the loop. This way, you can work on each match and put the data where it belongs.
Usually, a two-dimensional array would fit here, but that is not yet available in ACF.
Sample text:
Hornnes, Ole Kristian ole@example.no
Bjarne hansen bjarne@b.com
Borre Josefson borre@j.com
Extract Function:
Function testExtract(string source)
    source = substitute(source, "\r", "\n");
    string regex = "([A-Za-z, ]+)\s([a-z]+@[a-z]+\.[a-z]{2,3})";
    array string results = regex_extract(regex, source, "::");
    int l = sizeof(results);
    int i;
    for (i = 1, l)
        print "Line " + i + ":" + results[i];
        print "\n";
    end for
    return implode("||", results);
end
Console output:
Line 1:Hornnes, Ole Kristian ole@example.no::Hornnes, Ole Kristian::ole@example.no
Line 2:Bjarne hansen bjarne@b.com::Bjarne hansen::bjarne@b.com
Line 3:Borre Josefson borre@j.com::Borre Josefson::borre@j.com
New to Regular Expressions?
Regular expressions, often abbreviated as regex, are powerful tools for text manipulation and error checking. While they can be challenging to read for those unfamiliar with them, gaining knowledge about regular expressions can save you hours of work and improve code quality.
A regex pattern is a set of rules for interpreting string data, with each character in the pattern having a specific meaning. For those looking to learn more about regular expressions, consider the following resources:
- Lynda.com offers a comprehensive regex course that is well worth a few hours of your time.
- regex101.com provides an online regex editor and testing tool, complete with excellent documentation and explanations for each character in your regex pattern.

References:
- The Regex101 website contains regex documentation and a testing tool.
Back to top
Debugging Your Code
Debugging in ACF may not offer a traditional step-through debugging experience, but there are two essential features designed to help you debug your code effectively:
Print Statements: You can insert "print" statements within your code to output information to the console. These print statements don't affect the function's return value but are invaluable for debugging purposes.
Plugin Function ACF_GetConsoleOutput: This function allows you to retrieve the printed output and store it in a text field, variable, or any suitable storage location. The console output can also be monitored using the Data Viewer.
In addition to these features, you can assign values to global FileMaker variables to monitor plugin execution without relying on the console function. It's important to note that each call to ACF_run will reset the console.
Example:
string a = "this is a string";
int b = 22;
float c = 100.36;
print format ( "Variables a, b, c: %s, %d, %10.2f \n", a, b, c );

// Using the plugin function ACF_GetConsoleOutput lets you retrieve this text:
Variables a, b, c: this is a string, 22,     100.36
In this example, "print" statements are used to display variable values in the console. You can then use ACF_GetConsoleOutput to retrieve this printed information, aiding you in debugging your ACF code.
This section explains the debugging capabilities within ACF, including how to use print statements and retrieve console output, which can be invaluable for debugging your code effectively.
Back to top
Translation
Translation functions
The ACF plugin (v1.7.6.0) + DDRparser (v1.2.0) provide a simple, professional workflow for translating FileMaker solutions using standard POT/PO files.
Terminology
POT file (PO template)
A POT file is a template containing only source strings (no translations). DDRparser extracts _("…") / _n("…") calls and writes them to messages.pot. Tools then merge new strings into existing POTs so nothing already collected is lost.
Keep your POT under version control; other PO files are updated from it.
PO file
A PO file contains translations for one language. It has the same format as POT, but msgstr is filled in. Tools like Poedit (or hosted TMSes) can “Update from POT” to add new strings without overwriting existing translations.
Plugin functions
The functions exist both as FileMaker calculation functions and in the ACF language; names and behavior are identical.
_( text {; arg…} )
Purpose: Translate a single string using the currently loaded language.
- Parameters:
text— the source string (msgid). Optionalarg…— values for numbered placeholders%1,%2, … (order matters). - Returns: The translated string. If missing, returns the original
textand records the “miss” internally (you can merge misses into the POT later). - Notes: Lookups are fast (hash-map). FileMaker calcs using plugin functions are unstored.
Example
// EN source
_( "Overwrite file “%1”?" ; Packages::FileName )

// NB translation might reorder:
"«%1» vil bli overskrevet. Fortsette?"
Example (Show custom dialog)
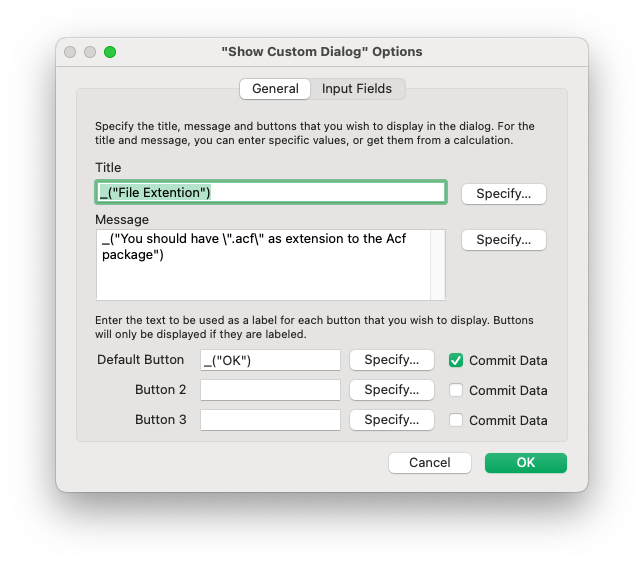
The PO file for the Norwegian text contains:
msgid "You should have \".acf\" as extension to the Acf package"
msgstr "ACF-pakken bør ha «.acf» som filendelse"
Then the dialogue shows the Norwegian text like this:
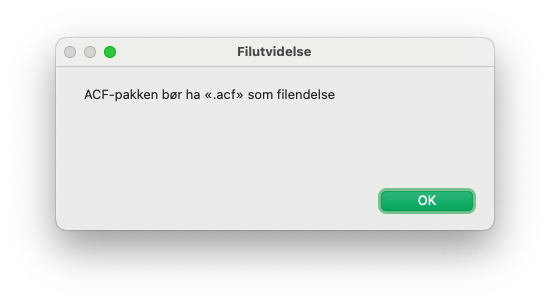
_n( singular ; plural ; count {; arg…} )
Purpose: Translate strings with singular/plural variants.
- Parameters:
singular,plural,count, optional placeholders. - Returns: Chooses
singularwhencount = 1, otherwiseplural, then applies placeholders.
Example
_n( "%1 item" ; "%1 items" ; Items::Count ; Items::Count )
Loading and resetting translations
ACF_Load_TranslationPO( pathOrTextOrContainer )
Purpose: Load/merge a .po file into memory so _()/_n() can translate.
Parameter 1 (required):
- Text path to a
.pofile or - Raw PO text or
- Container holding the PO (prefer TEXT part; falls back to FILE part).
- Text path to a
Returns:
"OK"on success, otherwise an error string.
Typical usage
// Load from a container field in Languages table.
ACF_Clear_Translation
ACF_Load_TranslationPO ( Languages::PO )

// Or from disk (client or server-accessible path).
ACF_Clear_Translation
ACF_Load_TranslationPO ( Get ( DocumentsPath ) & "i18n/en.po" )
Encoding: UTF-8 (BOM handled). Hosted files: If evaluated on Server, ensure the path is reachable by the Server. Session scope: Loads into the calling client’s process; call again after switching user/language.
ACF_Clear_Translation()
Purpose: Clear the in-memory translation catalog and the internal “missing strings” set.
- Parameters: none
- Returns:
"OK" - When to use: Before loading a different language, on logout/login, or to reset state during development.
Updating the POT from runtime “misses”
ACF_UpdatePOT( pathToPot )
Purpose: Append any missing strings encountered at runtime (calls to _() / _n() that had no translation) to your POT file. This complements DDRparser by capturing strings you exercised in the UI but hadn’t yet extracted.
- Parameter:
pathToPot— POSIX/absolute path to themessages.potyou want to update (e.g.,/Users/me/Project/TranslationFiles/messages.pot). - Returns:
"OK"on success, otherwise an error string.
What it does
- Loads the existing POT if present.
- Adds all unique runtime-missing
msgids(no duplicates). - Does not remove existing entries; it’s additive.
- Writes the POT back to disk.
- Clears the internal “missing” set so the same keys aren’t re-added next time.
Keep the POT under version control. After
ACF_UpdatePOT, commit changes and let translators update from POT in Poedit.
When to call it
- After a dev/test pass, where you navigated the app and saw base-language strings.
- Right before handing off to translators, to ensure POT completeness.
Recommended path handling (store it once)
Keep a global field (e.g., Settings::gPOTPath) with the POT’s POSIX path so updates are one click.
Set once
Set Field [ Settings::gPOTPath ;
   ACFU_SelectFileOnly( ""; _("Select POT file from the translation project (messages.pot)") ) ]
Update button/script
If [ not IsEmpty ( Settings::gPOTPath ) ]
  ACF_UpdatePOT ( Settings::gPOTPath )
  Show Custom Dialog [ "POT updated" ; "New strings (if any) were merged into the template." ]
Else
  Show Custom Dialog [ "Missing path" ; "Set Settings::gPOTPath first." ]
End If
Notes
- Ensure the path is writable by the client (or Server, if evaluated there).
- Call
ACF_UpdatePOTbeforeACF_Clear_Translationif you want to capture the session’s misses.
End-to-end workflow
Author: Put strings inline in calcs/layouts:
_("Orders"); _("Overwrite “%1”?" ; FileName)
_n("%1 item" ; "%1 items" ; n ; n)
Extract: Run DDRparser →
TranslationFiles/messages.pot.Translate: Use Poedit (or any PO tool) to create/update
xx.po.Load: In FileMaker, run:
ACF_Clear_Translation
ACF_Load_TranslationPO ( Languages::PO )   // from container
Iterate: Missing strings show in base language. Optionally call
ACF_UpdatePOT ( pathTo/messages.pot )to merge runtime misses into the POT, then update POs in Poedit.
Best practices
- Use placeholders (
%1,%2) instead of concatenation — translators can reorder naturally. - Keep msgids stable: avoid trailing spaces/typos; fix early (Poedit can fuzzy-match during updates).
Layout text (FM 20+): Use Layout Calculation:
<<ƒ:_("My orders")>>Value lists: plugin calcs are unstored (not indexable). If you need a value list from translated text, use a stored “shadow” field refreshed by script (Replace Field Contents) or build a per-session UI list.
Mini script: switch language (container-based)
# Assumes Languages table with Name + PO container

# Script: SwitchLanguage
ACF_Clear_Translation
ACF_Load_TranslationPO ( Languages::PO )
# Optionally refresh any stored “_forVL” fields here, refresh window, etc.
Editing in POedit
The Poedit application is free, but you can add some good addition that helps you in the translation work for a low subscription fee. Here is how it look like:
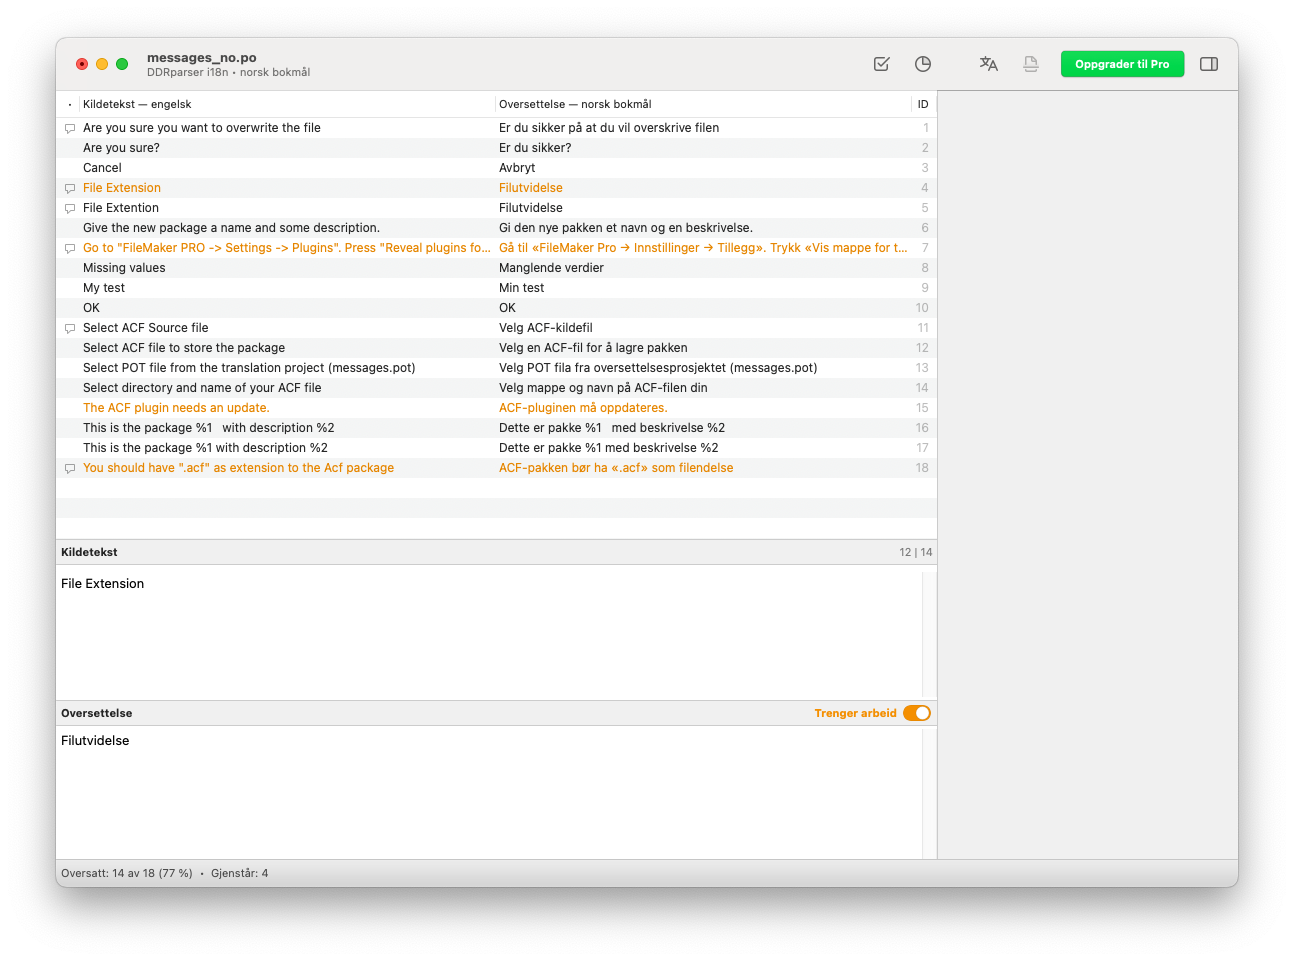
It can be downloaded from https://poedit.net/download
Using DDRparser 1.2.0 to generate and update the POT
DDRparser is a free command-line utility we have made. The command line switch -t tells DDRparser to update the POT by scanning the produced text files. In addition, DDRparser’s default job is to generate a searchable file tree (plain-text files for each script, layout, custom function, etc.), which makes reviews and diffs easy.
We strongly recommend keeping the POT at: (The DDR parser allready places this file correctly)
…/<YourOutput>/TranslationFiles/messages.pot
In other words, beside the solution folders (not inside them). This way, both sources can write to the same file:
- DDRparser
-t(extracted strings from code) ACF_UpdatePOT(runtime misses from users/testers)
Nothing “gets lost in translation”. 🙂
Typical workflow
Run DDRparser (generate text + update POT)
DDRparser \
 -i "/path/to/Summary.xml" \
 -f "/path/to/ProjectRoot/Parsed" \
 -t
What this does
- Creates/updates the readable export here (solution name is taken from the DDR):
ProjectRoot/Parsed/<SolutionName>/… - Creates/updates the POT here (shared across solutions in the same project):
ProjectRoot/Parsed/TranslationFiles/messages.pot
Notes
-fsets the target folder;SolutionNameis auto-derived from the parsed DDR.-tis additive: it scans the produced text and adds new msgids tomessages.pot(no deletions).Keep a global with the POSIX path to the POT (e.g.,
Settings::gPOTPath = /path/to/ProjectRoot/Parsed/TranslationFiles/messages.pot) so a button can call:ACF_UpdatePOT ( Settings::gPOTPath )to merge runtime “misses” into the same template.
- Creates/updates the readable export here (solution name is taken from the DDR):
Translate Open
messages.potin Poedit (or your TMS) → create/updatenb.po,ja.po,de.po, … (Poedit: Catalog → Update from POT… preserves existing translations and adds the new ones.)Load in FileMaker In your app/script:
ACF_Clear_Translation
ACF_Load_TranslationPO ( Languages::PO )    // from a container.
# or
ACF_Load_TranslationPO ( Settings::gPOPath )  // from disk.
Catch any misses during testing If you see base-language strings while clicking around, append them to the POT:
ACF_UpdatePOT ( Settings::gPOTPath ) // points to …/TranslationFiles/messages.potThen “Update from POT” again in Poedit and fill the new entries.
Recommended structure
ProjectRoot/
  Parsed/
    SolutionName/                               # DDRparser text output (safe to re-generate)
    TranslationFiles/
        messages.pot              # canonical template
        nb.po
        de.po
        ja.po
        en.po
        …
Keep messages.pot and your *.po files under version control. Re-running DDRparser with -t is additive—it won’t delete existing entries; it only adds new msgids it finds.
Tips & best practices
- Use placeholders
%1,%2, … in source strings; translators can reorder naturally. - Keep msgids stable (avoid typos/trailing spaces) for clean diffs and fewer fuzzy matches.
- Layout text (FM 20+): use Layout Calculation →
<<ƒ:_("My orders")>>. - Value lists: if you need translated, indexable lists, populate a stored “shadow” field via
Replace Field Contentson language change. Store the POT path once: a global like
Settings::gPOTPath(POSIX path) makes the “Update POT” button trivial:If [ not IsEmpty ( Settings::gPOTPath ) ] ACF_UpdatePOT ( Settings::gPOTPath ) End IfOptional references: if you enabled reference capture in DDRparser, you’ll see
#:lines in the POT (great context for translators).
With this loop—extract → translate → load → update POT from misses—your strings stay discoverable, your translators stay happy, and your app stays multilingual without schema gymnastics.
In short, missed hits turn dynamic text into a guided capture pass: anything DDRparser can’t infer at parse time (because it’s built from data or calcs) is collected the first time it’s shown at runtime. Keep your msgids stable by using numbered placeholders so only the data varies, then run a light sweep (e.g., loop products/categories) to exercise those screens. Finish with ACF_UpdatePOT to merge the unique misses into Parsed/TranslationFiles/messages.pot—store that POT’s POSIX path once in a global (e.g., Settings::gPOTPath) for a one-click update. Translators update the .po, you reload with ACF_Load_TranslationPO, and you’re done. Remember: misses are per session and cleared by ACF_Clear_Translation, so call ACF_UpdatePOT before clearing; it’s additive and safe to run repeatedly (no overwrites, no duplicates).
Case: Producing foreign invoices with translated product names.
Generating translation for product names.
Let's say you have a product table with 5000 products. You just need to generate "missed hits" for the product names. Either looping the products or using some other means to collect the strings:
Show All Records
Go to Record/Request/Page [First]
loop
     set variable [$name; _(Products::name)]
   Go to Record/Request/Page [next; exit after last]
end loop
After the loop is finished, we have missed hits for all unique product names.
Use the ACF_UpdatePOT as described above to add the names to the POT file.
Using an AI service to do the actual translation, inspect the result, edit and save to the language PO file. Load it into the container, and reload.
Now, you can use a layout calculation on the invoice layout to display the translated product name:
<<ƒ:_(InvoiceLines::ProductName)>>
Or, you can add a calculated field, unstored, calculation like above, then include this field on the invoice.
If you later add products to the table, and you see invoices with some items not translated. Update the POT, translate, reload and print the invoice again.
Back to top
EXCEL Spreadsheet functions
ACF-Plugin Functions for Excel Spreadsheets
Introduction
The ACF-Plugin introduces a robust set of functions and commands to work with Excel spreadsheets in the XLSX format. This functionality lets you create, manipulate, and style spreadsheets directly within your ACF workflows. There are two primary use cases:
- Creating New Excel Spreadsheets: Fully generate new XLSX files with custom content and styles.
- Opening and Altering Existing Spreadsheets Extend functionality to open existing spreadsheets for editing.
Commands and Functions
Functions for Creating and Managing Excel Files
Excel_Create
- Syntax:
int Excel_Create(string path {, NameOfSheet}) - Description: Creates a new Excel spreadsheet from scratch.
- Parameters:
path: The file path for the new spreadsheet. The file extension must be.xlsx, e.g.,~/Desktop/MyExcelFile.xlsx.NameOfSheetOptional, Name of the first sheet in the workbook. If not given, it will be "Sheet1".
- Returns: An
Excel_IDto reference the created spreadsheet.
Example (With some checking of overwrite an existing file):
Function TestExcel (string path)
    string res;
    if ( path == "") then
        return "No path";
    end if
    if ( file_exists ( path)) then
        if ( confirm ("File exists, do you really want to overwrite it?")) then
            res = delete_file (path);
        else
            return "File Exists";
        end if
    end if
    int wb = Excel_create ( path);
Excel_Open
- Syntax:
int Excel_Open(string path, string Access mode) - Description: Opens an existing spreadsheet for importing or manipulationg content.
- Parameters:
path: The file path for the new spreadsheet. The file extension must be.xlsx, e.g.,~/Desktop/MyExcelFile.xlsx.Access modeThe only supported mode is "r", read access. For Saving, useExcel_SaveWorkbookAs
- Returns: An
Excel_IDto reference the opened spreadsheet.
Example:
Function TestOpenExcel (string path)
    string res;
    if ( path == "") then
        return "No path";
    end if
    if ( ! file_exists ( path)) then
        throw "No such file: " + path
    end if
    int wb = Excel_Open ( path, "r");
Excel_SetMetaData
Note: This function is mandatory .
Syntax:
Excel_SetMetaData(int Excel_ID, JSON metadata)Description: Sets metadata for the Excel file, such as author, creation date, or modification date.
Parameters:
Excel_ID: The ID of the Excel file.metadata: JSON object containing metadata fields.
Example:
Excel_SetMetaData (wb, JSON ("Author", "Me(Ole)","Created", now(), "Changed", now()));
Excel_Close
- Syntax:
Excel_Close(int Excel_ID) - Description: Writes the content into the Excel file and closes it. This is usually the last thing to do.
- Note: If the file was opened with Excel_Open with accessmode "r", the file is not saved.
- Parameters:
Excel_ID: The ID of the Excel file.
Example:
    Excel_Close(wb);
    return "OK";
end
Excel_SaveAsWorkbook
- Syntax:
Excel_SaveAsWorkbook(int Excel_ID, string path) - Description: Writes the content into a new Excel file without closing the current one. This is usually the last thing to do.
- Parameters:
Excel_ID: The ID of the Excel file.path: The path of a new file. It cannot be the same as the original since it is still open.
- Note: The original file must still be closed with
Excel_Close
Example:
    Excel_SaveAsWorkbook(wb, "~/Desktop/MyNewExcelFile.xlsx");
  Excel_Close (wb);
    return "OK";
end
Functions for Working with Worksheets
Excel_Add_Worksheet
- Note: The
Excel_Createfunction automatically adds one worksheet. Use EXCEL_GetSheetID to obtain its ID. - Syntax:
int Excel_Add_Worksheet(int Excel_ID, string name) - Description: Adds a new worksheet to the Excel file.
- Parameters:
Excel_ID: The ID of the Excel file.name: The name of the worksheet.
- Returns: A
Worksheet_IDto reference the worksheet.
Example:
int s2 = Excel_Add_Worksheet(wb, "Second sheet");
Exel_GetSheetID
- Syntax:
int EXCEL_GetSheetID(int Excel_ID, int SheetNumber) - Description: Retrieves the Sheet ID for a specific sheet within a workbook. The Excel_Create function automatically adds a sheet to the workbook. This function can be used to retrieve its SheetID.
- Parameters:
Excel_ID: The ID of the workbook containing the sheet.SheetNumber: The number of the sheet to retrieve (1-based index).
- Returns: The
SheetIDcorresponding to the specified sheet in the workbook.
Example:
int s1 = EXCEL_GetSheetID(wb, 1);
Excel_GetSheetName
- Syntax:
string Excel_GetSheetName ( SheetID ) - Parameters:
SheetID: The ID of the sheet
- Return Value:
- A string containing the sheets name (name of the tab in Excel)
Example:
acf
string SheetName = Excel_GetSheetName (sheet);
Excel_SetColumnWidth
- Form 1 Syntax:
Excel_SetColumnWidth(int SheetID, array columnWidths) - Form 2 Syntax:
Excel_SetColumnWidth(int SheetID, int column, float columnWidth) - Description: Sets the widths of the columns in the worksheet. Default width is 10.
- Parameters:
SheetID: The ID of the worksheet.columnWidths: An array of integers or floats specifying the widths for each column.column: Column numbercolumnWidth: a float for setting the with for a single column.
Example:
    array float cw = {10,30,40,10,15.5};
    Excel_SetColumnWidth (s1, cw);
Functions for Populating Cells
Excel_setCell
- Syntax:
Excel_setCell(int SheetID, int row, int column, value{, string styleName}) - Description: Sets the value and style for a specific cell in the worksheet.
- Parameters:
SheetID: The ID of the worksheet.row: The row number of the cell.column: The column number of the cell.value: The value to insert into the cell.- The type of value determines the type of cell.
- string value creates text cells,
- Int, long or float creates numeric cells
- Date, time, timestamp creates their corresponding cell types.
- bool creates boolean cell.
styleName: The name of the style to apply to the cell. Default style is "Default". Numberformat, borders, fillcolor, color, alignment is all defined in the selected style.
Example:
Excel_setCell ( s, 1, 1, "Excel sheet header", "H1");
Note: Setting a cell with an empty string creates an empty cell, still having the style applied. This is useful for colored areas with no content, in this example, we have a long text in the first column that is styled with a grey background. The content float over to the next cells. To have the cells in column 2-5 styled with the same color, we use this technique.
    Excel_setCell ( s, 2, 1, "Excel sheet subheader ", "Ctitles");
    Excel_setCell ( s, 2, 2, "", "Ctitles");
    Excel_setCell ( s, 2, 3, "", "Ctitles");
    Excel_setCell ( s, 2, 4, "", "Ctitles");
    Excel_setCell ( s, 2, 5, "", "Ctitles");
Excel_setCellFormula
- Syntax:
Excel_setCellFormula(int SheetID, int row, int column, string formula, string styleName) - Description: Sets a formula for a specific cell in the worksheet.
- Parameters:
SheetID: The ID of the worksheet.row: The row number of the cell.column: The column number of the cell.formula: The formula expression (e.g.,SUM(A1:A10)).styleName: The name of the style to apply to the cell.
Example:
    currentRow++;i++;
    Excel_setCell ( s1, currentRow, 1, "SUM for this order", "SumLine");
    Excel_setCell ( s1, currentRow, 2, "", "SumLine");
    Excel_setCell ( s1, currentRow, 3, "", "SumLine");
    Excel_setCell ( s1, currentRow, 4, "", "SumLine");
    string formula = format("SUM(%s)", Excel_SheetAddress (3,5,currentRow-1,5));
    Excel_setCellFormula ( s1, currentRow, 5, formula, "SumLine");
Excel_SetColumns
Syntax:
Excel_SetColumns ( SheetID, row, startColumn, array Values, styleName );Description: Sets the values of multiple cells in a row, starting from a specific column.
Parameters:
SheetID: The ID of the worksheet.row: The row number where the values will be set.startColumn: The starting column for the values.Values: An array of values to be written into the cells.styleName: The name of the style to apply to the cells.
Example:
array string values = {"Value1", "Value2", "Value3"};
Excel_SetColumns(1, 2, 1, values, "BoldStyle");
Excel_SetRows
Syntax:
Excel_SetRows ( SheetID, StartRow, Column, array Values, styleName );Description: Sets the values of multiple cells in a column, starting from a specific row.
**Parameters **:
SheetID: The ID of the worksheet.StartRow: The starting row for the values.Column: The column where the values will be set.Values: An array of values to be written into the cells.styleName: The name of the style to apply to the cells.
Example:
array int values = {1,2,3};
Excel_SetRows(sheet, 1, 2, values, "ItalicStyle");
Excel_MergeCells
Syntax:
Excel_MergeCells (int SheetID, int row, int col, int rowspan, int colspan);Description: Merges a range of cells into a single cell.
Parameters
:
SheetID: The ID of the worksheet.row: The starting row of the range to merge.col: The starting column of the range to merge.rowspan: The number of rows to include in the merge.colspan: The number of columns to include in the merge.
Example:
// merging B2:D4 Rowspan = 3, Colspan = 2.
Excel_MergeCells(sheet, 2, 2, 3, 2);
Excel_SetConditionalFormatting
- Syntax:
Excel_SetConditionalFormatting ( Excel_ID, JSON Options ); - Description: Applies conditional formatting to a worksheet based on provided JSON options.
Parameters:
Excel_ID: The ID of the worksheet.JSON Options: A JSON object defining the conditional formatting rules.
Examples:
// Example 1:
JSON threeColorSliding = JSON (
    "Type", "ThreeColorSliding",
    "TargetRange", excel_sheetaddress (firstrow,4,lastrow,4),
    "MinColor", "yellow",
    "MediumColor", "red",
    "MaxColor", "blue",
    "MinType", "value",
    "MinValue", 1.0,
    "MediumType", "value",
    "MediumValue", 100.0,
    "MaxType", "value",
    "MaxValue", 200.0,
    "Transparency", 10); // Percent
Excel_SetConditionalFormatting (s, threeColorSliding);

// Example 2:
JSON twoColorSliding = JSON (
  "Type", "TwoColorSliding",
  "TargetRange", "D4:D5",
  "MinColor", "yellow",
  "MaxColor", "blue",
  "MinType", "min",
  "MaxType", "max",
  "Transparency", 10);
Excel_SetConditionalFormatting (s, twoColorSliding);

// Example 3:
JSON expresision = JSON (
    "Type", "Expression",
    "TargetRange",  excel_sheetaddress(6,1,6,5), // A6:E6
    "Expression", excel_sheetaddress(-6, -5)+"<0", // Becomes $E$6<0
    "Color", "red",
    "Transparency", 10); // Percent
Excel_SetConditionalFormatting (s, expresision);
Functions to retrive content from an Excel Workbook
For importing existing Excel spreadsheets with Excel_Open the following functions can be used to retrive content and style information.
Excel_GetCell
- Syntax:
string Excel_GetCell ( Sheet_ID, row, column ); - Description: Retrieves the value of a specific cell in the worksheet.
- Parameters:
Sheet_ID: The ID of the worksheet.row: The row number of the cell.column: The column number of the cell.
Return value:
- String containing the cell content. Numbers are formatted with period as decimal point. You can use the function
floatorintto convert it to a number if the cell contians a number.
Example:
string value = Excel_GetCell(sheet, 2, 3);- String containing the cell content. Numbers are formatted with period as decimal point. You can use the function
Excel_GetRowCount
- Syntax:
int Excel_GetRowCount ( SheetID ); - Description: Returns the number of rows in the worksheet.
- Parameters:
SheetID: The ID of the worksheet.
Return value:
- Int: containing the number of rows.
Example:
int rowCount = Excel_GetRowCount(sheet);
Excel_GetColCount
- Syntax:
int Excel_GetColCount ( SheetID ); - Description: Returns the number of columns in the worksheet.
- Parameters:
SheetID: The ID of the worksheet.
Return value:
- int containing the number of columns.
Example:
int colCount = Excel_GetColCount(sheet);
Excel_GetRows
- Syntax:
array string Excel_GetRows ( Sheet_ID, col, FromRow, ToRow ); - Description: Retrieves the values from multiple rows in a specific column.
- Parameters:
Sheet_ID: The ID of the worksheet.col: The column number to read values from.FromRow: The starting row number.ToRow: The ending row number.
Return value:
- An string array with the values in the rows for a spesific column.
Example:
array string rows;
// retrive 10 first rows of column 2
rows = Excel_GetRows(sheet, 2, 1, 10);
Excel_GetColumns
- Syntax:
array string Excel_GetColumns ( Sheet_ID, row, FromCol, ToCol ); - Description: Retrieves the values from multiple columns in a specific row.
- Parameters:
Sheet_ID: The ID of the worksheet.row: The row number to read values from.FromCol: The starting column number.ToCol: The ending column number.
Return value:
- An array of strings with the values in the columns for a spesific row.
Example:
array string columns;
// Return the 5 first cells of row 3
columns = Excel_GetColumns(sheet, 3, 1, 5);
Excel_CountSheets
- Syntax:
int Excel_CountSheets ( Excel_ID ); - Description: Returns the number of sheets in the workbook.
- Parameters:
Excel_ID: The ID of the workbook.
Return value:
- int containing the number of sheets in the workbook
Example:
int sheetCount = Excel_CountSheets(wb);
Functions for Defining and Manipulating Styles
The function use a JSON object to define the style parameters. This is documentet on a separate page
Excel_AddStyle
- Syntax:
Excel_AddStyle(int Excel_ID, string name, {string clonedFrom | JSON styleOptions}) - Description: Adds a new style to the workbook.
- Parameters:
Excel_ID: The ID of the Excel file.name: The name of the style.clonedFrom(optional): The name of an existing style to clone.styleOptions(optional): A JSON object defining the style properties.
Example:
    Excel_AddStyle ( wb, "H1"); // Cloned from Default
    Excel_SetStyleOptions (wb, "H1", JSON ("Font", "Areal", "FontSize", 20, "Decoration", "Bold, Italic"));
    Excel_AddStyle ( wb, "Ctitles", "H1"); // Cloned from H1
    Excel_SetStyleOptions (wb, "Ctitles",
        JSON ("FontSize", 16, "Decoration", "Bold", "FillColor", "DDDDDD",
            "Borders",JSON("Bottom", linetype_thin)));
    Excel_AddStyle(wb, "data", JSON ("Font", "Century Gotic", "FontSize", 12, "Alignment", "Top"))
    Excel_AddStyle(wb, "wrap", "data");
    Excel_SetStyleOptions ( wb, "wrap", JSON ("TextWrap", true));
    Excel_AddStyle (wb, "num", "data");
    Excel_SetStyleOptions ( wb, "num", JSON ("NumFormat", "### ##0.00"));
    Excel_AddStyle (wb, "SumLine", "num");
    Excel_SetStyleOptions ( wb, "SumLine",
        JSON ("Decoration", "Bold",
        "Borders", JSON ("Top", linetype_thin,"TopColor", "blue",
            "Bottom", linetype_double, "BottomColor", "blue")));
    Excel_AddStyle (wb, "cdata", "data");
    Excel_SetStyleOptions ( wb, "cdata", JSON ("Alignment", "Top, center"));
Excel_SetStyleOptions
- Syntax:
Excel_SetStyleOptions(int Excel_ID, string styleName, JSON styleOptions) - Description: Modifies the properties of an existing style.
- Parameters:
Excel_ID: The ID of the Excel file.styleName: The name of the style to modify.styleOptions: JSON object defining the style properties.
Example: See example for Add style above.
Excel_GetStyleOptions
- Syntax:
Excel_GetStyleOptions(int Excel_ID, string styleName) - Description: Retrives the properties of an existing style.
- Parameters:
Excel_ID: The ID of the Excel file.styleName: The name of the style to modify.
- Returns:
styleOptions: JSON object describing the style properties. Compatible withExcelStyleOptions
Example:
JSON style;
style = Excel_GetStyleOptions(wb, "Ctitles")
Returns:
{
  "Font":"Areal",
  "FontSize": 16,
  "FillColor": "DDDDDD",
  "FillPattern": "solid",
  "Decoration": "Bold",
  "Borders": {
    "Bottom":"thin",
    "BottomColor":"000000"
  },
  "StyleName": "Ctitles"
}
Excel_ListStyles
- Syntax:
array string Excel_ListStyles ( ExcelID ); - Description: Returns an arry of all the tyle names used in the Workbook.
- Parameters:
ExcelID: The ID of the Excel file.
- Return Value:
- An array of strings containing the style name of all the styles defined in the sheet.
- Note: When the workbook is saved, only the styles used in the Workbook is saved on the file. The plugin keeps track of the reference count for all styles. If the reference count is zero, no style information is saved in the stylesheet. However, the style-ID is still defined as an empty style. This behaviour might be changed in furure releases of the plugin.
Example:
// Add a sample sheet for the styles defined in the Workbook.

    array string styles = Excel_ListStyles ( wb);
    int i, stylecount = sizeof ( styles );
    int s2 = Excel_add_Worksheet ( wb, "Sample Styles");

    array float cw2 = {10,50};
    Excel_SetColumnWidth (s2, cw2);

    Excel_setCell ( s2, 1, 1, "Sample styles defined in this Workbook");
    for (i = 1, stylecount)
        Excel_setCell ( s2, i+3, 1, i);
        Excel_setCell ( s2, i+3, 2, styles[i], styles[i]);
    end for
    outpath = substitute ( path, ".xlsx", "-edited.xlsx");
    excel_SaveAsWorkbook ( wb, outpath);
    excel_close (wb);
    return "OK";
Excel_CleanUnusedStyles
- Syntax:
Excel_CleanUnusedStyles(int ExcelID); - Description: Removes unused styles from a workbook. Useful if spreadsheet is modified several times, the style table can build up unused styles. When importing, the styles references are counted. Any unused styles can be removed with this command.
- Parameters:
ExceelIDThe ID of the Excel file.
Example:
Excel_CleanUnusedStyles(wb);
Functions for Manipulating Rows and Columns
The functions for manipulating rows and columns do the following:
- Update all afected formulas to reference new location of referenced cells that has been moved.
- For deletion: If a formula reference a cell inside the deleted area, the formula becomes invalid and is deleted.
- Clone the style for inserted row or columns from the row or column spesificed in the parameters.
- For columns, shift the column-width with the insertion or deletion. New columns default to 10.
Excel_InsertRows
- Syntax:
Excel_InsertRows(int sheetID, int row {, int numberofrows {, bool insertabove}}); - Description: Inserts new rows into a sheet at the specified location. By default, rows are inserted below the specified
row. This can be changed by settinginsertabovetotrue. - Parameters:
sheetIDThe ID of the sheet where rows will be inserted.rowThe 1-based index of the row at which the new rows will be inserted.numberofrows(Optional) The number of rows to insert. Default is 1.insertabove(Optional) Iftrue, the rows are inserted above the specified row. Default isfalse.
Example:
// Insert 3 rows below row 4
Excel_InsertRows (sheetID, 4, 3, false);
Excel_InsertColumns
- Syntax:
Excel_InsertColumns(int sheetID, int column {, int numberofcols {, bool insertleft}}); - Description: Inserts new columns into a sheet at the specified location. By default, columns are inserted to the right of the specified
column. This can be changed by settinginsertlefttotrue. - Parameters:
sheetIDThe ID of the sheet where columns will be inserted.columnThe 1-based index of the column at which the new columns will be inserted.numberofcols(Optional) The number of columns to insert. Default is 1.insertleft(Optional) Iftrue, the columns are inserted to the left of the specified column. Default isfalse.
Example:
// Insert 2 columns to the right of column 5
Excel_InsertColumns(sheetID, 5, 2, false);
Excel_DeleteRows
- Syntax:
Excel_DeleteRows(int sheetID, int fromRow, int toRow); - Description: Deletes a range of rows from a sheet. All rows within the specified range, inclusive of
fromRowandtoRow, are removed, and data below the deleted rows is shifted up. - Parameters:
sheetIDThe ID of the sheet from which rows will be deleted.fromRowThe 1-based index of the first row to delete.toRowThe 1-based index of the last row to delete. Use-1to delete all the remaining rows.
Example:
// Delete rows 10 to 12
Excel_DeleteRows (sheetID, 10, 12);
Excel_DeleteColumns
- Syntax:
Excel_DeleteColumns(int sheetID, int fromCol, int toCol); - Description: Deletes a range of columns from a sheet. All columns within the specified range, inclusive of
fromColandtoCol, are removed. IftoColis set to-1, all columns to the right offromColare deleted. - Parameters:
sheetIDThe ID of the sheet from which columns will be deleted.fromColThe 1-based index of the first column to delete.toColThe 1-based index of the last column to delete. Use-1to delete all columns to the right.
Example:
// Delete columns 10 to 12
Excel_DeleteColumns (sheetID, 10, 12);

// Delete all columns to the right of column 5
Excel_DeleteColumns (sheetID, 5, -1);
Excel_ShiftRight
Syntax:
Excel_ShiftRight (int sheetID, int column, int noOfColumns, int fromRow, int toRow);Description As Excel_InsertColumn, except that it works for a range of rows instead of the whole sheet. You can insert columns in one table in your workbook, without altering other rows in your sheet.
Parameters:
sheetIDThe ID of the sheet from which columns will be shifted.columnThe leftmost column in the shift.noOfColumnsThe number of positions to shift right.fromRowandtoRowthe range of the rows to shift.
Excel_ShiftLeft
Syntax:
Excel_ShiftLeft (int sheetID, int column, int noOfColumns, int fromRow, int toRow);Description As Excel_ShiftRight, except that it shifts left instead of right. You can remove columns in one table in your workbook, without altering other rows in your sheet.
Parameters:
sheetIDThe ID of the sheet from which columns will be shifted.columnThe leftmost column in the shift.noOfColumnsThe number of positions to shift right.fromRowandtoRowthe range of the rows to shift.
Complete example functions to manipulate rows
Insert Rows and Delete Rows example
Here is a function to test the ExcelinsertRows and ExceldeleteRows functions:
function TestInsertAndDeleteRows (string path)
    string res, outpath;
    if ( path == "" ) then
        return "No path";
    end if
    int wb = excel_create ( path, "Sheet1");
    Excel_SetMetaData (wb, JSON ("Author", "Me(Ole)","Created", now(), "Changed", now()));
    res = ExcelSetDefaultStyles ( wb );
    int s = EXCEL_GetSheetID ( wb, 1);
    Excel_setCell ( s, 1, 1, "Test Insert/Delete rows sheet");

    array int bb = {120,33,200,44,66,700,129,300,2000,18};
    int i, count = sizeof (bb);

    for (i=1, count)
        Excel_setCell ( s, i+2, 1, bb[i], "dataNum2");
    end for

    // SumCell:
    string formula = format ("SUM(%s)", excel_sheetaddress(3, 1, count+2,1));
    Excel_setCellFormula ( s, count+3, 1, formula, "SumLine");


    // Excel_InsertRows (int sheetID, int row {, int numberofrows {, bool insertabove}});
    excel_setCell ( s, 4, 2, "Row parameter, insert below this");
    excel_setCell ( s, 5, 2, "This should be moved 3 down.");

    Excel_InsertRows (s, 4, 3, false);
    excel_setCell ( s, 11, 2, "Above deleted rows");
    excel_setCell ( s, 14, 2, "Below deleted rows");
    Excel_DeleteRows ( s, 12, 13);

    Excel_CleanUnusedStyles (wb);

    excel_close (wb);
    return "OK";
end
Result:

Insert Columns and Delete Columns example
Here is another function to test Insert/delete columns:
function TestInsertAndDeleteColumns (string path)
    string res, outpath;
    if ( path == "" ) then
        return "No path";
    end if
    int wb = excel_create ( path, "Sheet1");
    Excel_SetMetaData (wb, JSON ("Author", "Me(Ole)","Created", now(), "Changed", now()));
    res = ExcelSetDefaultStyles ( wb );
    int s = EXCEL_GetSheetID ( wb, 1);
    Excel_setCell ( s, 1, 1, "Test Insert/Delete Columns sheet");

    array int bb = {120,33,200,44,66,700,129,300,2000,18};
    int i, count = sizeof (bb);
    string f;
    Excel_setCell ( s, 3, count+1, "Line sum", "CH");
    for (i=1, count)
        Excel_setCell ( s, 3, i, "Col:"+string(i), "CH"); // Column headings are text cells
        Excel_setCell ( s, 4, i, bb[i], "dataNum2");
        Excel_setCell ( s, 5, i, bb[i]+100, "dataNum2");
        // Formulas below rows.
        f = format ("SUM(%s)", excel_sheetaddress(4, i, 5,i));
        Excel_setCellFormula ( s, 6, i, f, "SumLine");
    end for

    // SumCell To the right of row 4 and 5:
    string formula = format ("SUM(%s)", excel_sheetaddress(4, 1, 4,count));
    Excel_setCellFormula ( s, 4, count+1, formula, "SumLine");
    formula = format ("SUM(%s)", excel_sheetaddress(5, 1, 5,count));
    Excel_setCellFormula ( s, 5, count+1, formula, "SumLine");
    // Grand sum of the sums rightmost.
    formula = format ("SUM(%s)", excel_sheetaddress(4, count+1, 5,count+1));
    Excel_setCellFormula ( s, 6, count+1, formula, "SumLine");
    // Excel_InsertColumns (int sheetID, int column {, int numberofcols {, bool insertleft}});

    excel_setCell ( s, 2, 5, "InsLeft");
    excel_setCell ( s, 2, 6, "InsRight");

    Excel_InsertColumns (s, 5, 2, false);

    excel_setCell ( s, 2, 9, "DelLeft");
    excel_setCell ( s, 2, 12, "DelRight");
    Excel_DeleteColumns ( s, 10, 11);

    // Move table 1 column right to make room for the line descriptions.
    Excel_InsertColumns (s, 1, 1, true); // Insert column far left.
    excel_setCell ( s, 4, 1, "Items-1");
    excel_setCell ( s, 5, 1, "Items-2");
    excel_setCell ( s, 6, 1, "Sum", "SumLine");
    excel_setColumnWidth ( s, 1, 20); // Make it twize as wide (def = 10)
    Excel_CleanUnusedStyles (wb);

    excel_close (wb);
    return "OK";
end
Here is the result:

Helper Functions
Excel_SheetAddress
Formulas in Excel spreadsheets use Excel style address. To create those dynamically, this function becomes handy.
- Syntax:
string Excel_SheetAddress({string sheetName,}int row, int column {, int to_row, int to_column}) - Description: Converts numeric row/column values into an Excel-style address (e.g.,
"A1"). - Note: Negative row or column numbers makes absolute address, i.e.
$A$1for (-1,-1). - Parameters:
sheetName(optional) the name of the sheet referenced. If left out, current sheet.row: The starting row.column: The starting column.to_row(optional): The ending row (for a range).to_column(optional): The ending column (for a range).
- Returns: An Excel-style address string (e.g.,
D3:D7, or'Sheet2'!D3:D7).
Example:
string formula1 = Excel_SheetAddress ( 2,7 ) // G2
string formula2 = Excel_SheetAddress ( 2,7, 5,7 ) // G2:G5
string formula3 = Excel_SheetAddress ( "Sheet1", 2,7 ) // 'Sheet1'!G2
string formula4 = Excel_SheetAddress ( "Sheet2", 2,7, 5,7 ) // 'Sheet2'!G2:G5
Excel_ID and Sheet_ID
Excel_ID identifies the workbook, while SheetID identifies a sheet within a workbook. The ID's are to some degrees interchangeable, since both contains the Excel_ID.
- The ID's are 32 bit integers.
- Excel_ID is the 16 upper bits in the integer.
- Sheet_ID is the 16 lower bits in the integer.
- For the first sheet, Excel_ID and Sheet_ID will be identical numbers, as we assign sheets from "0".
This means that all commands that require an Excel_ID will work with an Sheet_ID too.
Back to top
Styling your spreadsheet
For styling your spreadsheet there is two functions managing the styles for your excel document. The styles are given names that can be referenced when you insert values in the cells to style the cell in a certain way.
- Excel_AddStyle (WorkbookID, "name", "optional other style to duplicate");
- Excel_AddStyle (WorkbookID, "name", JSON object defining the style options);
- Excel_SetStyleOptions ( WorkbookID, "name", JSON object defining the style options)
The JSON style object: Use the function JSON to create the object. The JSON function takes a comma-separated list of key/value pairs, where all odd parameter numbers are the keys, and the even parameter numbers are the value. For the JSON parameters, the datatype of the parameter must be JSON, not a string containing a JSON.
Example:
Excel_AddStyle ( wb, "ColumnTitles", JSON ("Font", "Arial", "FontSize", 14, "Decoration", "Bold"));
The table below describe the available options.
Style Options
Option Names in the table below is case sensitive.
| Option Name | Type | Description | Example |
|---|---|---|---|
Font |
string |
Specifies the font name for the style. | "Arial" |
FontSize |
int |
Specifies the font size. | 12 |
Decoration |
string |
Specifies text decorations, such as Bold or Italic. Multiple decorations can be comma-separated. |
"Bold, Italic" |
Color |
string |
Font colour in RGB or ARGB format. Defaults to 00000 (black) or FFFFFF (white) depending on FillColor. It can also use colour names from this list: black=000000, white=FFFFFF, red=FF0000, green=00FF00, blue=0000FF, yellow=FFFF00, cyan=00FFFF, magenta=FF00FF, gray=808080, grey=808080, silver=C0C0C0, maroon=800000, olive=808000, lime=00FF00, teal=008080, navy=000080, purple=800080, orange=FFA500 |
"FF0000FF" |
FillColor |
string |
Background fill colour in ARGB format. Adjusts Color automatically for contrast if not specified. |
"FFFFE0" |
FillPattern |
string |
Specifies the fill pattern. The default is "solid". |
"solid" |
NumFormat |
string |
Specifies the number format for the cell. | "### ##0.00" |
NumFormatCode |
int |
Specifies the number format for the cell, according to the Excel internal number format code table described on this page | 7 |
Alignment |
string |
Specifies horizontal and/or vertical alignment. Supported values: Left, Center, Right, Top, Middle, Bottom. Comma-separated for combined alignment. Case-insensitive. |
"Center, Top" |
TextWrap |
boolor int |
Enables or disables text wrapping. Accepts true, false, 1, or 0. Defaults to trueif invalid. |
true |
Borders |
object |
Specifies border styles and colors. Can include Top, Bottom, Left, Right, Diagonal, and their corresponding colors (TopColor, etc.). |
See detailed example below. |
Constants for Line Types in ACF Language
The values for linetype are case-sensitive. To make it easier, we have made constants for them that is not case sensitive. Using those constants below instead of the translated value works with syntax-coloring in TextMate too.
| Constant Name | Translated Value | Description |
|---|---|---|
linetype_hair |
hair |
Smallest thickness. |
linetype_dotted |
dotted |
Dotted line. |
linetype_dashdot |
dashDot |
Alternating dash and dot. |
linetype_dashdotdot |
dashDotDot |
Dash followed by two dots. |
linetype_dashed |
dashed |
Dashed line. |
linetype_double |
double |
Double line. |
linetype_medium |
medium |
Medium thickness. |
linetype_mediumdashed |
mediumDashed |
Medium thickness, dashed. |
linetype_mediumdashdot |
mediumDashDot |
Medium thickness, dash-dot. |
linetype_mediumdashdotdot |
mediumDashDotDot |
Medium thickness, dash-dot-dot. |
linetype_slantdashdot |
slantDashDot |
Slanted dash-dot. |
linetype_thick |
thick |
Thick line. |
linetype_thin |
thin |
Thin line (default for many cases). |
Example Usage in ACF
When using these constants in the ACF language, they are referenced without quotes. The compiler translates them to the appropriate string values.
Example ACF Script:
Excel_AddStyle(x, "headerStyle", JSON(
    "Borders", JSON(
        "Top", linetype_thick,
        "Bottom", linetype_double,
        "Left", linetype_dashdot,
        "Right", linetype_dotted
    )
));
Resulting JSON for the headerStyle:
{
    "Borders": {
        "Top": "thick",
        "Bottom": "double",
        "Left": "dashDot",
        "Right": "dotted"
    }
}
Border Configuration Example
The Borders option is a nested JSON object. Here’s an example configuration:
JSON myBorders =
'{
    "Borders": {
        "Top": "thin",
        "TopColor": "0000FF",
        "Bottom": "thick",
        "Left": "dotted",
        "Right": "dashed",
        "Diagonal": "double",
        "DiagonalColor": "FF0000"
    }
}';
Corresponding Updates:
Top: Border style for the top edge (e.g.,"thin").TopColor: Border color for the top edge in ARGB format (e.g.,"0000FF").
Intersecting borders
If your spreadsheet contains intersecting borders, you dont need to define a separate style for the intersecting cell. Lets say you have a column with data values, and it has a left border. Then below the table, you have a sum line with top and bottom border, bold text, etc. Lets say the sum line has the style "SumLine", and the table values has "LeftLine". Using "Sumline,LeftLine" to the intersecting cell will produce a new style cloned from the first, and added missing borders from the second.
It is only the border elements that is merged in this way, as we asume that the first style have the other elements allready in place.
Alignment Example
If you want both horizontal and vertical alignment:
{
    "Alignment": "Left, Top"
}
This will set:
horAlignmentto"Left".vertAlignmentto"Top".
Notes:
- Color Formats: Use ARGB format for
Color,FillColor, and border colors. - Default Behavior: If
Coloris not specified butFillColoris dark,Colordefaults to#FFFFFFfor contrast. - Validation: Throws runtime errors for invalid alignment values or unsupported border styles.
Back to top
Formatting numbers, dates, times and timestamps
There are two ways to describe the formats for the cells in your spreadsheet. Either you can use the tag "NumFormat" in the style options and specify a format string, or you can use one of the internal format numbers defined in Excel. You will find the complete list below. To use those, specify the tag "NumFormaCode" instead.
Excel Internal format numbers
I haven't found any official reference to the tables below, but I found out by experimenting. Look at the chapter near the bottom for a description of how I found out. For using those numbers below, use them in defining styles for your sheet:
Excel_AddStyle ( wb, "USD", JSON ("NumFormatCode", 7));
Wherever you add numbers using the Excel_SetCell function, it will be displayed with a currency symbol (according to regional settings), numbers with two decimals and 1000-group delimiters. The examples below are for Norway.
Number Formats
There are many duplicates in this table, but if you are parsing an Excel sheet, you find the complete table below. To use them, just pick one that fits.
| NumFormatCode | Rounding/Format | 1000-sep | Example |
|---|---|---|---|
| 0 | default | no | 1.5 |
| 1 | no decimals | no | 2 |
| 2 | two decimals | no | 1.50 |
| 3 | no decimals | yes | 1,500 |
| 4 | two decimals | yes | 1,500.00 |
| 23 | default | no | 1.5 |
| 24 | default | no | 1.5 |
| 25 | default | no | 1.5 |
| 26 | default | no | 1.5 |
| 37 | no decimals - negative values in parenthesis | yes | 45,655 |
| 38 | no decimals - negative values in parenthesis and red text | yes | 45,655 |
| 39 | two decimals - negative values in parenthesis | yes | 1,500.00 |
| 40 | two decimals - negative values in parenthesis and red text | yes | 1,500.00 |
| 41 | no decimals - negative values in parenthesis | yes | 45,655 |
| 43 | two decimals - negative values in parenthesis | yes | 1,500.00 |
| 49 | left justified | No | 1.5 |
| 59 | no decimals | no | 45,655 |
| 60 | two decimals | no | 45,655.00 |
| 61 | no decimals | yes | 45,655 |
| 62 | two decimals | yes | 45,655.00 |
| 69 | mixed fractions | no | 1 1/2 |
| 70 | mixed fractions | no | 2 3/4 |
| 12 | mixed fractions | no | 1 1/2 |
| 13 | mixed fractions | no | 3 1/8 |
Currency Formats
Numbers with currency symbols according to regional settings. Those below are for Norway.
| NumFormatCode | Rounding/Format | 1000-sep | Example |
|---|---|---|---|
| 5 | no decimals - negative values in parenthesis | yes | kr 45,655 |
| 6 | no decimals - negative values red, and in parenthesis | yes | kr 45,655 |
| 7 | two-decimals - negative values in parenthesis | yes | kr 45,655.00 |
| 8 | two-decimals - negative values red, and in parenthesis | yes | kr 45,655.00 |
| 42 | no decimals - negative values in parenthesis | yes | kr 45,655 |
| 44 | two decimals - negative values in parenthesis | yes | kr 45,655 |
| 63 | two-decimals - negative values in parenthesis | yes | kr 45,655.00 |
| 64 | two-decimals - negative values in parenthesis and red color | yes | kr 45,655.00 |
| 65 | two-decimals - negative values in parenthesis | yes | kr 45,655.00 |
| 66 | two-decimals - negative values in parenthesis and red color | yes | kr 45,655.00 |
Scientific Formats
The scientific format uses one digit before the comma and Exponential value.
| NumFormatCode | Rounding/Format | 1000-sep | Example |
|---|---|---|---|
| 11 | two dec | no | 4.57E+4 |
Engineering Formats
Engineering format uses exponent that are modules of 3.
| NumFormatCode | Rounding/Format | 1000-sep | Example |
|---|---|---|---|
| 48 | up to 2 decimals | No | 135.7E+3 |
Date Formats
| NumFormatCode(s) | Date | Rounding/Format |
|---|---|---|
| 14 | 29.12.2024 | default date |
| 15 | 29.des.24 | full date named month |
| 16 | 29.des | day+named month, no year |
| 17 | des.24 | named month+year |
| 27-31 | 29.12.2024 | default date |
| 36 | 29.12.2024 | default date |
| 50-58 | 29.12.2024 | default date |
| 71, 72 | 29.12.2024 | default date |
| 73 | 29.des.24 | default date |
| 74 | 29.des | day named month. no year |
| 75 | des.24 | no day, named month and year. |
Time Formats
| NumFormatCode | Time | Rounding/Format |
|---|---|---|
| 18 | 12:00 pm | hh:mm am/pm |
| 19 | 12:00:00 pm | hh:mm:ss am/pm |
| 20 | 12:00 | hh:mm |
| 21 | 12:00:00 | hh:mm:ss |
| 45 | 00:00 | mm:ss |
| 46 | 36:00:00 | hh:mm:ss (hours > 24) |
| 47 | 10:03,4 | mm:ss, 1/10 |
| 76 | 12:00 | hh:mm |
| 77 | 12:00:00 | hh:mm:ss |
| 79 | 09:33 | mm:ss |
| 80 | 36:00:00 | hh:mm:ss (hours > 24) |
| 81 | 10:03,2 | mm:ss, 1/10 |
Timestamp Formats
| NumFormatCode | Timestamp | Rounding/Format |
|---|---|---|
| 22 | 29.12.2024 12:00 | |
| 78 | 29.12.2024 12:00 |
Formatting using format strings
The other way to format cells is to use format strings instead.
Excel_AddStyle ( wb, "USD", JSON ("NumFormat", "USD ### ### ##0.00"));
This will be a currency format prefixed with USD and a number with two decimals.
Understanding Number Format Strings
Excel's number format strings are structured to define distinct display formats for different types of data within a single cell. These strings can be divided into up to four sections, separated by semicolons (;), each specifying the format for:
- Positive Numbers
- Negative Numbers
- Zero Values
- Text Strings
For example, the format string 0.00;[Red]-0.00;0.00;"Text:"@ applies:
0.00to positive numbers[Red]-0.00to negative numbers (displayed in red)0.00to zero values"Text:"@to text entries, prefixing them with "Text:"
If only one section is provided, it applies to all number types. Two sections mean the first applies to positive numbers and zeros, and the second to negative numbers. Three sections allow separate formatting for positive numbers, negative numbers, and zeros, respectively.
Common Format String Symbols
0: Displays insignificant zeros. For instance,000applied to the number5displays as005.#: Displays significant digits without extra zeros. For example,#.##applied to5.5displays as5.5, and applied to5displays as5..(Period): Acts as a decimal point.,(Comma): Serves as a thousands separator. Additionally, placing a comma after a number code scales the number by a thousand. For example,#,##0,applied to1500displays as1.%: Multiplies the number by 100 and appends a percent sign.?: Aligns decimal points in numbers with varying lengths by adding spaces.*(Asterisk): Repeats the character immediately following it to fill the cell's width. For instance,*(asterisk followed by a space) fills the remaining space with spaces._(Underscore): Skips the width of the character immediately following it, often used to improve alignment. For example,_(adds space equal to the width of an opening parenthesis.@: Placeholder for text in a cell."Text": Displays the enclosed text. For example,0" units"applied to5displays as5 units.
Date and Time Format Strings
Excel uses specific codes to represent dates and times:
d: Day number without a leading zero.dd: Day number with a leading zero.ddd: Abbreviated day name (e.g., Mon, Tue).dddd: Full day name (e.g., Monday, Tuesday).m: Month number without a leading zero.mm: Month number with a leading zero.mmm: Abbreviated month name (e.g., Jan, Feb).mmmm: Full month name (e.g., January, February).yy: Two-digit year.yyyy: Four-digit year.h: Hour without a leading zero.hh: Hour with a leading zero.m: Minute without a leading zero.mm: Minute with a leading zero.s: Second without a leading zero.ss: Second with a leading zero.AM/PM: Displays time in a 12-hour format with AM or PM.
Note: Excel interprets it as minutes rather than months when using m immediately after h or hh, or immediately before ss.
Colour Codes
You can apply colours to different sections by enclosing the colour name in square brackets:
[Black][Blue][Cyan][Green][Magenta][Red][White][Yellow]
For example, the format string [Red]0;[Blue]-0;0 displays positive numbers in red, negative numbers in blue, and zeros in the default colour.
Conditional Formatting within Number Formats
Excel allows conditional formatting directly within number formats by specifying conditions in square brackets.
For instance, the format string [>1000]0.00,"K";0.00 displays numbers greater than 1000 as thousands (e.g., 1500 as 1.50
How did we create the internal numbers list?
I have not found any official documentation about those numbers, but tons of pages describe how to format numbers in Excel.
After experimenting with some formatting in Excel, looking at the generated stylesheets, and finding the most important ones, I found another better method.
I generated a spreadsheet with the ACF plugin and defined 161 styles in a loop, all with the NumFormatCode from 0 to 160. Then I populated rows using the newly created style to see how it formats numbers, strings, date and time values. Here is the function I made:
function TestBuiltInStyles ()
    string res;
    string path = desktop_directory ()+ "TestNumFOrmatCodes.xlsx";
    print path + "\n";
    if ( file_exists (path)) then
        res = delete_file ( path );
    end if
    int wb = Excel_Create ( path, "Codes");
    excel_addstyle ( wb, "H1", json("Font", "Arial", "FontSize", 18, "Decoration", "Bold"));
    excel_addstyle ( wb, "H2", json("Font", "Arial", "FontSize", 14, "Decoration", "Bold",
        "FillColor", "DDDDDD", "Borders", json ("Bottom", linetype_thin)));

    int s = Excel_GetSheetID ( wb, 1);
    excel_setCell ( s, 1, 1, "Internal NumFormatCodes in Excel", "H1" );
    array string hd = {"NumFormatCode", "Value 1.5", "Value 2", "Text", "Date", "Time", "TimeStamp" };
    excel_setColumns ( s, 2, 1, hd, "H2");
    long todayInt = date(now())-date("1900-01-01", "%Y-%m-%d")+2;
    float tsValue = 0.5 + todayInt;
    int i, row;
    string style;
    for (i=0, 160)
        style = "Code"+i;
        excel_addstyle ( wb, style, json ("NumFormatCode", i));
        row = i+3;
        excel_setcell( s, row, 1, i);
        excel_setcell( s, row, 2, 1.5, style);
        excel_setcell( s, row, 3, 2, style);
        excel_setcell( s, row, 4, "Some Text", style);
        excel_setcell( s, row, 5, todayInt, style);
        excel_setcell( s, row, 6, 0.5, style);
        excel_setcell( s, row, 7, tsValue, style);
    end for
    excel_close ( wb);
    return "OK";
end
Then I got a spreadsheet like this:

Then I just had to categorize it for this documentation.
Good luck with your cell formatting.
Back to top
FileMaker Plugin Calls
Plugin Function: ACF_RegisterPlugin
Updated: 23.10.2024 - Plugin version 1.7.1.7
ACF_RegisterPlugin is the licensing function of the plugin. After purchasing the plugin, you will receive a license code that needs to be used with this function to unlock full permanent functionality. Without registering the license, the plugin operates fully for 30 minutes. After that period, only the ACF_RegisterPlugin function remains active. You can also obtain a free demo license that is valid for 14 days. After the demo period, the plugin will operate in demo mode for 30 minutes, and all plugin calls will return an error message for an expired license. There are two types of licenses available:
Developer License: This license grants access to all plugin functions, including the ability to compile ACF code.
Runtime License: The runtime license allows you to use all plugin features except for compiling ACF code. It can load and execute compiled code. Typically, you would use a developer license for your development work and runtime licenses for your clients.
When you run the ACF_RegisterPlugin function for the first time on a computer, the plugin checks the license's validity with our license server. After this initial validation, the plugin no longer requires communication with the license server. This check is primarily in place to prevent the publication of licenses on the internet. We send only the license's serial number and a SHA512 fingerprint to create an untraceable ID for the computer. No additional data is transmitted. If a license is used excessively, we may suspect it has been shared publicly, and it will be invalidated. The rightful owner will receive a new valid license that must be applied.
Mac and Windows Compatibility
The license code is valid for both Mac and Windows. The distribution package contains plugins for each platform, allowing them to run the same compiled ACF code.
Prototype:
<status> = ACF_RegisterPlugin ( <Licence_name>; <LicenceKey )
Parameters:
| Parameter name | Type | Description |
|---|---|---|
| Licence Name | TEXT | Registered name of the license |
| Licence Key | TEXT | Unique license key provided by HORNEKS ANS |
Return value: - Type TEXT: "OK" for a valid license; any other error indicates an expired or incorrect license code.
Example:
Set Variable [$Res; ACF_RegisterPlugin ( "DEMO"; "ACF_Plugin DEV1 - DEMO 1001
========LICENCE BEGIN======
QB25ZD76dmuP/xJsxlfh1LqPponjja1mQ6K3lia1uc7Otjy9BoxR6BqI0OgialQKo9Q4ZWcv
S96V56bDBY3us2EEUrLpFTd+35ebK9rXFvQXb/vL1fN+A8SypseN0zoIs78uDajP5xfi+mnu
1lC0wA
======= LICENCE END =======" )]
Back to top
Function: ACF_run
The ACF_run function allows you to execute any of your ACF functions. Once your functions are compiled or loaded, you are ready to execute them. In your code, other ACF functions can be called directly using their names; there's no need to use ACF_run from inside an ACF function to execute another one. ACF functions can call each other directly. However, if you want to call a function in a different package, you can use the ACF_run syntax enclosed in "@" signs to achieve this. In a future release of the plugin, this feature may be available directly.
The ACF_GetAllPrototypes function returns a text containing all your loaded ACF functions, along with their parameters and types, as they can be called from a FileMaker Script Step, Calculation, or directly from a button.
It's important to ensure that the number of parameters matches when calling ACF functions. If you add parameters to an ACF function, you must also update any places where you call that function from FileMaker to match the new parameter count. This behavior is consistent with regular custom functions in FileMaker.
Functions can have arrays as parameters, which work smoothly when ACF functions call each other. However, since FileMaker does not have an array data type, you cannot supply such an argument from FileMaker using the ACF_run command. In the future, there are plans to introduce a feature that allows a variable number of parameters, where the last argument to a function can be declared as an array to collect additional parameters as array cells. Currently, this feature is not available.
Prototype:
ACF_run ( <Function name>; <List of parameters according to the function declaration, separated by semicolons>)
Parameters:
| Parameter name | Type | Description |
|---|---|---|
| Function name | string | The name of the function. You can use ACF_GetAllPrototypes to copy and paste functions directly. |
| Parameters | As declared | Parameters according to the declaration. The number of parameters must match. There are no default values for parameters. |
Return value:
The return type and value depend on the return value and type specified in your ACF function.
Example:
// For an ACF function declared like this:

Function CreateCID ( int InvoiceNumber, int CustomerNumber, int CIDlength)
...
...
END

// And from a FileMaker script step:

Set Field ( Invoices::CID number; ACF_run  ("CreateCID"; Invoices::Invoice_number; Invoices::CustomerNumber, 16))
References:
- ACF_GetAllPrototypes
- FunctionID
Back to top
Function: ACF_Compile
Compile a text with ACF Source Code and generate a binary Base64 encoded package that can be later installed using ACF_Install_base64Text or, if saved to a file, use ACF_InstallFile.
Upon successful compilation, the compiled package loads automatically, making the functions within it ready for execution.
Parameters:
| Parameter name | Type | Description |
|---|---|---|
| Source | string | The ACF Source code to compile |
| Debug level | number | Debug levels from 0 to 5. 0 = only list source code compiled, 1 to 5 correspond to different levels of debug information from the compiler. |
Return value:
Type TEXT: If the compilation is successful (no compile errors), the return is a base64 encoded binary that can be installed using ACF_Install_base64Text. If there are compilation errors, the return value will be a summary of those errors that need correction. You can use PatternCount ( $res ; "=== START ===" ) to check if the compilation was successful, and then store the result only if the compilation was successful.
Example:
# ------------------------------------------
# Created by: Ole Kristian Ek Hornnes
# Created date: 15.10.2018
# Purpose: To compile the ACF package and produce binary
# ------------------------------------------
Set Variable [ $x; Value:ACF_StartDurationTimer ]
Set Variable [ $res; Value:ACF_Compile( Preferences::Source; 0 ) ]
Set Variable [ $$compt; Value:ACF_GetDuration_uSec ]
If [ PatternCount ( $res ; "=== START ===" )> 0 ]
      Set Field [ Preferences::ACF_Pack4; $res ]
      Set Field [ Preferences::CompilationErrors; 0 ]
Else
      Set Field [ Preferences::CompilationErrors; 1 ]
End If
Set Field [ Preferences::Consolle; ACF_GetConsolleOutput ]
Set Field [ Preferences::Prototypes; ACF_GetAllPrototypes ]
Commit Records/Requests[ No dialog ]
GotoField[ ][ Select/perform ]
You can use the "compilation errors" field to display or hide two icons. One icon is displayed when the error count is 0, and the other when it's 1. Placing these icons on top of each other in the layout can indicate the result of the compilation.
Example of output on successful compile:
Advanced Custom Function Binary Package
==================================================
=== Package name: markdownfunctions
=== Description:
MarkDown functions for the dok prosjekt...
==================================================
=== Do not change anything below this line =======
=== START ===
AAABDBYAAAAAAAAAc2VyaWFsaXphdGlvbjo6YXJjaGl2ZRAABAgECAEAAAAAAAAAAAxY/ABk
AAAAAAAAAG1hcmtkb3duZnVuY3Rpb25zAAAAEKWTXv9/AAAQpZNe/38AABClk17/fwAAEKWT
Xv9/AAAQpZNe/38AABClk17/fwAAGJaTXgMAAAAQpZNe/38AABClk17/fwAAEKWTXv9/AAA8
BQAAxgPnBAAAQgAAADkAWQAAACilk17/fyilk14opZNe/38AAEEAAAAAAAAAKKWTXv9/AABQ
ZXNzaW5nCgIAAAAAAAAAT0sPAAAAAAAAAGNvbnZlcnRtYXJrZG93bgAAAAAAAAAADAAAAAAA
....
....
....
AAABAAAAAAAAADEWAAAAAAAAAHNlcmlhbGl6YXRpb246OmFyY2hpdmUQAAQIBAgBAAAAAAAA
AAAAAAAAAAAAAAAAAAAWAAAAAAAAAHNlcmlhbGl6YXRpb246OmFyY2hpdmUQAAQIBAgBAAAA
KQAAAAAAAABNYXJrRG93biBmdW5rc2pvbmVyIGZvciBkb2sgcHJvc2pla3RldC4uLg
=== END ===
Example of output on compilation errors:
These errors are also logged in the console and can be obtained using ACF_getConsoleOutput.
Compilation errors: 1
Debug level is: 0

// 1: package MarkDownFunctions "MarkDown funksjoner for dok prosjektet...";
Compiling package markdownfunctions
MarkDown funksjoner for dok prosjektet...

// 2:
// 3:
// 4: function post_processing (string htmlfile)
// 5:   int a = fido*3;

FATAL ERROR: Undeclared identifier fido
>At Line number 5 Position: 9

// 6:   print "post processing\n";
// 7:   int x = open ( htmlfile, "r"  );
...
...
..
Back to top
Function: ACF_CompileFile
Compile a text with ACF Source Code and generate a binary Base64 encoded package that can be later installed using ACF_Install_base64Text or, if saved to a file, use ACF_InstallFile.
This function is similar to ACF_Compile, but it takes input from a disk file and produces output on another file. The name of the compiled disk file will be the same as the source, but with the ".dsComp" extension.
Upon successful compilation, the compiled package loads automatically, making the functions within it ready for execution.
Prototype:
ACF_CompileFile( SourceFile {;Verbose Level} )
Parameters:
| Parameter name | Type | Description |
|---|---|---|
| SourceFile | string | The path to the source file containing the ACF package to compile |
| Verbose Level | int | Debug levels from 0 to 5. 0 = only list source code compiled, 1 to 5 correspond to different levels of debug information from the compiler. |
Return value: Type TEXT : The path to the compiled package. It is placed in the same folder as the source file, with the extension ".dsComp".
Example:
Set Variable [ $res; Value:ACF_CompileFile( Preferences::SourcePath; 0 ) ]
References: No references
Back to top
Function: ACF_GetAllPrototypes
The ACF_GetAllPrototypes function is designed to retrieve the prototype text for all installed package functions. In this context, each parameter in the prototypes includes a type prefix, using FileMaker terminology.
The primary purpose of this function is to streamline the development process and facilitate the creation of internal documentation by providing access to the prototypes of developed functions.
Have the output from this handy when you develop FileMaker scripts, so you can cut and paste into your calculations.
Prototype:
ACF_GetAllPrototypes
Parameters: No parameters
Return value: Type TEXT : The Prototype text
Example of output:
Set Field [ Preferences::Prototypes; ACF_GetAllPrototypes ]
After running the above script, the field "Preferences::Prototypes" will contain the following text, which displays the prototypes for various packages:
=========================================================
Package: bootstrap
Functions to facilitate load and save source and binary files

ACF_run("LoadFile"; text_filename)
   ==> Return type = text

ACF_run("SaveFile"; text_filename; text_content)
   ==> Return type = num

ACF_run("SelectFile"; text_startPath; text_Prompt)
   ==> Return type = text

ACF_run("SelectFolder"; text_Prompt)
   ==> Return type = text

ACF_run("SelectSaveAsFile"; text_prompt; text_defname; text_defdir)
   ==> Return type = text


=========================================================
Package: markdownfunctions
Markdown functions for the doc project

ACF_run("post_processing"; text_htmlfile)
   ==> Return type = text

ACF_run("ConvertMarkdown"; text_sourcefile; text_htmlfile; text_html_root; text_style; text_codestyle)
   ==> Return type = text

ACF_run("createHTML_Filename"; text_file; text_html_path)
   ==> Return type = text

ACF_run("openList")
   ==> Return type = num

ACF_run("readnextline"; num_fileid)
   ==> Return type = text

ACF_run("closeList"; num_fileID)
   ==> Return type = undef


=========================================================
This text provides an overview of the packages and their associated functions, making it easier to understand the available prototypes.
Back to top
The Console Function
A console function primarily serves as a debugging tool in the ACF plugin. The ACF plugin includes a function to retrieve the console, which is particularly useful during the compilation process. When compiling using the compile functions, you also receive errors and debug output in the console. The debug level used in those commands determines the amount of data retrieved.
Inserting print statements in your code can greatly aid in debugging and quality checks for ACF functions.
The console function also has the ability to reset the console. This means that you cannot retrieve the same console output twice. You can leverage this function to reset the console before executing a series of ACF function calls, effectively clearing previous console output.
Plugin Function: ACF_GetConsoleOutput
Parameters: There are no parameters required for this function.
Return Value: The return value of this function is the text added to the console, which may include errors and print statements generated by the functions.
Example:
Here's an example of how the console function can be used in a script for compiling plugin functions. The console output is placed into a field on the layout for easy monitoring of the compilation process.
# ------------------------------------------
# Opprettet av: Ole Kristian Ek Hornnes
# Opprettet dato : 15.10.2018
# Formål:
# ------------------------------------------
Set Variable [ $x; Value:ACF_StartDurationTimer ]
Set Variable [ $res; Value:ACF_Compile( Preferences::Source; 0 ) ]
Set Variable [ $$compt; Value:ACF_GetDuration_uSec ]
If [ PatternCount ( $res ; "=== START ===" )> 0 ]
      Set Field [ Preferences::ACF_Pack4; $res ]
      Set Field [ Preferences::CompilationErrors; 0 ]
Else
      Set Field [ Preferences::CompilationErrors; 1 ]
End If
Set Field [ Preferences::Consolle; ACF_GetConsolleOutput ]
Set Field [ Preferences::Prototypes; ACF_GetAllPrototypes ]
Commit Records/Requests[ No dialog ]
GotoField[ ][ Select/perform ]
Back to top
Function: ACF_InstallFile
ACF_InstallFile allows you to install a compiled source stored in a filesystem file. However, there is an important note regarding runtime versions of the FileMaker application.
In the case of the file being located in the extensions folder of the solution and supplying the path to it via this function in a runtime environment, it appears that the runtime may unload the plugin. It seems like FileMaker actively prevents any references to the folder structure of the runtime when fed as parameters to the plugin. This behavior is specific to runtime versions.
For this reason, it is recommended to use the ACF_Install_base64Text function to load packages when working with runtime solutions.
Prototype:
ACF_InstallFile( base64_Binary_File )
Parameters:
| Parameter name | Type | Description |
|---|---|---|
| base64_Binary_File | string | Path to the file |
Return value:
Type TEXT : An empty string is returned on success, while an error message is returned on failure.
Example:
Set Variable [ $res; Value:ACF_InstallFile( "~/Projects/ACFbinaries/myACFfunctions.dsComp" ) ]
References:
- No references
Back to top
Running the Plugin on the Server
When running the plugin on the server, there are some logical limitations and considerations to keep in mind:
Dialog Functions: Functions that present dialogues are not functional when running on the server. These functions are designed for user interaction and are not suitable for server-side execution.
Calculation Limitations: All FileMaker calculations performed from inside ACF functions follow the same limitations as ordinary calculations. This means you should be aware of the server's calculation capabilities and avoid complex or resource-intensive operations.
To run the plugin on the server, you need to register the plugin and load the ACF binaries of your compiled ACF functions. This registration process should be performed only once and not with every Perform Script on Server (PSoS) operation. Since multiple PSoS processes can run on the server concurrently, reloading the ACF binaries during an ongoing process can lead to issues or interruptions in functionality.
To avoid unnecessary reloading of ACF binaries, you can use a simple method:
- Create a basic ACF function like this:
function AreWeLoaded()
    return "Yes";
end
- At the beginning of your PSoS script, check if the ACF binaries are already loaded using the
AreWeLoadedfunction:
If [ ACF_run("AreWeLoaded") ≠ "Yes" ]
    Set Variable [ $reg ; Value: ACF_RegisterPlugin( "Company"; "License data..." ]
    Go to Layout [ “Preferences” (Preferences) ; Animation: None ]
    Set Variable [ $$ACF ; Value: Let( [ v = If (not IsEmpty ( Preferences::ACF_Pack1) ; ACF_Install_base64Text( Preferences::ACF_Pack1 ); "") ..........
End If
This method ensures that the ACF binaries are loaded only when necessary, preventing unnecessary reloads and potential issues with concurrent PSoS processes.
Access Mode for the Plugin on the Server:
Follow FileMaker's instructions for installing the plugin on the server, and make sure to set the access mode correctly to allow loading and execution:
# Open terminal
cd /path/to/Server/extensions/directory
chmod g+wrx <filepath>
Note: On Windows servers, ensure you use the 64-bit version of the plugin, which is named ACF_plugin.fmx64 and is included in the download package.
Back to top
Function: Compiling using literal source code in the calculation
In FileMaker, multi-line text literals do not contain line separators; they consist of just a single space character.
To work around this,
Create a script step:
Insert Text. ChooseSelect, and for target checkVariable, and name it$$Sourcefor example. Below the variable, a text field comes up where you can paste in the source code found in "bootstrap.acf". In this way, the text is pasted as-is, and there is not removed any linebreaks from it.Then a second script step,
Set Variable, and$res, and the formula isACF_Compile($$Source)
If [ ACF_run("bootstrap_AreWeLoaded") ≠ "Yes" ]
    Insert Text ( Select; $$Source; 'package bootstrap "Functions to facilitate..."')
    Set Variable [ $res; Value:ACF_Compile( $$Source ) ]
End If
Here is some images:
In this example, we demonstrate how to prepare source code for the "bootstrap" package using the ACF_Compile function.
In the demo files, you can find a similar statement in the startup script. This is especially helpful when many buttons and scripts rely on the "bootstrap" package. Having it in place from the start simplifies the implementation in a target application.
By following this approach, you can include source code directly in your calculations while ensuring proper handling of line separators, quotes, and backslashes.
Back to top
Arrays, JSON and XML
JSON Data Type in ACF Language
Integration with FileMaker: ACF's JSON support seamlessly integrates with FileMaker, allowing complex data structures to be transmitted efficiently between the two environments. Unlike FileMaker, where JSON is managed through text strings and specific functions, ACF elevates JSON to a first-class data type.
Simplified JSON Manipulation: As a dedicated data type, JSON handling in ACF is more intuitive and streamlined compared to FileMaker. The compiler understands JSON-specific operations, reducing the need for specialized JSON functions. This simplification means standard operations on JSON variables are inherently understood by the compiler.
Key Functions:
JSON: Used both as a declaration for JSON variables and as a function for creating JSON objects with key/value pairs.STRING: Equivalent toJSON_Stringify, this function is versatile but, when applied to a JSON variable, instructs the compiler to convert the JSON object into a string representation.SIZEOFTo determine the size of an array, works also on JSON objects and JSON arrays.LIST_KEYS- to list all the keys found at a given path.
Notation and Operations:
- Bracket Notation: Similar to arrays, JSON in ACF uses bracket notation for path specification
["companies[3].name"]and array index access within JSON objects. - Appending Elements: ACF uses empty brackets (
[]) for appending elements to arrays and JSON structures, allowing dynamic addition of elements without prior knowledge of the array or object size.
This powerful implementation simplifies JSON handling, making it more accessible and consistent with other data types in ACF, enhancing productivity and reducing the learning curve for developers familiar with JSON in other contexts.
Example from the FileMaker reference compared to ACF.
We have this example from the Claris website about JSON. It is about adding a product with 6 fields to a JSON array object:
 # In FileMaker
Set Variable [ $NewProduct ; Value:
   JSONSetElement ( "{}" ;
      [ "id" ; "FB4" ; JSONString ] ;
      [ "name" ; "Vanilla Cake" ; JSONString ] ;
      [ "price" ; 17.5 ; JSONNumber ] ;
      [ "stock" ; 12 ; JSONNumber ] ;
      [ "category" ; "Cakes" ; JSONString ] ;
      [ "special" ; true ; JSONBoolean ]
   ) ]
Set Variable [ $NextIndex ; Value:
   ValueCount (
      JSONListKeys ( $$JSON ; "bakery.product" )
   ) ]
Set Variable [ $$JSON ; Value:
   JSONSetElement (
      $$JSON ; "bakery.product[" & $NextIndex & "]" ; $NewProduct ;
      JSONObject
   ) ]
And here is the same written in ACF
    JSON fmJSON = $$JSON;  // Declaration and assignment from FM variable $$JSON
    JSON newProduct = JSON ( // New product, 6 key/value pair
        "id", "FB4",
        "name", "Vanilla Cake",
        "price", 17.5,
        "stock", 12,
        "category", "Cakes",
        "special", true);
    fmJSON["bakery.product[]"] = newProduct; // add it to the array
    return fmJSON; // return back to FM script with the result.
And here is what we got:
{
    "bakery": {
        "product": [
            {
                "category": "Cakes",
                "id": "FB4",
                "name": "Vanilla Cake",
                "price": 17.5,
                "special": 1,
                "stock": 12
            }
        ]
    }
}
As you can see, the tags are ordered alphabetically to improve speed on lookup.
Detailed syntax descriptions
In this part, we will go walk you through the more detailed descriptions of the syntax and how you do different tasks. As there are not so many function names involved in this JSON implementation, we need to look closer at the syntax.
Assignments
JSON elements are typically built via a series of assignment statements. All begin with a declaration of a JSON variable:
JSON myJson;
Simple Assignments
Assigning a text string directly to a JSON variable in ACF creates a leaf node rather than an object. To handle cases where this assignment might be inappropriate (such as assigning plain text to a JSON variable), ACF reinitializes the JSON object and inserts an "ERROR" key detailing the issue:
myJson = "This is text";
This results in:
{
    "ERROR": {
        "Key": "",
        "Message": "Invalid JSON assignment; key/value pairs required. The resulting JSON was not an object",
        "Value": "This is text"
    }
}
Simple assignments can also be used for parsing JSON strings. For instance, if you receive JSON-formatted text from a web service, you can directly assign it to a JSON variable. ACF assumes it's a JSON object if the text begins with an opening curly bracket ({) and attempts to parse it accordingly.
Making assignment with a tag
MyJson["myText"] = "This is text";
Give this result:
{
    "myText" : "This is text"
}
For more levels into the JSON, you use dot-notation for the path.
MyJson["myText.personalText.mondayText"] = "This is text";
Give this result:
{
    "myText" : {
        "personalText" : {
            "mondayText": "This is text"
        }
    }
}
Make an array with two items on the inner level Place empty square brackets at the end of the path:
MyJson["myText.personalText.mondayText[]"] = "This is text";
MyJson["myText.personalText.mondayText[]"] = "Second text";
Give this result:
{
    "myText" : {
        "personalText" : {
            "mondayText": [
                "This is text",
                "Second text"
            ]
        }
    }
}
Using string arrays
We can also make the same product using string arrays:
ARRAY string myTexts;
myTexts[] = "This is text";
myTexts[] = "Second text";
// This method replaces the inner level array.
MyJson["myText.personalText.mondayText"] = myTexts;
Using the JSON function to make JSON key / Value pairs.
myJson["People[]"] = JSON ("name", "Olaf Haraldsson",
                "address", "Frivei 2",
                "Zip", "1617",
                "City", "NORTH POLE");
This will produce:
{
    "People" : [
        {
            "name" : "Olaf Haraldsson",
            "address" : "Frivei 2",
            "Zip" : "1617",
            "City" : "NORTH POLE"
        }
    ]
}
Extracting values from JSON objects
Extracting simple or complex parts from a JSON object is the other important thing in this. implementation. The syntax for the path is similar, except that the object is not modified, so you cannot use the [] at the end of the path. If the path is not pointing to anything in the object, a question mark is returned.
To pull the name from the previous example, you can simply write this:
string name;

name = myJson["People[1].name"];
To retrieve a JSON part into another JSON variable, it can be written this way:
JSON myPerson;

myPerson = myJson["People[1]");
Data types
A JSON object can contain data with several different data types, like other objects, strings, or numbers. When ACF functions are compiled, the compiler has no info about the structure of the JSON object you are working on. Therefore the type of an extracted value is always a string, even if it's a number type inside the object. In order to use it in a calculation, you need to use a type converter to explicitly tell the compiler the type of the extracted object.
For the calculation of the line sum based on a product price you have extracted from a JSON, let's use the very first example JSON from Chapter 1:
float line_sum, count = 10;
line_sum = count * float ( fmJSON["bakery.product[1].price"] );
You can use all the simple declaration words as type converters. Strings need of course no type converter.
Getting the size of a JSON array
To get the size of a JSON array, the SizeOf function can be used. This function also returns the number of tags in a non-array path.
int numberOfBakeryProducts = SizeOf ( fmJSON ["bakery.product"] );
To iterate an array inside a JSON object
int numberOfBakeryProducts = SizeOf ( fmJSON ["bakery.product"] );
int i;
for (i=1, numberOfBakeryProducts)
    print fmJSON["bakery.product["+i+"].name"] + "\n";
end for
or easier with the format function:
int numberOfBakeryProducts = SizeOf ( fmJSON ["bakery.product"] );
int i;
for (i=1, numberOfBakeryProducts)
    print fmJSON[format("bakery.product[%d].name",i)] + "\n";
end for
Getting a list of tags for a given path
To list all the keys that can be found for a given path, you can use the list_keys function:
// From the object created in "Using the JSON function to make JSON key / Value pairs."
string myKeys = list_keys(myJson["Customers.People[1]"]);
You get the result:
Address
City
Country
Name
Zip
More examples
Pulling JSON data from a WEB-service
In this example, we use the Norwegian company register, and access an API service to look up a company from its organization number:
function OppslagEnhetBRREG ( string orgNr )
    // Remove non-digits from OrgNr
    orgNr = regex_replace ( "[^0-9]", orgNr, "");
    // request URL
    string url = "https://data.brreg.no/enhetsregisteret/api/enheter/" + orgNr;
    // Headers pr API-documentation
    string hdr = 'Accept: application/vnd.brreg.enhetsregisteret.enhet.v2+json;charset=UTF-8';
    // Request API
    string respons = HTTP_GET ( url, hdr );
    // Check if error....
    if ( left ( respons, 1) != "{") then
        print respons;
        return "ERROR";
    end if

    json data;
    data = respons;
    // Pull some data from the response....
    string CompanyName   = data["navn"];
    string address       = data["forretningsadresse.adresse[1]"];
    string Zip           = data["forretningsadresse.postnummer"];
    string City          = data["forretningsadresse.poststed"];
    string Country       = data["forretningsadresse.land"];
    date   Etab          = date(data["stiftelsesdato"], "%Y-%m-%d");

    // print the JSON on the console, so we can look at it to see what is there.
    print string(data); // beautify JSON automatically, so it is easier to see the
                        // values we can get.
                        // Just return the values. We could update some data using
                        // SQL to the current record...
    return CompanyName + "\n" + address + "\n"+ Zip + " "+ City + "\n" + Country+
           "\nEstablished: " + Etab;

end
Writing a helper function to simplify the construct of a composite JSON.
You can use the JSON function to create key/value pairs for a JSON object. Makin a helper function to create a specific type of object can make it easier:
Like this:
// Helper function to be used in the other function below.
function MakeJsonPerson (string name, string address, string zip, string city, string country);
    return JSON ("Name", name, "Address", address, "Zip", zip, "City", city, "Country", country);
end

// Main function

function json_test ()
    JSON b; // Declaration

    // Add some people to our JSON array...
    array JSON c;
    c[] = MakeJsonPerson ("Olaf Haraldsson", "Frivei 2", "1617", "NORTH POLE", "NORWAY" );
    c[] = MakeJsonPerson ("Guri Kråkeslott", "Frivei 3", "1617", "NORTH POLE", "NORWAY") ;
    c[] = MakeJsonPerson ("Rachel Green", "Green Road 104", "9999", "SOUTH POLE", "LANGTVEKKISTAN") ;

    // Put the arrays into a node in our JSON.
    b["Customers.People"] = c;
    b["Customers.Count"] = sizeof(c);

    array string some_countries = {"Norway", "England", "Sweden", "Denmark", "France"};
    b["Countries"] = some_countries;

    b["TimeStampNow"] = now(); // Timestamps

    return b; // Auto JSONstringify !!
end
This example will create this:
{
    "Countries": [
        "Norway",
        "England",
        "Sweden",
        "Denmark",
        "France"
    ],
    "Customers": {
        "Count": 3,
        "People": [
            {
                "Address": "Frivei 2",
                "City": "NORTH POLE",
                "Country": "NORWAY",
                "Name": "Olaf Haraldsson",
                "Zip": "1617"
            },
            {
                "Address": "Frivei 3",
                "City": "NORTH POLE",
                "Country": "NORWAY",
                "Name": "Guri Kråkeslott",
                "Zip": "1617"
            },
            {
                "Address": "Green Road 104",
                "City": "SOUTH POLE",
                "Country": "LANGTVEKKISTAN",
                "Name": "Rachel Green",
                "Zip": "9999"
            }
        ]
    },
    "TimeStampNow": "2023-11-25T07:28:09"
}
Using JSON to exchange values between a FileMaker Script and an ACF functions
Sometimes, you need to return more than one value from a function. Since there are JSON functions in both the ACF language and in FileMaker, this is an ideal method.
Let's say, we have this API call to the Norwegian Company Register, and we want to use that to pull some name and address information and use it in a FileMaker Script to create a customer record based on its organizational number.
The function can return a simplified JSON object containing only the fields we need. The API call returns a rather complex JSON based on what information is registered about the company. This means that from the API there are variations in the returned data. The address, for example, can be the business address, or a postal address. We want the postal address if it's registered, or the business address otherwise.
Let's modify the API function a bit:
function GetCustomerInfoBrreg ( string orgNr )
    // remove non-digits from OrgNr
    orgNr = regex_replace ( "[^0-9]", orgNr, "");
    // request URL
    string url = "https://data.brreg.no/enhetsregisteret/api/enheter/" + orgNr;
    // Headers pr API-documentation
    string hdr = 'Accept: application/vnd.brreg.enhetsregisteret.enhet.v2+json;charset=UTF-8';
    // Perform the API request:
    JSON respons = HTTP_GET ( url, hdr );
    if ( respons["navn"] == "?" ) then
        return "";
    end if

    JSON returnData;

    // Pull some data from the response....
    returnData["CompanyName"] = respons["navn"];
    if ( respons["postadresse"] != "?") then
        returnData["address"] = respons["postadresse.adresse[1]"];
        returnData["Zip"] = respons["postadresse.postnummer"];
        returnData["City"] = respons["postadresse.poststed"];
        returnData["Country"] = respons["postadresse.land"];
    else
        returnData["address"] = respons["forretningsadresse.adresse[1]"];
        returnData["Zip"] = respons["forretningsadresse.postnummer"];
        returnData["City"] = respons["forretningsadresse.poststed"];
        returnData["Country"] = respons["forretningsadresse.land"];
    end if

    return returnData;
end
Then in a FileMaker script, you can use this function to call the API and get a simplified JSON object to create the record:
Set Variable [$Cust; Value: ACF_Run ( "GetCustomerInfoBrreg", Globals::OrgNoToCreate ) ]
if [ $Cust ≠ "" ]
    NEW Record/Request
    Set Field [ Customer::Name ; JSONGetElement ( $Cust ; "CompanyName" ) ]
    Set Field [ Customer::Address ; JSONGetElement ( $Cust ; "address" ) ]
    Set Field [ Customer::Zip ; JSONGetElement ( $Cust ; "Zip" ) ]
    Set Field [ Customer::City ; JSONGetElement ( $Cust ; "City" ) ]
    Set Field [ Customer::Country ; JSONGetElement ( $Cust ; "Country" ) ]
    Commit Records/Requests [ With dialog: Off ]
End If
Back to top
XML datatype in the ACF language
We have created the XML implementation as close as possible to the JSON implementation to make the learning curve as short as possible. However, there are some conceptual differences between the XML format and the JSON format.
Namespaces and Attributes: XML's use of namespaces and attributes offers a level of detail and organization not present in JSON. These features allow for more nuanced data structuring and meaning, especially in complex or hierarchical data models.
Array Representation: XML represents arrays differently than JSON. In XML, arrays are often implied through repeated child elements, whereas JSON uses explicit array notation. This difference affects how we'll parse and generate arrays in XML compared to JSON.
Addressing these conceptual differences is crucial in the design of the XML handling system that is both intuitive for users familiar with JSON in ACF and accurate to XML's structure and capabilities. The approach to namespaces, attributes, and array handling will significantly influence the syntax and functionality of the XML implementation.
Datatypes
We introduce two new datatypes for XML handling. The first is the XML document itself, declared exactly as JSON or any other datatype in ACF. The other is XML-references which is really a pointer pointing to a position in the XML structure.
Example:
XML myXMLDoc;
// Some initialization of the XML
myXMLDoc["rootNode.companies.company[]"] = XML("Name", "CompanyA", "Address", "....");
This means that in the XML structure, you have:
<?xml version="1.0" encoding="UTF-8"?>
<rootNode>
    <companies>
        <company>
            <Name>CompanyA</company>
            <Address>....</Address>
        </company>
    </companies>
</rootNose>
XML references
To make a short-hand to work with a part of the XML structure, we can create a pointer that points to the first company record in the structure, and now you can add more fields to this:
XMLref node = myXMLDoc["rootNode.companies.company[1]");

node["Phone"] = "12345678";
This changes the XML to look like this:
<?xml version="1.0" encoding="UTF-8"?>
<rootNode>
    <companies>
        <company>
            <Name>CompanyA</company>
            <Address>....</Address>
            <Phone>12345678</Phone>
        </company>
    </companies>
</rootNose>
XMLref as parameters and return-value in ACF functions
An XMLref variable is just a pointer to another XML variable's structure, so it cannot work without it. Once you return from a function, the XML variable that owns the data XMLref points to go out of scope. Therefore, the compiler will issue a compilation error if you try to return an XMLref using the return statement.
However, You can have an XMLref as a parameter to another function. Operations on it will act on the calling functions XML variable that it points to.
ARRAYs in XML
XML doesn't have an array construct like JSON has. However, arrays are created using repetitive XML constructs instead. Like this example:
<rootnode>
    <child>
        <Elem1>Value1</Elem1>
        <Elem2>Value2</Elem2>
    </child>
    <child>
        <Elem1>Value3</Elem1>
        <Elem2>Value3</Elem2>
    </child>
</rootnode>
In ACF, this construct is made like this:
XML myXML;
myXML["rootnode.child[]"] = XML ("Elem1", "Value1", "Elem2", "Value2");
myXML["rootnode.child[]"] = XML ("Elem1", "Value3", "Elem2", "Value4");
This syntax tells the function to add a new child to the rootnode, containing the key/value pairs as described. This syntax looks similar to the JSON functions in ACF, but the difference is that the child node in JSON is not repeated, but the key/value pairs are added to a JSON array below child.
To get the value of the Ellem2-tag for the second child in the example above, we would write:
string myValue = myXML["rootnode.child[2].Ellem2"];
Counting size of ARRAY in XML
To get the number of repeated child elements in the above example, you can use the SizeOf function.
int NoOfChilds = SizeOf ( myXML["rootnode.child"] ) ;
List the keys in the XML
If you want to know what keys are present in an XML node, you can use the list_keys function, similar to the same for JSON.
// From the XML made under the heading "ARRAYs in XML"
string myKeys = list_keys(myXML["rootnode.child[1]"]);
This will give the following value in myKeys:
Elem1
Elem2
Attributes and namespaces
Attributes and namespaces is a feature that does not exist for JSON type, so here we have some syntax and functions that do not operate on JSON, only for XML.
Namespaces
Namespaces in XML are used to avoid element name conflicts in XML documents. They're similar to the concept of namespaces in programming languages. When multiple XML-based languages are combined in a single XML document, namespaces ensure that element names from one language don't conflict with those in another.
A namespace is defined using the xmlns attribute in the start tag of an element. The value of this attribute is a URI (not necessarily a working URL) that uniquely identifies the namespace. After a namespace is declared, elements or attributes can be associated with it using a prefix.
For example:
<root xmlns:ns="http://www.example.com/ns">
  <ns:element>Content</ns:element>
</root>
Here, ns is the prefix associated with the namespace http://www.example.com/ns, and element belongs to this namespace. Namespace declarations apply to the element where they're declared and to all elements within that scope.
Attributes
XML attributes provide additional information about XML elements. They are always specified in the start tag of an element and generally come in name/value pairs like name="value". Attributes are used to provide properties of elements, such as configuration settings, identifiers, or other data that defines or describes the element.
Here's an example:
<book title="The Great Gatsby" author="F. Scott Fitzgerald" />
In this example, the book element has two attributes: title with the value "The Great Gatsby" and author with the value "F. Scott Fitzgerald". Attributes are a powerful way to add information to elements without cluttering the document's structure.
Using attributes and namespaces in the ACF language
As we can see namespace definitions are just an attribute to an XML tag. To define attributes and namespace definitions, we use the XML_set_attribute function. The parameter is an XML variable with the optional path in it, then the name of the attribute, and then as a third parameter, the value of the attribute.
To make the XML above, we can write:
XML myXML;
myXML["book"] = "";
XML_set_attribute ( myXML["book"], "title", "The Great Gatsby");
XML_set_attribute ( myXML["book"], "author", "F. Scott Fitzgerald");
To set a namespace on the root node of an XML document:
XML myXML;
myXML["root.ns:element"] = "Content";
XML_set_attribute( myXML, "xmlns:ns", "http://www.example.com/ns" ) ;
Getting a list of attributes
Importing and exporting XML
To initialize an XML variable with content from a file or from a WEB service, you use a simple assignment.
Example:
XML myXMLdoc;
int x;
x = open ("/path/to/xmlfile.xml", "r");
myXMLdoc = read(x);
close (x);
for exporting XML, you use the string conversion function:
XML myXMLdoc;
// creating some content in it.....
int x;
x = open ("/path/to/xmlfile.xml", "w");
write(x, string(myXMLdoc));
close (x);
Paths can be applied to the XML variable to export only a part of the XML or import a document into a specific path.
Extracting values from XMLs where namespaces are used.
Sometimes when reading XML documents, you don't know the namespace prefixes of a given tag. We have a somewhat simplified approach when addressing paths inside XML's. You can safely leave out the namespace prefix and use only the tag-name part of the tag.
For the example:
XML myXML;
myXML["root.ns:element"] = "Content";
XML_set_attribute( myXML, "xmlns:ns", "http://www.example.com/ns" ) ;

string theContent = myXML["root.element");
// or
string theContent = myXML["root.ns:element");
Both work fine to pull the content from the XML. If you have several element tags in different namespaces, you must obviously use the prefix to get the correct element.
Back to top
About Array Functions
Array functions were introduced in ACF to simplify programming with fields and datasets. In this version of ACF, we support one-dimensional arrays exclusively. Arrays can significantly streamline certain programming tasks.
Declaration:
array string myArr;     // Declared with zero elements.

// or an array with five elements:
array string myArr = {"ell1", "ell2", "ell3", "ell4", "ell5"};
Getting the value count for an array:
array string myArr = {"ell1", "ell2", "ell3", "ell4", "ell5"};
int x = sizeof(myArr); // should be 5
Adding elements to an array:
array string myArr = {"ell1", "ell2", "ell3", "ell4", "ell5"};
myArr[] = "ell6";
Accessing individual cells in an array:
array string myArr = {"ell1", "ell2", "ell3", "ell4", "ell5"};
print myArr[3]; // Should print "ell3" on the console.
You cannot set individual cells outside the currently counted cells; otherwise, you will encounter an "array index..." error.
Merging two arrays:
array string myArr = {"ell1", "ell2", "ell3", "ell4", "ell5"};
array string myArr2 = {"ell6", "ell7", "ell8", "ell9", "ell10"};
array string myArr3 = {myArr, myArr2}; // All ten elements. The list may contain constant strings or single variables too, merged into myArr3.
Also, consider exploring the Explode and Implode functions for more array manipulation options. The markdown example contains numerous array-related illustrations as well.
Back to top
Function: Explode
The explode function is used to create an array from a delimited string. It splits the input string into individual elements separated by a specified delimiter. This function is particularly useful when dealing with output from SQL queries or other scenarios where data is structured as a delimited string.
Parameters:
delimiter(string): The delimiter that separates the elements within the source string.source string(string): The delimited string that you want to split into an array.
Return value:
Type array string: An array where each cell contains one part of the original string.
Example:
string source = "Element1,Element2,Element3";
array string parts = explode ( ",", source);
int s = sizeof ( parts );
int i;
for (i = 1, s)
print "Part " + i + ": " + parts[i]+"\n";
end for
In this example, the explode function splits the source string using a comma (,) as the delimiter. The resulting array, parts, contains individual elements from the source string. The for loop then iterates through the array and prints each part to the console.
The output in the console will be:
Part 1: Element1
Part 2: Element2
Part 3: Element3
See also:
- Implode
This function is handy for parsing and processing delimited data within your FileMaker solution.
Back to top
Function: implode
The implode function creates a delimited string from an array. You specify both the delimiter and the array, and the function returns a string with the content of the array separated by the specified delimiter. This function is often used in conjunction with "explode," which performs the reverse operation. Typical use cases include building a value list for an SQL query or creating a CSV line for export.
When working with SQL queries in FileMaker, you often receive results as a delimited list. Using the explode function followed by implode allows you to process this data efficiently, making it easier to access individual fields within the SQL result.
Parameters:
| Parameter name | Type | Description |
|---|---|---|
| delimiter | string | The character or string that joins the elements of the array. |
| array | array | The array to be processed. |
Return value: Type String: The resulting delimited array.
Example:
array string headers = {"ID", "Name", "Address", "Zip", "Town"};
print implode(", ", headers);
// This will output to the console:
ID, Name, Address, Zip, Town
In this example, an array named headers is joined into a delimited string using implode, with a comma and a space as the delimiter. The resulting string is printed to the console.
References:
- The Console function
This section explains the usage of the implode function in ACF, demonstrating how to create delimited strings from arrays, making it useful for various tasks such as building value lists or processing SQL query results.
Back to top
Function: SQL Queries and Array Functions
When working with SQL queries in FileMaker, especially in the absence of native array functionality, SQL query results are typically returned as delimited lists. Handling these results requires parsing to access individual record fields. This process involves:
- Cleaning up the result to remove line breaks and applying substitutions as needed.
- Replacing record separators with line breaks to separate records.
- Iterating through the records and replacing field separators with line breaks to retrieve each field using the GetValue function.
This approach can be somewhat tedious and error-prone.
The array concept in ACF simplifies this process significantly. You no longer need to worry about line breaks in the result set as long as you use delimiters that don't exist in your retrieved data. A common practice is to use "||" for field separation and "|*|" for record separation.
With ACF, you can use array functions like explode to convert the result set into arrays effortlessly.
Example:
string resultSet = ExecuteSQL("........"; "||"; "|*|");
array string fields, recs = explode("|*|", resultSet);
int i, noRecs = sizeof(recs);
for (i = 1, noRecs)
fields = explode("||", recs[i]);
// Now you can access each field in the record individually using fields[1], fields[2], ... fields[n]...
end for
This method makes it much easier to work with SQL query results, eliminating the need for complex parsing and simplifying your code. For more examples of SQL functions in the plugin, refer to the article about SQL functions.
Back to top
FileSystem Functions
An Overview of the File-System Functions
File Input/Output (File I/O) is a fundamental aspect of computing, and while FileMaker has some built-in capabilities, they may not always meet all your needs. Therefore, we've included robust file-system functions in ACF to empower your FileMaker solutions with versatile file operations.
In addition to the basic file operations like opening, closing, reading, and writing to files, ACF offers a comprehensive suite of file-system functions:
Select File Dialogue: A convenient function to open a system dialog for selecting files, making it easy for users to choose files for processing.
Select Directory Dialogue: Similar to the file dialogue but designed for selecting directories (folders). This function simplifies directory selection within your solutions.
Choose File Name and Directory for Saving: A function that opens a system dialog to allow users to specify a file name and directory for saving, ensuring files are stored precisely where they want them.
Copy File: Easily duplicate files with this function. Copy a file from one location to another within your file system.
Move File: Move files from one location to another using this function. Efficiently organize your files and directories.
Delete File: Remove unwanted files from your file system using this function. Keep your storage clean and clutter-free.
File Size: Determine the size of a file with this function. Useful for monitoring and managing storage usage.
List Files in a Directory: Retrieve a list of files contained within a directory. This function simplifies tasks involving multiple files in a folder.
Get Document Directory: Find the document directory specific to your platform (e.g., macOS, Windows, iOS) with this function.
Get Desktop Directory: Quickly access the desktop directory location for your platform.
Get Temporary Directory: Retrieve the temporary directory path, typically used for temporary file storage.
Get Home Directory: Get the user's home directory path, ensuring access to a user's personal storage space.
The "Create File" function is not necessary because when you open a file for writing, and it doesn't exist, it will be created automatically. This approach simplifies file creation.
It's worth noting that ACF provides an efficient method for handling file operations. When you open a file using ACF, you receive a file ID, which you can assign to an integer variable. This file ID allows you to interact with the file in multiple function calls, such as reading and writing. You don't need to close the file immediately after opening it; you can continue to work with it and close it explicitly when you're finished.
ACF uses POSIX paths (Unix paths) for file operations, simplifying path handling. There's no need to deal with various path syntaxes like "file:///" or "filemac://"; you can work with standard POSIX paths directly.
In summary, ACF's file-system functions provide a powerful toolkit for managing files and directories within your FileMaker solutions efficiently. Whether you need to read, write, copy, move, or delete files, or interact with directories, ACF simplifies the process and makes file operations seamless.
- table comes here -
Back to top
Function: File_Exists
Check if a file with given path exists in the file-system. To avoid errors one can check if a file exists before trying to open it, to example.
Prototype:
bool z = file_exists ( "/path/to/file.txt");
Parameters:
| Parameter name | Type | Description |
|---|---|---|
| path | string | full path or relative path to the acutal file |
Return value: Type Boolean : True if file exists, otherwise false.
Example:
if ( file_exists ( "datafile.txt")) then
// read the datafile
else
// Create the datafile
end if
See also:
- Directory exists
- open
- close
Back to top
Function: directory_exists
Check if a directory in the file-system exists or not. Can be used to conditionaly create directories before putting files in them, to example.
Prototype:
bool z = directory_exists ( string path );
Parameters:
| Parameter name | Type | Description |
|---|---|---|
| path | string | path to directory, without a trailing slash (/) |
Return value: Type Bool : True if the directory exists, otherwise false.
Example:
string dir = "/users/ole/Desktop/MyLoggFiles", res;
if ( ! direcotry_exists ( dir)) then
res = create_directory ( dir );
end if
// Put some log-file in it.
string loggfile = dir + "/loggfile.txt"
int x = open ( loggfile, "wa" );
write ( x, format ("%s Some logg text...", string(now(), "yyyy-mm-dd" )));
close ( x );
See also:
- Create_Direcotory
- Delete_Directory
- File_Exists
Back to top
Function: Create_Directory
Create a directory if it does not exists. This function also creates intermediate directories if neccessary.
Prototype:
string result = create_directory ( string path);
Parameters:
| Parameter name | Type | Description |
|---|---|---|
| Path | string | path to the target directory |
Return value: Type string : Returns "OK" if the direcotry exists or is created. Otherwise an error message.
Example:
string res = create_directory("/Users/ole/Desktop/loggfiles/a/b/c/d/e/f");
Suppose "loggfiles" does not exits from before then the following happens.
- The directory "loggfiles" is created on the desktop of user "ole", then
- "a" inside it, then
- "b" inside "a", then
- "c" inside "b", then
- "d" inside "c", then
- "e" inside "d", then
- finaly "f" inside "e".
Otherwise, if some of the directories in this path does not exists, they are created as needed.
See also:
- Directory_exists
- File_Exists
Back to top
Function: open
The open function allows you to open a filesystem file for read, write, or write-append access.
Parameters:
| Parameter Name | Type | Description |
|---|---|---|
| Filename | string | Full path or relative path of the file. Use ~ to refer to the user's home folder. |
| Access Mode | string | Either "r" (read), "w" (write), or "wa" (write append) mode. |
Return Value:
Type Int: An integer number representing the open file, which can be used as a parameter in subsequent function calls to write more bytes to the same file.
Example:
int x = open("myFile.txt", "w");
write(x, "This is a line of text to the file");
write(x, format("\nHere are some data, %s, %d, %s, %d", "data1", 22, "data2", 33));
close(x);
Related:
- read
- write
- close
Back to top
Function: read
The read function reads the entire content of a file into a string variable. It takes the open file ID obtained from the "open" function as a parameter. If you want to read a file line by line, consider using the readline function. After the content has been read, you must close the file using the close command.
Parameters:
| Parameter Name | Type | Description |
|---|---|---|
| FileID | int | File ID obtained from the "open" function. |
Return Value:
Type TEXT: The content of the file.
Example:
int x = open("myfile.txt", "r");
string content = read(x);
close(x);
See Also:
- open file
- close file
- write to file
Back to top
Function: readline
The readline function is similar to read, but it reads only one line at a time. It is designed for use when sequentially processing lines in a file, such as during an import operation.
Parameters:
| Parameter Name | Type | Description |
|---|---|---|
| FileID | int | FileID obtained from the open function. |
Return Value:
Type string: The next line in the file. When the end of the file is reached, it returns "EOF" (End of File).
Example:
int x = open("myFile.txt", "r");
string line;
repeat
line = readline(x);
// .. do something with the line
until (line == "EOF");
The readline function is useful for reading and processing files line by line, making it suitable for various tasks like data imports.
Back to top
Command: write
The "write" command is used to write the contents of a string variable to a file. You can perform multiple writes to the same file, appending each write to the existing content, as long as the file remains open. If the file is opened in "wa" mode, the write operation will append the content to the end of the file.
Parameters:
| Parameter Name | Type | Description |
|---|---|---|
| FileID | int | The FileID returned from the "open" function. |
| text | string | The text to write, which can span multiple lines. |
Return Value:
The "write" command does not return any value.
Example:
int x = open("myfile.txt");
write(x, "This is the first line\n");
write(x, "This is the second line\n");
close(x);
In this example, we open the file "myfile.txt," write two lines of text to it, and then close the file.
Keeping Files Open Across Several ACF Function Calls
It is possible to maintain a file open for writing across multiple ACF function calls by utilizing a global variable to store the FileID (x in the example above). One function can open the file, write some content to it, and leave it open. Then, another function can continue to write to the same file, and a third function can eventually close it. This approach allows for the coordination of file operations across multiple ACF functions within a FileMaker Script. Alternatively, the function responsible for opening the file can return the FileID back to FileMaker, which can then pass it as a parameter to subsequent ACF functions for write operations and, finally, close the file. This latter method ensures better concurrency control, as separate processes do not share the same FileID, enhancing the reliability of file handling.
References:
- No references
Back to top
Function: close
The "close" function is used to close a previously opened filesystem file. When you've finished working with a file, it's essential to close it properly to free up system resources and ensure data integrity.
Function Prototype
close(<File ID>);
Parameters
File ID(int): An integer number returned from a previously applied open function, which represents the file you want to close.
Return Value
Type: None - There is no return value for the "close" function.
Example
int x = open("myFile.txt", "r");
// Perform operations on the file
close(x);
In this example, the "open" function is used to open the file "myFile.txt" for reading. After performing operations on the file, the "close" function is called to properly close it.
The "close" function is an essential part of working with files in ACF and ensures that files are handled correctly and efficiently.
References
- open
- read
- write
The "close" function allows you to gracefully conclude your file operations in ACF, promoting proper resource management and data integrity.
Back to top
Function: save_file_dialogue
The save_file_dialogue function opens a file dialog for the user to select a new or existing filename to be used in a later script step. This function does not create the file or write any content to it. If the selected file already exists, the user is prompted to confirm whether they want to overwrite it.
Parameters:
| Parameter name | Type | Description |
|---|---|---|
| prompt | string | Text displayed in the title bar of the save file dialog. |
| InDir | string | Path pre-selected in the dialog. |
| filename | string | A proposed filename that the user can edit. |
Return value: Type string: The full path of the selected file. If empty, it means the user clicked the "Cancel" button.
Example:
string root = "~/Documents/";
string selectedFile = save_file_dialogue("Save file as?", root, "test.txt");
Use this function to allow users to specify a file location and name for saving files in your FileMaker solution.
References:
- No references available at this time.
Back to top
Function: select_directory
The select_directory function opens a dialog that allows the user to select a directory (folder).
Parameters:
| Parameter name | Type | Description |
|---|---|---|
| prompt | string | Text displayed in the dialog's title bar. |
Return value:
Type string: The full path of the directory selected by the user. If the user cancels the dialog, an empty string is returned.
Example:
string selectedDirectory = select_directory("Choose a directory for HTML");
if (selectedDirectory == "") then
// The user canceled the selection
end if
Use this function when you need users to specify a directory location within your FileMaker solution.

References:
- No references available.
Back to top
Function: Copy_file and Move_file
The copy_file and move_file functions allow you to perform file operations in ACF. You can copy or move files from a source path to a destination path. However, please note that the source file must exist, and the destination directory must also exist before performing these operations.
About move_file
When using the move_file function, the behavior depends on whether the source and destination are on different disks or the same drive:
- Different Disks: The function will copy the file to the destination and then remove the source file.
- Same Drive: The function will directly move the file to the destination, effectively renaming it.
To rename a file, you can simply move it to the desired location with a different name.
Prototype:
string copy_file ( <Source file path>, <Destination path>);
string move_file ( <Source file path>, <Destination path>);
Parameters:
Source file path: The POSIX path to the source file.Destination path: The POSIX path to the destination file.
Return value:
Type string: "OK" if the operation was successful, otherwise an error message.
Example: Copy File
function testCopyFile ()
string file1 = select_file ("Choose a file to copy?", desktop_directory()) ;
if ( file1 == "" ) then
return ""; // User hit cancel
end if
string wohin = select_directory("Destination directory?");
if ( wohin == "" ) then
return ""; // User hit cancel
end if
string newfn = regex_replace("^(.+)/(.+\..+)$", file1, wohin + "/\2");
print format ("Chosen file: %s\nDest.dir: %s\nNew Path: %s\n", file1, wohin, newfn);
if ( file1 == newfn ) then
throw "No match in regex";
end if
return copy_file ( file1, newfn ) ;
END
Example: Move File
function testMoveFile ()
string file1 = select_file ("Choose a file to move?", desktop_directory()) ;
if ( file1 == "" ) then
return ""; // User hit cancel
end if
string wohin = select_directory("Destination directory?");
if ( wohin == "" ) then
return ""; // User hit cancel
end if
string newfn = regex_replace("^(.+)/(.+\..+)$", file1, wohin + "/\2");
print format ("Chosen file: %s\nDest.dir: %s\nNew Path: %s\n", file1, wohin, newfn);
if ( file1 == newfn ) then
throw "No match in regex";
end if
return move_file ( file1, newfn ) ;
END
In these examples, a file selection dialogue allows you to choose a file, followed by a directory selection dialogue for specifying the destination directory. A regular expression (regex_replace) is used to create a new path for the destination. The console output displays the chosen file, destination directory, and the new path.
Moving or Copying Directories
Both move_file and copy_file functions can also work on directories. If the source path points to a directory, the entire directory will be moved or copied to the destination. In the example provided, we've adjusted the regular expression to accommodate directory names.
Example: Copy Directory
function testCopyDirectory ()
string dir1 = select_directory ("Choose a directory to copy?", desktop_directory()) ;
if ( dir1 == "" ) then
return ""; // User hit cancel
end if
string wohin = select_directory("Destination directory?");
if ( wohin == "" ) then
return ""; // User hit cancel
end if
string newdir = regex_replace("^(.+)/([^/]+)$", dir1, wohin + "/\2");
print format ("Chosen directory: %s\nDest dir: %s\nNew Path: %s\n", dir1, wohin, newdir);
if ( dir1 == newdir ) then
throw "No match in regex";
end if
return copy_file ( dir1, newdir ) ;
END
In this example, you can choose a directory for copying to another location. The regular expression creates the new path for the destination directory.
These functions provide convenient ways to copy or move files and directories within your FileMaker solution.
Back to top
Character Set Conversion
FileMaker uses the UTF-8 character set internally, but there may be situations where you need to read from or write to files in different character sets. To facilitate character set conversion, ACF provides two essential functions: "to_utf" and "from_utf." These functions allow you to convert strings between UTF-8 and other character sets, making it easier to handle data in various encodings.
from_utf Function
The "from_utf" function converts a UTF-8 string to a character set specified in the second parameter. This function is particularly useful when you need to convert strings before writing them to files in a specific character set.
to_utf Function
Conversely, the "to_utf" function converts a string from a character set specified in the second parameter to UTF-8. You can employ this function to convert strings after reading them from files encoded in various character sets.
Supported Character Sets
ACF supports a wide range of character sets for conversion. Here are the valid character set specifications:
- windows-874
- Shift_JIS
- GB2312
- KSC5601-1987
- Big5
- windows-1250
- windows-1251
- windows-1252
- windows-1253
- windows-1254
- windows-1255
- windows-1256
- windows-1257
- windows-1258
- US-ASCII
- KOI8-R
- EUC-JP
- KOI8-U
- ISO-8859-1
- ISO-8859-2
- ISO-8859-3
- ISO-8859-4
- ISO-8859-5
- ISO-8859-6
- ISO-8859-7
- ISO-8859-8
- ISO-8859-9
- ISO-8859-13
- ISO-8859-15
- ISO-2022-JP
- ISO-2022-KR
- EUC-KR
- GB18030
Function Prototypes
from_utf Function Prototype
string converted = from_utf(string SourceUTF8String, ToCharacterSet);
SourceUTF8String: The string containing the UTF-8 string to convert from.ToCharacterSet: A string containing one of the character sets mentioned above to specify the conversion destination.
to_utf Function Prototype
string destUTF8string = to_utf(string SourceString, FromCharacterSet);
SourceString: The string containing the text to convert.FromCharacterSet: A string containing one of the character sets mentioned above to specify the conversion source.
Platform-Specific Implementation
It's important to note that while most conversion codes should work on both Mac and Windows platforms, there may be some differences in implementation. The Mac version of the plugin utilizes the "iconv" library for conversions, while the Windows version uses the boost::locale library. If you encounter specific conversion needs or issues, you can contact the developer for further exploration or refer to the respective libraries for more information.
Example:
string utftext = to_utf("My ISO8859-1 text to be converted", "ISO-8859-1");
string isotext = from_utf(utftext, "ISO-8859-1");
In this example, the "to_utf" function converts a string from ISO-8859-1 to UTF-8, and the "from_utf" function converts it back to ISO-8859-1.
The "from_utf" and "t_utf" functions in ACF provide a convenient way to handle character set conversions when working with different encodings in your FileMaker solutions.
Back to top
MarkDown - HTML
Introduction: Markdown to HTML Conversion Functions
A set of functions is employed to convert Markdown text into HTML format. The output can either be a string containing HTML code or a file saved on disk.
Setup
To make these functions work, you need to specify a destination HTML directory where the HTML documents will be stored. This directory serves as the root directory for the website hosting the HTML files. It's crucial to ensure that this directory contains the "Themes" folder that comes with the plugin. Simply copy the "Themes" folder into your designated HTML directory to set it up.
The command set_markdown_html_root is used to define this directory before initiating the conversion process.
Additional CSS: You have the option to specify an additional CSS file that will be included in the generated HTML code. This CSS file allows you to customize or modify the styling of the resulting documents as needed.
The command set_markdown_CSS is used to specify this additional CSS file (optional).
Styling:
The "Themes" folder within the plugin contains named themes and code styles for use, particularly in pre-code boxes. The second parameter of the markdown2html function call, named "style," accepts a comma-separated list of style and code style names.
Example:
package myTestPackage "This is a small test to convert Markdown";
function ConvertMarkdown ()
string root = select_directory("Select the root directory for HTML");
set_markdown_html_root ( root ) ;
string sf = select_file ("Select a Markdown File?");
if (sf != "") then
string df = save_file_dialogue ("Save file as?", "test.html", root);
if (df != "") then
string res = markdown2html (sf, "solarized-dark,monokai", df);
print res;
end if
end if
return "OK";
end
Compile the script using the "ACF_CompileText" plugin function provided by the ACF_Functions plugin. If there are no compilation errors, the product is already loaded and can be executed.
In a FileMaker Script step, use the following:
Set Variable ( $x; ACF_run ( "ConvertMarkdown") )
References:
- Markdown functions
Back to top
Command: set_markdown_html_root
The set_markdown_html_root command is used to set the root path for the HTML directory where subsequent calls to convert Markdown documents to HTML will be stored. This directory must contain a "Themes" folder with the CSS styles and themes used for the conversion. Failing to use this command before calling Markdown to HTML conversion functions may cause those functions to fail due to the inability to locate the themes folder.
Parameters:
| Parameter name | Type | Description |
|---|---|---|
| path | string | The full path of the HTML folder. |
Return value:
No return value.
Example:
string root = select_directory("Choose the root directory for HTML");
if ( root == "" ) then
return "Canceled";
end if
set_markdown_html_root(root);
Use this command when you want to specify the root directory for storing HTML files generated from Markdown.
References:
- Markdown functions
Back to top
Function: markdown2html
Convert a document in Markdown format to HTML using themes. You select themes to be used for styling the HTML to be a good looking HTML representation of the Markdown document. The function uses the html root path specified in the "set_markdown_html_path" command to locate the themes folder with the CSS for selected theme.
Parameters:
| Parameter name | Type | Description |
|---|---|---|
| SourceFile | string | Full path to the source Markdown file |
| Style | string | <style>, <codestyle> Pick one style and one codestyle from the table below separat by comma. See example. |
| Output file | string | resulting html full path |
Return value: Type TEXT : Status of the operation. If Output file is not specified, the returnvalue contains the HTML tekst.
Example:
string root = select_directory("Velg root katalog for HTML");
set_markdown_html_root ( root ) ;
string res = markdown2html (sf, "solarized-dark,monokai", df);
Markdown styles:
| Style Name | Type | Description |
|---|---|---|
| black | style | |
| foghorn | style | |
| github | style | |
| solarized-light | style | |
| solarized-dark | style | |
| dirt | style | |
| ghostwriter | style | |
| witex | style | |
| agate | codestyle | |
| dark | codestyle | |
| monokai_sublime | codestyle | |
| androidstudio | codestyle | |
| darkula | codestyle | |
| obsidian | codestyle | |
| arta | codestyle | |
| default | codestyle | |
| paraiso | codestyle | |
| ascetic | codestyle | |
| docco | codestyle | |
| pojoaque | codestyle | |
| atelier-cave | codestyle | |
| far | codestyle | |
| railscasts | codestyle | |
| atelier-dune | codestyle | |
| foundation | codestyle | |
| rainbow | codestyle | |
| atelier-estuary | codestyle | |
| github | codestyle | |
| school_book | codestyle | |
| atelier-forest | codestyle | |
| github-gist | codestyle | |
| solarized_dark | codestyle | |
| atelier-heath | codestyle | |
| googlecode | codestyle | |
| solarized_light | codestyle | |
| atelier-lakeside | codestyle | |
| grayscale | codestyle | |
| sunburst | codestyle | |
| atelier-plateau | codestyle | |
| hopscotch | codestyle | |
| tomorrow | codestyle | |
| atelier-savanna | codestyle | |
| hybrid | codestyle | |
| tomorrow-night | codestyle | |
| atelier-seaside | codestyle | |
| idea | codestyle | |
| tomorrow-night-blue | codestyle | |
| atelier-sulphurpool | codestyle | |
| ir_black | codestyle | |
| tomorrow-night-bright | codestyle | |
| brown_paper | codestyle | |
| kimbie | codestyle | |
| tomorrow-night-eighties | codestyle | |
| brown_papersq | codestyle | |
| magula | codestyle | |
| vs | codestyle | |
| codepen-embed | codestyle | |
| mono-blue | codestyle | |
| xcode | codestyle | |
| color-brewer | codestyle | |
| monokai | codestyle | |
| zenburn | codestyle |
Back to top
Programming Examples
📌 Practical Example: Calculating Distance Between Cities
In this tutorial, we’ll create a set of ACF functions that allow you to calculate the distance between two cities based on their names.

We'll implement the following components:
- A function to look up coordinates for each city using an external API
- A function to calculate the distance between two coordinate pairs
- A final function to present the result in a readable format
🌍 Looking Up City Coordinates via API
To retrieve the geographic coordinates (latitude and longitude) of a city, we use a free public API: Nominatim, based on OpenStreetMap.
Since the ACF language does not (yet) include a built-in url_encode function, we'll first create a small helper function to encode city names for safe inclusion in the API URL.
For plugin version 1.7.5.2: This function is built in with the name URL_Encode
Function UrlEncode:
Function UrlEncode ( string input ) // → string encoded
string safe = "abcdefghijklmnopqrstuvwxyzABCDEFGHIJKLMNOPQRSTUVWXYZ0123456789-_.~";
string encoded = "", c;
int i;
for (i = 0; length(input)-1)
c = mid(input, i, 1);
if (pos(safe, c) >= 0) then
encoded += c;
else
encoded += "%" + format("%02X", ascii(c));
end if
end for
return encoded;
End
Then we go to the API function itself. It is called GetCityCoordinates
This will return a JSON object, containing the latitude and the longitude coordinates.
Function GetCityCoordinates ( string cityName ) // → float lat, float lon
string baseUrl = "https://nominatim.openstreetmap.org/search";
string url = format("%s?q=%s&format=json&limit=1", baseUrl, Url_Encode (cityName));
string res = http_get(url,"User-Agent: MyACFapp/1.0");
if (res == "" || HTTP_STATUS_CODE != 200) then
throw "No response from Nominatim API";
end if
JSON js;
js["a"] = res;
string latStr = js["a[1].lat"];
string lonStr = js["a[1].lon"];
if (latStr == "?" || lonStr == "?") then
throw "City not found";
end if
float lat = float(latStr);
float lon = float(lonStr);
return json ("lat", lat, "lon", lon);
End
📐 Calculating the Distance
Now that we can request coordinates for two cities, we can calculate the distance between them using the Haversine formula. You could use the Pythagorean theorem, but since we're not flat-earthers, we need a formula that accounts for the curvature of the Earth — and that's exactly what the Haversine formula does.
But before we implement it, we need a helper function: Atan2.
ℹ️ What is atan2?
atan2 is a special arctangent function that returns the angle (in radians) between the x-axis and the point (x, y) on a 2D plane. It’s a smarter version of atan(y / x) that also takes direction into account.
🔍 Why not just use atan(y / x)?
Because atan(y / x) loses quadrant information:
- It only knows the ratio, not the signs of
xandyseparately. - It can’t distinguish between
(1, 1)and(-1, -1)— both produce the same result.
atan2(y, x) fixes this by:
- Taking two arguments (y and x),
- And correctly computing the angle in all four quadrants.
This would be a good candidate for a built-in ACF function in the future. But since it’s not currently available (and FileMaker doesn’t have it either), we’ll create our own version:
Note: Plugin version 1.7.5.2 has this function natively, so it will not be neccessary
Function: Atan2
Function Atan2 ( float y, float x )
if (x > 0) then
return atan(y / x);
elseif (x < 0 && y >= 0) then
return atan(y / x) + pi;
elseif (x < 0 && y < 0) then
return atan(y / x) - pi;
elseif (x == 0 && y > 0) then
return pi / 2;
elseif (x == 0 && y < 0) then
return -pi / 2;
else
throw "Atan2 is undefined for (0, 0)";
end if
End
Then we can make a function for the Haversine formula.
Function HaversineDistance:
Function HaversineDistance ( float lat1, float lon1, float lat2, float lon2 )
// Earth's radius in kilometers
float R = 6371;
// Convert degrees to radians
float fi1 = lat1 * pi / 180;
float fi2 = lat2 * pi / 180;
float dtfi = (lat2 - lat1) * pi / 180;
float dtlb = (lon2 - lon1) * pi / 180;
// Haversine formula
float a = sin(dtfi / 2)^2 + cos(fi1) * cos(fi2) * sin(dtlb / 2)^2;
float c = 2 * atan2(sqrt(a), sqrt(1 - a));
return R * c;
End
🧩 Wrapping Up
Now that we’ve built all the pieces, let’s put them together.
We’ll create a function that takes two city names, looks up their coordinates, and returns the distance between them in kilometers.
Function: CityDistance
Function CityDistance ( string cityA, string cityB )
JSON a = GetCityCoordinates(cityA);
JSON b = GetCityCoordinates(cityB);
float lat1 = float(a["lat"]);
float lon1 = float(a["lon"]);
float lat2 = float(b["lat"]);
float lon2 = float(b["lon"]);
return HaversineDistance(lat1, lon1, lat2, lon2);
End
💡 Bonus: Presenting the Result — the Nerdy Way
If we’re feeling a bit nerdy (and why not?), we can enhance the result by adding a descriptive text and calculating how long light would take to travel the same distance — in microseconds.
To do this, we use a value converter called m2lighty to convert meters into light-years. Then we multiply the result by the number of seconds in a year to get the time light would take, and finally multiply by 10^6 to express it in microseconds.
Function DisplayCityDistance:
Function DisplayCityDistance (string cityA, string cityB)
float distkm = CityDistance(cityA, cityB);
float distmiles = distkm*0.621371;
float distlysec = m2lighty(distkm*1000.0)*365*24*60*60;
return format ("The distance between %s and %s is %.1f km, (%.1f miles)\n(%f us at lightspeed)",
cityA, cityB, distkm, distmiles, distlysec*10^6);
end
Testing
In FileMaker, we run this script:
Set Field [test::result; ACF_Run("DisplayCityDistance"; test::FromCity; test::ToCity]
For the cities of New York and Fredrikstad, it came up with
The distance between New York and Fredrikstad is 5948.5 km, (3696.2 miles)
(19828.351929 us at lightspeed)
Full listing:
This listing is for plugin version 1.7.5.2, which has the URL_Encode and Atan2 as standard functions.
Package CityDistances "Functions to calculate the distance beween cities";
Function HaversineDistance ( float lat1, float lon1, float lat2, float lon2 )
print format ("\n\n %f, %f, %f, %f", lat1, lon1, lat2, lon2);
// Earth's radius in kilometers
float R = 6371;
// Convert degrees to radians
float fi1 = lat1 * pi / 180;
float fi2 = lat2 * pi / 180;
float dtfi = (lat2 - lat1) * pi / 180;
float dtlb = (lon2 - lon1) * pi / 180;
// Haversine formula
float a = sin(dtfi / 2)^2 + cos(fi1) * cos(fi2) * sin(dtlb / 2)^2;
float c = 2 * atan2(sqrt(a), sqrt(1 - a));
return R * c;
End
function OsloNYCDist ()
float d = HaversineDistance(59.9139, 10.7522, 40.7128, -74.0060); // Oslo to NYC
Print format("Distance: %.1f km", d);
return d;
end
Function GetCityCoordinates ( string cityName ) // → float lat, float lon
string baseUrl = "https://nominatim.openstreetmap.org/search";
string url = format("%s?q=%s&format=json&limit=1", baseUrl, URL_Encode(cityName));
string res = http_get(url,"User-Agent: MyACFapp/1.0");
if (res == "") then
throw "No response from Nominatim API";
end if
// print res;
JSON js;
js["a"] = res;
print string(js);
string latStr = js["a[1].lat"];
string lonStr = js["a[1].lon"];
if (latStr == "" || lonStr == "") then
throw "City not found";
end if
// print latstr;
float lat = float(latStr);
float lon = float(lonStr);
return json ("lat", lat, "lon", lon);
End
Function CityDistance ( string cityA, string cityB )
JSON a = GetCityCoordinates(cityA);
JSON b = GetCityCoordinates(cityB);
//print string (a);
//print string (b);
float lat1 = float(a["lat"]);
float lon1 = float(a["lon"]);
float lat2 = float(b["lat"]);
float lon2 = float(b["lon"]);
return HaversineDistance(lat1, lon1, lat2, lon2);
End
Function DisplayCityDistance (string cityA, string cityB)
float distkm = CityDistance(cityA, cityB);
float distmiles = distkm*0.621371;
float distlysec = m2lighty(distkm*1000.0)*365*24*60*60;
return format ("The distance between %s and %s is %.1f km, (%.1f miles)\n(%f us at lightspeed)",
cityA, cityB, distkm, distmiles, distlysec*10^6);
end
Back to top
Interacting with a Web Microservice and Updating the Database
This demo showcases how to use an ACF custom function to interact with a web microservice and update the database with the data it returns.
The microservice, developed in PHP, is responsible for moving XML files stored locally to an SFTP server. It then scans a designated folder on that SFTP server to retrieve XML receipt files. These files are decoded, and the service returns an SQL statement that updates the database.
This is part of a comprehensive solution designed to generate EHF format files for invoicing. Another service within the solution handles the generation of these files based on invoice data. The generated files are stored on the server until this microservice is called to deliver them to the SFTP server, where they are queued for delivery.
The function is triggered once all EHF documents are generated. It retrieves and decodes the receipt files, then uses an SQL INSERT statement to add the retrieved data into a FileMaker table, allowing the receipts to be viewed directly within the invoice layout.
/*
Check status, send accumulated EHF files from the server, retrieve receipt files, and update the database.
*/
function EHFStatus ( string APIkey, string Bank, string Company, string addr1, string addr2, string postnr, string sted, string orgnr )
// Make the post data:
string crlf = "\r\n";
string vb1 = "----WebKitFormBoundaryvaBIqQXnhryXmJxO";
string vb2 = "--" + vb1 + crlf;
string vb3 = "--" + vb1 + "--" + crlf;
string vUrl = "https://example.com/ws/EHFStatus_new.php";
string h1 = "APIkey||Bank||FirmaNavn||Adresse1||Adresse2||Postnr||Sted||OrgNr\n";
string h2 = APIkey + "||" + Bank + "||" + Company + "||" + addr1 + "||" + addr2 + "||" + postnr + "||" + sted + "||" + orgnr + crlf;
string postdata = vb2 + "Content-Disposition: form-data; name=\"CompanyDetails\"" + crlf + crlf + h1 + h2;
postdata = postdata + vb3;
$$LastPost = postdata; // To debug, lets see the post after call in the data viewer
// headers in the post request
string hdrs = format ( "Content-Type: multipart/form-data; boundary=%s",vb1 );
// Then send the data
string resData = HTTP_POST ( vUrl, postData, hdrs);
// Parse the result...
if ( pos ( resData, "FEIL")>-1) then
alert ( resData);
end if
string sttag = "===DATA TO BE INSERTED===";
string entag = "===END DATA to BE INSERTED===";
string insdata = trimboth ( between ( resData, sttag, entag));
bool allcomp = pos(resData, "===ALL COMPLETED===")>0;
bool partly = pos(resData, "===PARTLY COMPLETED===")>0;
// Update the database
string sql, ressql;
if (length(insdata)>0 ) then
sql = "INSERT INTO EHF_InvoiceStatus (Invoice_nr, RecDate, RecTime, Message) " + insdata;
print sql;
ressql = ExecuteSQL ( sql );
if (ressql != "" ) then
alert (ressql);
end if
end if
return partly;
end
When run, this now result in a SQL statement to update the database. The SQL is executed by the function using its ExecuteSQL implementation that also can insert data opposed to the same function in FileMaker that does not allow that. The microservice just returns the part starting with "VALUES", so the first part is supplied by the function in the SQL below.
INSERT INTO EHF_InvoiceStatus (Invoice_nr, RecDate, RecTime, Message) VALUES
(55893, DATE '2024-08-16','13:15:20','Document has been processed and forwarded to PEPPOL'),
(55890, DATE '2024-08-16','13:15:20','Document has been processed and forwarded to PEPPOL'),
(55892, DATE '2024-08-16','13:15:20','Document has been processed and forwarded to PEPPOL'),
(55891, DATE '2024-08-16','13:15:20','Document has been processed and forwarded to PEPPOL'),
(55889, DATE '2024-08-16','13:15:20','Document has been processed and forwarded to PEPPOL'),
(55895, DATE '2024-08-16','13:15:20','Document has been processed and forwarded to PEPPOL'),
(55896, DATE '2024-08-16','13:15:20','Document has been processed and forwarded to PEPPOL'),
(55897, DATE '2024-08-16','13:15:20','Document has been processed and forwarded to PEPPOL'),
(55899, DATE '2024-08-16','13:15:20','Document has been processed and forwarded to PEPPOL'),
(55901, DATE '2024-08-16','13:15:20','Document has been processed and forwarded to PEPPOL'),
(55897, DATE '2024-08-16','12:56:36','Kvittering for mottatt EHF faktura fra NETS'),
(55899, DATE '2024-08-16','12:56:36','Kvittering for mottatt EHF faktura fra NETS'),
(55901, DATE '2024-08-16','12:56:36','Kvittering for mottatt EHF faktura fra NETS'),
(55889, DATE '2024-08-16','12:56:33','Kvittering for mottatt EHF faktura fra NETS'),
(55890, DATE '2024-08-16','12:56:33','Kvittering for mottatt EHF faktura fra NETS'),
(55891, DATE '2024-08-16','12:56:32','Kvittering for mottatt EHF faktura fra NETS'),
(55892, DATE '2024-08-16','12:56:32','Kvittering for mottatt EHF faktura fra NETS'),
(55893, DATE '2024-08-16','12:56:34','Kvittering for mottatt EHF faktura fra NETS'),
(55895, DATE '2024-08-16','12:56:35','Kvittering for mottatt EHF faktura fra NETS'),
(55896, DATE '2024-08-16','12:56:36','Kvittering for mottatt EHF faktura fra NETS’)
If everything is OK, the return of the ExecuteSQL is an empty string, so we test. If any error, we got an error message that is displayed using the "Alert" function.
If there is more than 50 files, the microservice return the status for those, and need to be re-run to handle the next 50. The check
bool partly = pos(resData, "===PARTLY COMPLETED===")>0;
tell us if we are done or has done a partly operation. This is to avoid the PHP script gets a timeout during its operation. This value is returned to FileMaker, that executes this in a loop until it returns "0".
in the invoice layout we got this for one of the invoices.

The PHP script in the microservice, accumulate a string containing the SQL part. The PHP service has this implementation:
if ($finished) {
echo "\n===ALL COMPLETED===\n";
} else {
echo "\n===PARTLY COMPLETED===\n";
}
if ($Records) {
$xsql = trim($sql, "\n\r,");
echo "\n===DATA TO BE INSERTED===\n".$xsql."\n===END DATA to BE INSERTED===\n";
}
This makes the return have this SQL part enclosed in a start and end tag in its output.
In the ACF function we extract this part using those lines:
string sttag = "===DATA TO BE INSERTED===";
string entag = "===END DATA to BE INSERTED===";
string insdata = trimboth ( between ( resData, sttag, entag));
The "between" function extracts what is between the start and end tag, and the "trimboth" function trims away white space on each side. This ensures that the variable "insdata" is empty if there is nothing but white space between the tags. Otherwise there is some data to be applied in our SQL statement.
if (length(insdata)>0 ) then
sql = "INSERT INTO EHF_InvoiceStatus (Invoice_nr, RecDate, RecTime, Message) " + insdata;
print sql;
ressql = ExecuteSQL ( sql );
if (ressql != "" ) then
alert (ressql);
end if
end if
How did we do it before ?
We used two different plugins to accomplish this. Troi_URL to do the http post part, and MyFMbutler_DoSQL to execute the SQL query. Since MyFMButler_DoSQL isn't maintained anymore, we needed to come up with some change.
We had a standard Custom Function like this:
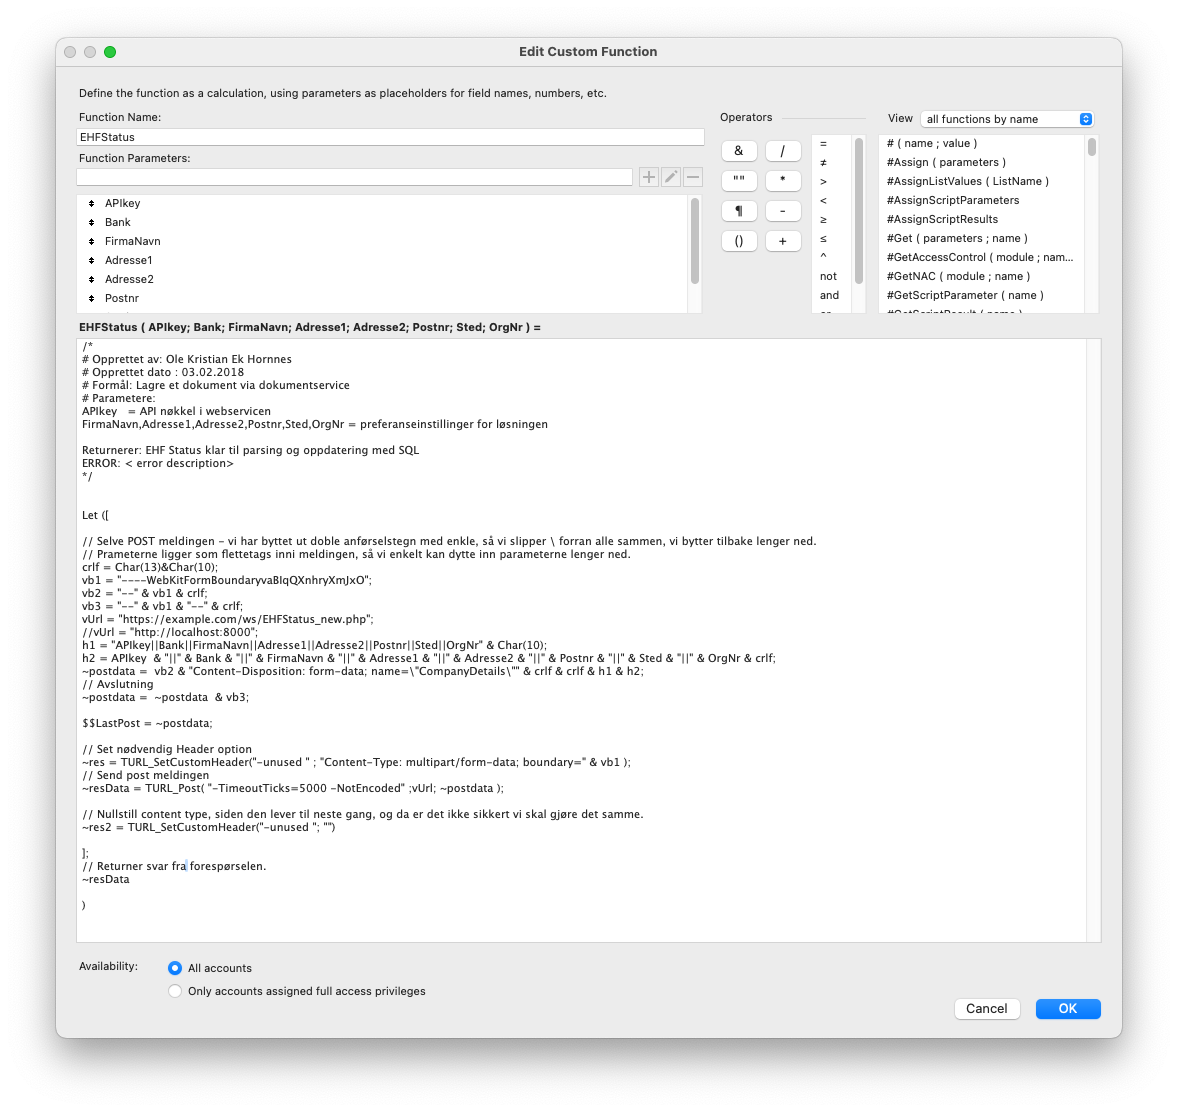
Then the FM-script needed to parce the result to extract the SQL data, and use myFMbutler_DoSQL to insert the values.
You see, the custom function is similar, but there is no error checking. The custom function above, only do the micro-service part. The new function do it all complete, with error checking and a propper message. This then seems to be a valid upgrade to our functionality.
Back to top
Creating an Excel Report from Claris FileMaker
Although there are several plugins capable of creating Excel documents, they often come with a high cost. The ACF plugin, as a low-cost alternative, is also capable of creating Excel reports. This tutorial is intended for Mac users and covers the use of ACF-Plugin version 1.7.0.19.
This tutorial consists of two parts:
- A general XML library, featuring highly reusable code.
- Data collection, which involves producing the XML for the report using the above library and writing the result to a file.
There are several aspects of the ACF plugin that make it highly ideal for this task:
- The XML datatype in the plugin is ideal for creating XMLs.
- Its SQL implementation simplifies working with the result set from the report's data collection.
- The programming logic is straightforward and efficient for organizing data for the report.
- Developer tools like the XML/JSON dev-tool app facilitate the creation of accurate library functions for XML.
About the Excel XML Format
Excel can work with various formats: XLSX, XLS, XML, and more. The XLSX format is a ZIP compressed file and is a bit more difficult to work with. The content in an XLSX archive comprises a bunch of XML files, so manipulating them is possible. However, this is not the focus of this tutorial. We will concentrate on the XML format, which is a text format. You can create such a file from Excel using the "Save as" function, and select the 2004/XML format.
The file can be opened in any text editor, and as you will see, it is a very detailed XML file. This file is the target for this tutorial.
With the ACF plugin, we create a source code file for some ACF functions. I have used the XML/JSON dev-tool to create most of the library functions below, each responsible for creating a small part of the XML. This approach ensures that the XML attributes are accurate for each part (XML attributes are in the XML start tag, before the closing bracket).
It might seem like a lot, but the XML format for Excel documents is very detailed, and every detail needs to be accurate to open the document in Excel. Most functions are general, reusable functions.
The lib functions
The functions are written in the ACF language on a single text file. The file is loaded and compiled using the ACF plugin. Then in a single script step: `Set variable[$result; ACF_Run("MakeSalesMenWeekStatReport")] the functions produce the reports.
A fully working demo can be downloaded at horneks.no/downloads
Here is the lib I created:
package ExcelReport "Functions for creating EXCEL reports";
/*
====================================================
EXCEL report implementation - the excel lib
====================================================
*/
Function Excel_DocProp(string Author)
timestamp createdZ = now();
string CreatedS = string ( createdZ, "%Y-%m-%2023-12-12%h:%m:%sZ");
XML xmlvar;
xmlVar["DocumentProperties"] =
XML("Author",Author,"LastAuthor",Author,"Created",CreatedS
,"LastSaved",CreatedS,"Version","16.00");
// Assign attributes to the XML...
XMLattributes(xmlVar["DocumentProperties"], XML("xmlns","urn:schemas-microsoft-com:office:office");
return XmlVar;
End
Function Excel_DocSettings()
XML xmlvar;
xmlVar["OfficeDocumentSettings"] =
XML("AllowPNG","");
// Assign attributes to the XML...
XMLattributes(xmlVar["OfficeDocumentSettings"], XML("xmlns","urn:schemas-microsoft-com:office:office");
return XmlVar;
End
Function Excel_WorkBook()
XML xmlvar;
xmlVar["ExcelWorkbook"] =
XML("WindowHeight","17440","WindowWidth","28040","WindowTopX","11580"
,"WindowTopY","5400","ProtectStructure","False","ProtectWindows","False"
);
// Assign attributes to the XML...
XMLattributes(xmlVar["ExcelWorkbook"], XML("xmlns","urn:schemas-microsoft-com:office:excel");
return XmlVar;
End
Function Excel_Table(int col)
XML xmlvar;
xmlVar["Table"] = "";
// Assign attributes to the XML...
// removed : "ss:ExpandedRowCount","20",
// to be added after all rows is added.
XMLattributes(xmlVar["Table"], XML("ss:ExpandedColumnCount",string(col),"x:FullColumns","1"
,"x:FullRows","1","ss:DefaultColumnWidth","65","ss:DefaultRowHeight","16");
return XmlVar;
End
Function Excel_WorkSheetOptions()
XML xmlvar;
xmlVar["WorksheetOptions"] =
XML("Selected","","ProtectObjects","False","ProtectScenarios","False"
);
xmlVar["WorksheetOptions.PageSetup"] =
XML("Header","","Footer","","PageMargins",""
);
xmlVar["WorksheetOptions.Panes.Pane"] =
XML("Number","3","ActiveRow","13","ActiveCol","3"
);
// Assign attributes to the XML...
XMLattributes(xmlVar["WorksheetOptions"], XML("xmlns","urn:schemas-microsoft-com:office:excel");
XMLattributes(xmlVar["WorksheetOptions.PageSetup.Header"], XML("x:Margin","0.3");
XMLattributes(xmlVar["WorksheetOptions.PageSetup.Footer"], XML("x:Margin","0.3");
XMLattributes(xmlVar["WorksheetOptions.PageSetup.PageMargins"], XML("x:Bottom","0.75","x:Left","0.7","x:Right","0.7"
,"x:Top","0.75");
return XmlVar;
End
Function Excel_Column(int index, int width)
XML xmlvar;
xmlVar["Column"] = "";
// Assign attributes to the XML...
XMLattributes(xmlVar["Column"], XML("ss:Index",string(index),"ss:AutoFitWidth","0","ss:Width",string(width));
return XmlVar;
End
The functions described above help us create the document structure. However, we need a few more elements to complete the process.
Excel Styles
The functions below might need to be changed or expanded to reflect the actual styles in your reports. Some functions are designed to create a single style. These are used in the function at the bottom named setStyles. This function combines all the detailed styles into one comprehensive Styles structure.
Function Excel_Style()
// Function to create a default Excel style
XML xmlvar;
xmlVar["Style"] =
XML("Alignment", "", "Borders", "", "Font", "", "Interior", "", "NumberFormat", "", "Protection", "");
// Assign attributes to the XML elements
XMLattributes(xmlVar["Style"], XML("ss:ID", "Default", "ss:Name", "Normal"));
XMLattributes(xmlVar["Style.Alignment"], XML("ss:Vertical", "Bottom"));
XMLattributes(xmlVar["Style.Font"], XML("ss:FontName", "Calibri", "x:Family", "Swiss", "ss:Size", "12", "ss:Color", "#000000"));
return XmlVar;
End
Function Excel_RightStyle()
// Function to create a right-aligned Excel style
XML xmlvar;
xmlVar["Style"] =
XML("Alignment", "", "Font", "");
// Assign attributes to the XML elements
XMLattributes(xmlVar["Style"], XML("ss:ID", "s66"));
XMLattributes(xmlVar["Style.Alignment"], XML("ss:Horizontal", "Right", "ss:Vertical", "Bottom"));
XMLattributes(xmlVar["Style.Font"], XML("ss:FontName", "Calibri", "x:Family", "Swiss", "ss:Size", "14", "ss:Color", "#000000", "ss:Bold", "1"));
return XmlVar;
End
Function Excel_NumberStyle()
// Function to create a numeric Excel style
XML xmlvar;
xmlVar["Style"] =
XML("Alignment", "", "Borders", "", "Font", "", "Interior", "", "NumberFormat", "", "Protection", "");
// Assign attributes to the XML elements
XMLattributes(xmlVar["Style"], XML("ss:ID", "cNum"));
XMLattributes(xmlVar["Style.Alignment"], XML("ss:Vertical", "Bottom"));
XMLattributes(xmlVar["Style.Font"], XML("ss:FontName", "Calibri", "x:Family", "Swiss", "ss:Size", "12", "ss:Color", "#000000"));
XMLattributes(xmlVar["Style.NumberFormat"], XML("ss:Format", "#,##0"));
return XmlVar;
End
Function Excel_DateStyle()
// Function to create a date format Excel style
XML xmlvar;
xmlVar["Style"] =
XML("Alignment", "", "Borders", "", "Font", "", "Interior", "", "NumberFormat", "", "Protection", "");
// Assign attributes to the XML elements
XMLattributes(xmlVar["Style"], XML("ss:ID", "s68"));
XMLattributes(xmlVar["Style.Alignment"], XML("ss:Vertical", "Bottom"));
XMLattributes(xmlVar["Style.Font"], XML("ss:FontName", "Calibri", "x:Family", "Swiss", "ss:Size", "12", "ss:Color", "#000000"));
XMLattributes(xmlVar["Style.NumberFormat"], XML("ss:Format", "dd/mm/yyyy;@"));
return XmlVar;
End
Function CreateColorStyle(string ssid, string back, string textcolor)
// Function to create a colored Excel style
XML xmlvar;
xmlVar["Style"] = XML("Interior", "");
XMLattributes(xmlVar["Style"], XML("ss:ID", ssid));
XMLattributes(xmlVar["Style.Interior"], XML("ss:Color", back, "ss:Pattern", "Solid"));
return xmlvar;
end
Function Excel_SumColStyle(string style)
// Function to create a sum column style in Excel
XML xmlvar;
xmlVar["Style"] =
XML("Font", "", "NumberFormat", "", "Borders", XML("Border", "", "Border", ""));
// Assign attributes to the XML elements
XMLattributes(xmlVar["Style"], XML("ss:ID", style));
XMLattributes(xmlVar["Style.Borders.Border[1]"], XML("ss:Position", "Bottom", "ss:LineStyle", "Double", "ss:Weight", "3"));
XMLattributes(xmlVar["Style.Borders.Border[2]"], XML("ss:Position", "Top", "ss:LineStyle", "Continuous", "ss:Weight", "1"));
XMLattributes(xmlVar["Style.Font"], XML("ss:FontName", "Calibri", "x:Family", "Swiss", "ss:Size", "12", "ss:Color", "#000000", "ss:Bold", "1"));
XMLattributes(xmlVar["Style.NumberFormat"], XML("ss:Format", "#,##0"));
return XmlVar;
End
Function Excel_BoldTextStyle(string style)
// Function to create a bold text style in Excel
XML xmlvar;
xmlVar["Style"] =
XML("Font", "");
// Assign attributes to the XML elements
XMLattributes(xmlVar["Style"], XML("ss:ID", style));
XMLattributes(xmlVar["Style.Font"], XML("ss:FontName", "Calibri", "x:Family", "Swiss", "ss:Size", "12", "ss:Color", "#000000", "ss:Bold", "1"));
return XmlVar;
End
function SetStyles()
// Function to set various Excel styles
XML styles;
// Standard font style
styles["Styles"] = Excel_Style(); // Style "Default"
// 14pt Bold style
styles["Styles.Style[]"] = xml("Font", "");
xmlAttributes(styles["Styles.Style[2]"], xml("ss:ID", "s64"));
xmlAttributes(styles["Styles.Style[2].Font"], XML("ss:FontName", "Calibri", "x:Family", "Swiss", "ss:Size", "14", "ss:Color", "#000000", "ss:Bold", "1"));
// Standard bold right justified style
styles["Styles.Style[]"] = XML("Alignment", "", "Font", "");
xmlAttributes(styles["Styles.Style[3]"], XML("ss:ID", "s66"));
XMLattributes(styles["Styles.Style[3].Alignment"], XML("ss:Horizontal", "Right", "ss:Vertical", "Bottom"));
xmlAttributes(styles["Styles.Style[3].Font"], XML("ss:FontName", "Calibri", "x:Family", "Swiss", "ss:Size", "14", "ss:Color", "#000000", "ss:Bold", "1"));
// Standard bold with grey background style
styles["Styles.Style[]"] = XML("Font", "", "Interior", "");
XMLattributes(styles["Styles.Style[4]"], XML("ss:ID", "s67"));
XMLattributes(styles["Styles.Style[4].Font"], XML("ss:FontName", "Calibri", "x:Family", "Swiss", "ss:Size", "12", "ss:Color", "#000000", "ss:Bold", "1"));
XMLattributes(styles["Styles.Style[4].Interior"], XML("ss:Color", "#E7E6E6", "ss:Pattern", "Solid"));
// Other styles defined in their respective functions
styles["Styles+"] = Excel_DateStyle();
styles["Styles+"] = Excel_NumberStyle();
styles["Styles+"] = CreateColorStyle("color1", "#70AC46", "#000000");
styles["Styles+"] = Excel_SumColStyle("cSumRow");
styles["Styles+"] = Excel_BoldTextStyle("cBoldText");
return styles;
end
Functions for Data Content
Additionally, we require functions for handling the data content in the report. These functions are essential for simplifying content generation by abstracting the XML-specific details from the process of creating the content.
// Function for creating the left and right heading row
Function Excel_headingRow1(string leftText, string rightText, int colcnt)
XML xmlvar;
xmlVar["Row.Cell[]"] = XML("Data", leftText);
xmlVar["Row.Cell[]"] = XML("Data", rightText);
// Assign attributes to the XML elements
XMLattributes(xmlVar["Row"], XML("ss:Height", "19"));
XMLattributes(xmlVar["Row.Cell[1]"], XML("ss:StyleID", "s64")); // Style for left cell
XMLattributes(xmlVar["Row.Cell[1].Data"], XML("ss:Type", "String"));
XMLattributes(xmlVar["Row.Cell[2]"], XML("ss:Index", string(colcnt), "ss:StyleID", "s66")); // Style for right cell
XMLattributes(xmlVar["Row.Cell[2].Data"], XML("ss:Type", "String"));
return xmlVar;
End
// Function for creating a single left heading row
Function Excel_headingRow2(string leftText)
XML xmlvar;
xmlVar["Row.Cell"] = XML("Data", leftText);
// Assign attributes to the XML elements
XMLattributes(xmlVar["Row"], XML("ss:Height", "19"));
XMLattributes(xmlVar["Row.Cell"], XML("ss:StyleID", "s64"));
XMLattributes(xmlVar["Row.Cell.Data"], XML("ss:Type", "String"));
return xmlVar;
End
// Function for creating cells containing text
Function Excel_TextCell(string text, string style)
XML xmlvar;
xmlVar["Cell"] = XML("Data", text);
// Assign attributes to the XML elements
XMLattributes(xmlVar["Cell"], XML("ss:StyleID", style));
XMLattributes(xmlVar["Cell.Data"], XML("ss:Type", "String"));
return xmlVar;
End
// Function for creating cells containing numeric values
Function Excel_NumberCell(float number, string style)
XML xmlvar;
xmlVar["Cell"] = XML("Data", string(number));
// Assign attributes to the XML elements
XMLattributes(xmlVar["Cell"], XML("ss:StyleID", style));
XMLattributes(xmlVar["Cell.Data"], XML("ss:Type", "Number"));
return xmlVar;
End
// Function for creating cells containing dates
Function Excel_DateCell(date dato, string style)
XML xmlvar;
xmlVar["Cell"] = XML("Data", string(dato, "%Y-%m-%dT00:00:00.000"));
// Assign attributes to the XML elements
XMLattributes(xmlVar["Cell"], XML("ss:StyleID", style));
XMLattributes(xmlVar["Cell.Data"], XML("ss:Type", "DateTime"));
return xmlVar;
End
// Function for creating a cell with a sum formula
Function Excel_SumColCell(int col, int row, int fromRow, int toRow, string style)
XML xmlvar;
xmlVar["Cell"] = XML("Data", "");
// Assign attributes to the XML elements
string formula = format("=SUM(R[%d]C:R[%d]C)", fromRow - row + 1, toRow - row);
print "\n" + formula;
XMLattributes(xmlVar["Cell"], XML("ss:Index", string(col), "ss:StyleID", style, "ss:Formula", formula));
XMLattributes(xmlVar["Cell.Data"], XML("ss:Type", "Number"));
return xmlVar;
End
Some utility functions:
There is also a need for utility functions to facilitate the creation of the final report. One such function is required to search for a specific value in an array and return its index. It's possible that a future version of the ACF plugin will include this functionality built-in.
function find_in_array ( array string arr, string key)
int i;
for ( i = 1, sizeof(arr))
if ( arr[i] == key) then
return i;
end if
end for
return -1;
end
The report generation
In this example, we will extract data from an order table named OrderHeader. This table will be used to generate a sales report, which will display one line for each salesperson, along with their sales amounts per week for the past 11 weeks, formatted as columns in the spreadsheet.
Main Function - We begin by querying for the report data after making some initial declarations.
function MakeSalesMenWeekStatReport()
// Set the date interval for the report (can also be parameterized)
date dateTo = date(now()) - 1; // Set 'dateTo' as yesterday
int WeeksBack = 11; // Define the number of weeks to look back
date dateFrom = dateTo - WeeksBack * 7; // Calculate 'dateFrom' as 11 weeks prior to 'dateTo'
// Declare arrays for storing query results
array string uIDs, Perioder, PeriodeIdx;
array int sAar, sUke;
array float ordSum;
// SQL query definition
string sql = "SELECT User_ID, Order_Year, Order_Week, sum(Sum_Order) FROM OrderHeader
WHERE User_ID <> '1' AND Order_date BETWEEN :dateFrom AND :dateTo
GROUP BY User_ID, Order_Year, Order_Week
INTO :uIDs, :sAar, :sUke, :ordSum";
// Execute the SQL query
string res = ExecuteSQL(sql);
As demonstrated in the snippet above, we calculate two dates: dateTo, set as yesterday, and dateFrom, set as 11 weeks prior.
Subsequently, we declare some arrays to receive the results from the SQL query. The OrderHeader table includes fields such as Order_date, a calculated field Order_Year, and another calculated field named Order_Week, which represents the week number. The WeekOfYearFiscal(Order_Date;2) function is utilized in these calculations to determine the week number.
The INTO part of the SQL query is a special feature of the ACF plugin. It specifies the arrays that will receive the query results. We obtain the results in four arrays: uIDs, sAar, sUke, and ordSum.
Additionally, the use of :dateFrom and :dateTo is specific to the ACF plugin. These placeholders represent actual data from those variables, which will be used at runtime.
To organize the data into weekly periods, we need to create an array of periods corresponding to each row in the other four arrays. We use the year and week numbers to create a period string formatted as YYYY-WW. These strings identify the columns that will receive the data.
int i, cnt = sizeof (uIDs);
string cmd = string(dateTo+1, "WeekOfYearFiscal(Date(%m;%d;%Y);2)");
string firstPeriod = string (dateTo+1, "%Y") + format("-%02d", int(eval(cmd)));
string per;
for (i=1, cnt)
per = format("%04d-%02d", sAar[i], sUke[i]);
Perioder[] = per;
if ( per < firstPeriod) then
firstPeriod = per;
end if
end for
Next, we sort the arrays to ensure that all the user IDs are ordered correctly, which is essential for the subsequent handling of breaks. The sorting is done using the following ACF command:
sort_array ( < uIDs, <sAar, <sUke, ordSum, Perioder);
We also need to create some column headings. In addition, we initialize a data array to store one line of data in the report. At the end of this process, we copy this data into an array named Empty. This approach allows us to easily reset the data array for each new salesperson.
array float lineData;
array string lineHD;
date Sun;
for (i=1, WeeksBack)
Sun = dateTo-(i-1)*7;
cmd = string(Sun, "WeekOfYearFiscal(Date(%m;%d;%Y);2)");
lineHD[] = string (Sun, "%Y") + format("-%02d", int(eval(cmd)));
linedata[] = 0;
end for
array float Empty = linedata;
The variable Sun represents the date of the Sunday corresponding to the week of the column. To obtain the week number for this Sunday, we create a FileMaker calculation. Although the ACF plugin doesn't have a direct function for this, it offers the eval function, which leverages the FileMaker calculation engine to evaluate expressions. The string function mentioned previously takes a date as its first parameter and a format string as the second argument. This format string is a FileMaker command, where %m, %d, and %Y are placeholders for the month, day, and year values, respectively.
Since the user names and signatures are not included in the data arrays, it's necessary to retrieve the user information to map them correctly in the final rows. The column Bruker_ID is numeric, but we need it in a text format. To achieve this, a short loop is used to convert and store these numeric IDs as text variants in the array Selger_IDs.
array string selger_IDs, selger_Navn, selger_signatur;
array int selger_id_num;
// Grab users
sql = "SELECT Bruker_ID, Navn, Signatur FROM Users
ORDER BY Navn
INTO :selger_id_num, :selger_Navn, :selger_signatur";
res = ExecuteSQL ( sql );
for ( i=1, sizeof ( selger_id_num))
selger_IDs[] = string (selger_id_num[i] );
end for
The Production of the Excel Document:
We start by declaring two variables: Excel as an XML datatype, and NumberOfRows to keep track of the row count in our report. It's important to update the XML with the row count once all the columns have been added.
XML excel;
int NumberOfRows;
Next, we construct the structural elements of the XML, utilizing the library functions discussed in the first part of this article:
clear(excel); // We clear it up first....
excel["Workbook"] = Excel_DocProp("John Doe Author");
excel["Workbook"] = Excel_DocSettings();
excel["Workbook"] = Excel_WorkBook();
excel["Workbook"] = SetStyles();
XMLattributes(excel["Workbook"], XML("xmlns","urn:schemas-microsoft-com:office:spreadsheet",
"xmlns:o","urn:schemas-microsoft-com:office:office",
"xmlns:x","urn:schemas-microsoft-com:office:excel",
"xmlns:ss","urn:schemas-microsoft-com:office:spreadsheet",
"xmlns:html","http://www.w3.org/TR/REC-html40");
int TotalColumns = 3+WeeksBack;
XML worksheet;
worksheet["Worksheet"] = Excel_Table(TotalColumns);
// Assign attributes to the XML...
XMLattributes(worksheet["Worksheet"],XML("ss:Name","SalesWeekReport");
// Define the column-with. All except A, B, and C should be 80.
array int cw = {65,200,65};
int colw;
for (i=1, TotalColumns)
colw = (i>3)?80:cw[i];
worksheet["Worksheet.Table+"] = Excel_Column(i,colw);
end for
// Add a row for the headings, merging in the lineHD array created above
array string headings = {"SelgerID", "Navn", "Signatur", lineHD};
// Top two lines are report headings.
worksheet["Worksheet.Table+"] = Excel_headingRow2 ( "Salesperson report - Week statistics");
worksheet["Worksheet.Table+"] = Excel_headingRow2 ( "To be run each monday ");
// Next line has date interval left, and description for the data rows to the right,
worksheet["Worksheet.Table+"] = Excel_headingRow1 ( string (dateFrom, "%d.%m.%Y" +" - " + string (dateTo, "%d.%m.%Y")), "Year-Week number", TotalColumns);
Then we add the rows for the column headings:
// Create the heading rows for the table.
XML row;
clear ( row );
for (i=1, sizeof(headings))
row["Row+"] = Excel_TextCell(headings[i], "s67");
end for
worksheet["Worksheet.Table+"] = row;
NumberOfRows = 5; // Next row is number 5
excel["Workbook"] = worksheet;
excel["Workbook"] = Excel_WorkSheetOptions();
Now, we iterate through the arrays. The process involves a break upon each change in User-ID. For each new person identified, we append a new row to the Excel document. All the rows in our table corresponding to the same salesperson contribute data to the lineData array. During this process, we also retrieve each salesperson's name and signature to ensure this information is included.
int uix, j;
string Name, Signature;
slepSelger=uIDs[1];
float errorSum = 0;
bool addData = False;
// Produce data rows for the spreadsheet.
for (i=1, cnt)
// Check for a new salesperson.
if (uIDs[i] != slepSelger) then
uix = find_in_array(selger_IDs, slepSelger);
if (uix > 0) then
Name = selger_Navn[uix];
Signature = selger_signatur[uix];
else
Name = "-";
Signature = "-";
end if
// Add a new row to the Excel sheet.
clear(row);
row["Row+"] = Excel_TextCell(slepSelger, "Default");
row["Row+"] = Excel_TextCell(Name, "Default");
row["Row+"] = Excel_TextCell(Signature, "Default");
for (j = 1, WeeksBack)
row["Row+"] = Excel_NumberCell(linedata[j], "cNum");
end for
excel["Workbook.Worksheet.Table+"] = row;
NumberOfRows++;
linedata = Empty;
addData = False;
slepSelger = uIDs[i];
end if
// Accumulate data for the current salesperson.
uix = find_in_array(lineHD, Perioder[i]);
if (uix > 0 && uix <= WeeksBack) then
linedata[uix] = linedata[uix] + ordSum[i];
addData = True;
else
errorSum += ordSum[i];
end if
end for
When we reach the last row in the table, there isn't a natural break because the loop is concluding. Therefore, we need to ensure that this final line is also added. The process for this involves replicating the code used in the previous conditional statement (the if statement). This step ensures that the data for the last salesperson is properly captured and included in the Excel document, just like for the preceding rows.
// Some data for the last sales person, not handled in the break above.
if ( addData ) then
uix = find_in_array ( selger_IDs, slepSelger);
if ( uix > 0) then
Name = selger_Navn[uix];
Signature = selger_signatur[uix];
else
Name = "-";
Signature = "-";
end if
// Add the last row to excel
clear ( row );
row["Row+"] = Excel_TextCell(slepSelger, "Default");
row["Row+"] = Excel_TextCell(Name, "Default");
row["Row+"] = Excel_TextCell(Signature, "Default");
for (j = 1, WeeksBack)
row["Row+"] = Excel_NumberCell(linedata[j], "cNum");
end for
excel["Workbook.Worksheet.Table+"] = row;
NumberOfRows ++;
end if
Adding a Sum Line Below the Table
It's beneficial to include a sum line below the table. Rather than calculating the sums directly, we insert Excel formulas for the summation. This approach allows users to manually edit data in the report while ensuring the sums remain accurate.
// Add a sum-line
clear ( row );
row["Row+"] = Excel_TextCell("", "cBoldText");
row["Row+"] = Excel_TextCell("Sum alle selgere", "cBoldText");
row["Row+"] = Excel_TextCell("", "cBoldText");
for (i=1, WeeksBack)
row["Row+"] = Excel_SumColCell(i+3, NumberOfRows, 4, NumberOfRows-1, "cSumRow");
end for
excel["Workbook.Worksheet.Table+"] = row;
NumberOfRows ++;
Finalizing the Report
To simplify the process, we create a folder on the user's desktop named "Monday_reports". Within this folder, we establish a file path:
// Crete a path for the report.
res = create_directory ( Desktop_directory () + "/Monday_reports/");
string path = Desktop_directory () + "/Monday_reports/SelgerHistorikk_"+ string ( now(), "%Y%m%d_%h%i%s") + ".xml";
Update table element with the number of rows:
// Update table attributes to reflex the number of rows.
XMLattributes (excel["Workbook.Worksheet.Table"], xml("ss:ExpandedRowCount",string(NumberOfRows));
Then we save the report to the file, and returns.
// Save the report to the file.
string report = string (excel); // Stringify the XML
clear (excel);
int x = open (path, "w" );
write ( x, report);
close (x);
return "OK";
end
Here is the produced report opened in Excel

Back to top
A Developer Tool for ACF Programming - XML
When crafting XML documents in your code, you might often refer to sample documents, especially in API documentation for web services. To facilitate this process for developers, we've created a handy tool that generates ACF source code based on these sample XML documents. Written in the ACF language, it uses XML functions to parse provided samples and create corresponding source code. Once you use this tool to generate the foundational code, you can easily insert actual data elements, enabling the generation of practical results directly applicable in your applications.
Needed plugin version for this to work: 1.7.0.5 -pre-release.
- Download at: Downloads
Let's say, we have this sample from some service:
<?xml version="1.0"?>
<customers>
<customer id="55000">
<name>Charter Group</name>
<address>
<street>100 Main</street>
<city>Framingham</city>
<state>MA</state>
<zip>01701</zip>
</address>
<address>
<street>720 Prospect</street>
<city>Framingham</city>
<state>MA</state>
<zip>01701</zip>
<Phone>
<type>Mobile</type>
<number>12345678</number>
</Phone>
</address>
<address>
<street>120 Ridge</street>
<state>MA</state>
<zip>01760</zip>
</address>
</customer>
</customers>
Then, running it through this tool, we got the following ACF code:
Function MakeCustomerAddressesXML()
XML xmlvar;
xmlVar["customers.customer"] =
XML("name","Charter Group");
XMLref addressRef = FindElement(xmlVar["customers.customer.address"]);
addressRef["[]"] = XML("street","100 Main","city","Framingham","state","MA"
,"zip","01701");
addressRef["[]"] = XML("street","720 Prospect","city","Framingham","state","MA"
,"zip","01701","Phone",XML("type","Mobile","number","12345678"));
addressRef["[]"] = XML("street","120 Ridge","state","MA","zip","01760"
);
// Assign attributes to the XML...
XMLattributes(xmlVar["customers.customer"], XML("id","55000");
return string(XmlVar);
End
Running this will produce the sample directly:
<?xml version="1.0" encoding="UTF-8"?>
<customers>
<customer id="55000">
<name>Charter Group</name>
<address>
<street>100 Main</street>
<city>Framingham</city>
<state>MA</state>
<zip>01701</zip>
</address>
<address>
<street>720 Prospect</street>
<city>Framingham</city>
<state>MA</state>
<zip>01701</zip>
<Phone>
<type>Mobile</type>
<number>12345678</number>
</Phone>
</address>
<address>
<street>120 Ridge</street>
<state>MA</state>
<zip>01760</zip>
</address>
</customer>
</customers>
Now, when we have this sample, we can easily replace the hard-coded data values in it with actual database content, or add more structures to it when necessary.
Source code for the tool
Here is the source code for the developer tool:
package xmlTools "XML tool developer package"
/*
Developer tool Package to produce ACF source code from XML source.
Main function is:
ACFSource = ToolCreateACF_fromXML (xml source);
From FileMaker script:
Set Field [Demo::Result; ACF_Run("ToolCreateACF_fromXML"; $XMLSource)]
*/
/*
Count the elements with the same name, to determine if it is an array or not.
*/
function checkIfArray ( array string aKeys, string token )
int count = 0;
int vc = sizeof (aKeys);
int i;
for ( i = 1, vc )
if ( aKeys[i] == token && akeys[i] != "") then
count ++;
end if
end for
return count;
end
/*
Handle leaf nodes on any given level. Use XML(....) function for all leaf nodes.
Don't touch array nodes. Mark them as done in the array (that is transferred by reference)
*/
function HandleLeafNodes (XML so, string Key, array string aKeys, string xmlvarName)
int i, arrcnt, hit=0, vc = sizeof (aKeys) ;
string prefix = "", result = "XML(", thiskey;
// Loop and check if any of the nodes on this level are LEAF nodes, and then create a XML function call for them.
for (i = 1, vc)
if ( aKeys[i] != "") then
thiskey = aKeys[i];
arrcnt = checkIfArray( aKeys, thisKey ); // is it an array? - only handle leaf nodes that is no an array.
if ( list_keys(so[thiskey]) == "" && arrcnt == 1) then // leaf node
result += prefix + '"'+thiskey+'","' + string(so[thiskey]) + '"';
hit++;
if ( mod(hit,3) == 0) then
result += "\n\t\t";
end if
aKeys[i] = ""; // Mark it as done.
prefix = ",";
end if
end if
end for
if ( hit > 0) then
return xmlvarName + '["'+Key+'"] = \n\t\t' + result + ");\n";
end if
return "";
end
/*
Make a key, as period-separated tokens.
*/
function MakeKey ( string key, string thisKey)
string qKey;
if ( key == "") then
qKey = thisKey ;
else
qKey = key + "." + thisKey ;
end if
return qKey;
end
/*
Recursive function to create parameter lists to the XML function. To handle leaf
nodes
*/
function KeyValuePairList (XML so, string key, string token, string xmlvarName)
string keys = list_keys(so), thisKey, result;
string KeyValuePairList, prefix; // decl return type;
int hit=0, i, vc = valuecount ( keys );
if ( vc > 0) then
result = "XML(";
prefix = "";
for (i = 1, vc)
thiskey = GetValue(keys,i);
if ( list_keys(so[thiskey]) == "") then // leaf node
result += prefix + '"'+thiskey+'","' + string(so[thiskey]) + '"';
else
result += prefix + '"'+thiskey+'",' + KeyValuePairList(so[thiskey], key, thiskey, xmlvarName) ;
end if
prefix = ",";
hit++;
if ( mod(hit,3) == 0) then
result += "\n\t\t";
end if
end for
result += ")";
else
// No keys, it's a string...
result = '"' + string (so) + '"';
end if
return result;
end
/*
Main recursive function to convert XML to ACF source code.
*/
function convertXMLtoACFrecursive ( XML so, string key, string token, string xmlvarName)
string convertXMLtoACFrecursive;
string result = "", qKey, refName;
string keys = list_keys(so), thisKey;
array string aKeys = explode ( "\r", keys);
int vc = sizeof ( aKeys );
// Handle leaf nodes.
if ( vc == 1 && aKeys[1] == "" ) then
result = xmlvarName+'["'+key+'"] = "'+ string(so)+'";\n';
else
aKeys = explode ( "\r", keys);
end if
int i,j , arrcnt;
result += HandleLeafNodes ( so, Key, aKeys, xmlvarName); // special handling for leaf nodes on this level.
for ( i=1, vc)
thisKey = aKeys[i] ;
if ( thisKey != "") then
qKey = MakeKey (key, thisKey);
arrcnt = checkIfArray( aKeys, thisKey );
if ( arrcnt == 1) then
// dig into the next level
result += convertXMLtoACFrecursive(so[thisKey], qKey, thisKey, xmlvarName);
else /* Handle arrays */
refName = thisKey+"Ref";
result += 'XMLref '+refName+' = FindElement('+xmlvarName+'["'+qKey+'"]);\n';
arrcnt = 0;
for ( j = i, vc)
if ( aKeys[j] == thisKey) then
arrcnt++;
result += refName + '["[]"] = ' + KeyValuePairList (so[thisKey+'['+arrcnt+']'], thiskey, thiskey, xmlvarName)+";\n";
aKeys[j] = ""; // flag the key as "done".
end if
end for
end if
end if
end for
return result;
end
/*
Loop XML a second time, only to pick up the attributes of the nodes.
They should be assigned after the XML has been created.
*/
function makeAttributesDeclarations ( XML so, string key, string token, string xmlvarName)
string makeAttributesDeclarations;
XML attributes;
string result = "", qKey, refName;
string keys = list_keys(so), thisKey;
array string aKeys = explode ( "\r", keys);
int vc = sizeof ( aKeys );
int i,j , arrcnt;
// We have some keys, loop the keys...
for ( i=1, vc)
thisKey = aKeys[i] ;
if ( thisKey != "") then
qKey = MakeKey (key, thisKey);
arrcnt = checkIfArray( aKeys, thisKey );
if ( arrcnt == 1) then
if ( has_XMLattributes (so[thisKey])) then
attributes = XMLattributes(so[thisKey]);
result += "XMLattributes(" + xmlvarName + '["'+qKey+'"], ' +
KeyValuePairList (attributes["root"], thiskey, thiskey, xmlvarName)+"; // one Unique\n";
end if
// dig into the next level
result += makeAttributesDeclarations(so[thisKey], qKey, thisKey, xmlvarName);
else /* Handle arrays */
refName = thisKey+"Ref";
arrcnt = 0;
for ( j = i, vc)
if ( aKeys[j] == thisKey) then
arrcnt++;
if ( has_XMLattributes (so[thisKey+'['+arrcnt+']'])) then
attributes = XMLattributes(so[thisKey+'['+arrcnt+']']);
result += "XMLattributes(" + xmlvarName + '["'+MakeKey(key,thisKey+'['+arrcnt+']')+'"], ' +
KeyValuePairList (attributes["root"], thiskey, thiskey, xmlvarName)+"; // inloop\n";
end if
result += makeAttributesDeclarations (so[thisKey+'['+arrcnt+']'], thisKey+'['+arrcnt+']', thiskey, xmlvarName)+";\n";
aKeys[j] = ""; // flag the key as "done".
end if
end for
end if
end if
end for
return result;
end
/*
Start function for the tool. The parameter is XML source in text format.
The return value is the produced ACF source code.
*/
function ToolCreateACF_fromXML ( string xmlsource )
XML so = xmlsource;
string result, attributes;
result = "XML xmlvar;\n"+convertXMLtoACFrecursive (so, "", "", "xmlVar");
// make a second run for all the attributes.
attributes = makeAttributesDeclarations(so, "", "", "xmlVar");
if ( attributes != "") then
result += "// Assign attributes to the XML...\n";
result += attributes;
end if
return result;
end
Another Example for 24sevenoffice financial system API
I just looked up the API documentation for this API and found the "SaveInvoice" API documentation.
I just copied their sample and ran it on this tool, I came up with this ACF code:
XML xmlvar;
xmlVar["soap:Envelope.soap:Body.SaveInvoices.invoices.InvoiceOrder"] = XML("CustomerId","1","OrderStatus","Offer");
XMLref InvoiceRowRef = FindElement(xmlvar["soap:Envelope.soap:Body.SaveInvoices.invoices.InvoiceOrder.InvoiceRows.InvoiceRow"]);
InvoiceRowRef["[]"] = XML("ProductId","1","Price","1.00","Name","Test","Quantity","1.00");
InvoiceRowRef["[]"] = XML("ProductId","22","Price","100.00","Name","Test2","Quantity","11.00");
XMLattributes (xmlvar["soap:Envelope"],
XML("xmlns:xsi", "http://www.w3.org/2001/XMLSchema-instance",
"xmlns:xsd", "http://www.w3.org/2001/XMLSchema",
"xmlns:soap", "http://schemas.xmlsoap.org/soap/envelope/"));
XMLattributes (xmlVar["soap:Envelope.soap:Body.SaveInvoices"],
XML ("xmlns", "http://24sevenOffice.com/webservices"));
I also added a second invoice row to it, to demonstrate how easy it is to do just that.
Here is the output:
<?xml version="1.0" encoding="UTF-8"?>
<soap:Envelope xmlns:xsi="http://www.w3.org/2001/XMLSchema-instance" xmlns:xsd="http://www.w3.org/2001/XMLSchema" xmlns:soap="http://schemas.xmlsoap.org/soap/envelope/">
<soap:Body>
<SaveInvoices xmlns="http://24sevenOffice.com/webservices">
<invoices>
<InvoiceOrder>
<CustomerId>1</CustomerId>
<OrderStatus>Offer</OrderStatus>
<InvoiceRows>
<InvoiceRow>
<ProductId>1</ProductId>
<Price>1.00</Price>
<Name>Test</Name>
<Quantity>1.00</Quantity>
</InvoiceRow>
<InvoiceRow>
<ProductId>22</ProductId>
<Price>100.00</Price>
<Name>Test2</Name>
<Quantity>11.00</Quantity>
</InvoiceRow>
</InvoiceRows>
</InvoiceOrder>
</invoices>
</SaveInvoices>
</soap:Body>
</soap:Envelope>
Do we have some tools for JSON as well?
Yes, we have. In the ACF language, the syntax for manipulating and handling JSON data and XML data is the same, just only different names of the datatypes involved. For the process of this, we just turn the JSON into an XML, run the tool on it, and then do some substitute on the result to make it work for JSON.
The Small starter method, ToolCreateACF_fromXML can be duplicated and modified. Here is the original method:
/*
Start function for the tool. Parameter is XML source in text format.
Return value is the produced ACF source code.
*/
function ToolCreateACF_fromXML ( string xmlsource )
XML so = xmlsource;
string result;
result = "XML xmlvar;\n"+convertXMLtoACFrecursive (so, "", "", "xmlVar");
return result;
end
Now, we duplicate it and make some minor changes to it, and viola, we have JSON to ACF function as well.
function ToolCreateACF_fromJSON ( string JSONsource )
JSON js = JSONsource;
XML so;
so["root"] = js;
string result;
result = "JSON JsonVar;\n"+convertXMLtoACFrecursive (so, "", "", "JsonVar");
result = substitute ( result, "XML(", "JSON(");
result = substitute ( result, "XMLref ", "JSONref ");
result = substitute ( result, '["root.', '["');
return result;
end
Let us give it a try. I found some examples of JSON on the net. It looks like this:
{
"glossary": {
"title": "example glossary",
"GlossDiv": {
"title": "S",
"GlossList": {
"GlossEntry": {
"ID": "SGML",
"SortAs": "SGML",
"GlossTerm": "Standard Generalized Markup Language",
"Acronym": "SGML",
"Abbrev": "ISO 8879:1986",
"GlossDef": {
"para": "A meta-markup language, used to create markup languages such as DocBook.",
"GlossSeeAlso": ["GML", "XML"]
},
"GlossSee": "markup"
}
}
}
}
}
Then we ran this on the new function:
JSON JsonVar;
JsonVar["glossary"] =
JSON("title","example glossary");
JsonVar["glossary.GlossDiv"] =
JSON("title","S");
JsonVar["glossary.GlossDiv.GlossList.GlossEntry"] =
JSON("Abbrev","ISO 8879:1986","Acronym","SGML","GlossSee","markup"
,"GlossTerm","Standard Generalized Markup Language","ID","SGML","SortAs","SGML"
);
JsonVar["glossary.GlossDiv.GlossList.GlossEntry.GlossDef"] =
JSON("para","A meta-markup language, used to create markup languages such as DocBook.");
JSONref GlossSeeAlsoRef = FindElement(JsonVar["glossary.GlossDiv.GlossList.GlossEntry.GlossDef.GlossSeeAlso"]);
GlossSeeAlsoRef["[]"] = "GML";
GlossSeeAlsoRef["[]"] = "XML";
After testing, the ACF code produces the same result. The order of the fields is not the same, that's because we sort it alphabetically to faster query operation in the JSON. It does not matter for any practical use of it.
{
"glossary": {
"GlossDiv": {
"GlossList": {
"GlossEntry": {
"Abbrev": "ISO 8879:1986",
"Acronym": "SGML",
"GlossDef": {
"GlossSeeAlso": [
"GML",
"XML"
],
"para": "A meta-markup language, used to create markup languages such as DocBook."
},
"GlossSee": "markup",
"GlossTerm": "Standard Generalized Markup Language",
"ID": "SGML",
"SortAs": "SGML"
}
},
"title": "S"
},
"title": "example glossary"
}
}
NOTE: Arrays in JSON (using square brackets instead of curly brackets - do not exist in XML. The only way we can identify array notation when we go via XML is to have at least two instances of the array. Then the parser will see there is more than one node with the same tag and will handle it as an array.
If we in the example above change the JSON to have "GlossList as an array, we could change it this way:
{
"glossary": {
"GlossDiv": {
"GlossList": [{
"GlossEntry": {
"Abbrev": "ISO 8879:1986",
"Acronym": "SGML",
"GlossDef": {
"GlossSeeAlso": [
"GML",
"XML"
],
"para": "A meta-markup language, used to create markup languages such as DocBook."
},
"GlossSee": "markup",
"GlossTerm": "Standard Generalized Markup Language",
"ID": "SGML",
"SortAs": "SGML"
}
},{
"GlossEntry": {"Abbrev": "Dummy entry"}
}],
"title": "S"
},
"title": "example glossary"
}
}
As you can see, we have added a second dummy element to the array for our tool to recognize it as an array.
This will produce this ACF code:
JSON JsonVar;
JsonVar["glossary"] =
JSON("title","example glossary");
JsonVar["glossary.GlossDiv"] =
JSON("title","S");
JSONref GlossListRef = FindElement(JsonVar["glossary.GlossDiv.GlossList"]);
GlossListRef["[]"] = JSON("GlossEntry",JSON("Abbrev","ISO 8879:1986","Acronym","SGML","GlossDef",JSON("GlossSeeAlso","GML","GlossSeeAlso","GML","para","A meta-markup language, used to create markup languages such as DocBook."
)
,"GlossSee","markup","GlossTerm","Standard Generalized Markup Language","ID","SGML"
,"SortAs","SGML"));
GlossListRef["[]"] = JSON("GlossEntry",JSON("Abbrev","Dummy entry"));
The dummy entry we added comes on its own line, as can be removed.
Creating Composite Structures within Arrays in JSON/XML
Take, for instance, a financial export scenario. It's common to encounter multiple "invoice" nodes, each harboring a complex internal structure. If we initially isolate this intricate segment, treating it as a distinct operation, we can efficiently craft these recurring structures into a separate XML variable. Following this, we apply the process to the section encasing the repeating structure.
Once these two components are prepared, we can seamlessly merge them using the empty-bracket notation previously mentioned, culminating in the formation of the complete XML structure.
Consider an export comprising a single root structure, followed by several invoices, each containing multiple invoice lines. The strategy involves first constructing the invoice framework minus the lines. Next, we incorporate the lines through separate operations. Lastly, we assemble the root structure, methodically integrating each invoice into it.
Example composite structure in JSON.
Let's consider a scenario using a glossary. Our goal is to create a separate JSON variable for the inner structure. Initially, I used the development tool to generate a basic structure, replacing "JsonVar" with "GlossEntry". After extracting this from the complete sample, I reran the tool to create the root structure. Finally, I set up a loop to generate three instances of "GlossEntry" within the root structure.
Here's the refined example:
function JsonTest ()
// Declarations....
JSON GlossEntry;
JSON JsonVar;
JSONref ge_GlossSeeAlsoRef;
// Create the surrounding structure....
JsonVar["glossary"] =
JSON("title","example glossary");
JsonVar["glossary.GlossDiv"] =
JSON("title","S");
// Loop to add three elements...
for ( i=1, 3)
GlossEntry = "{}"; // Reset the GlossEntry
GlossEntry["GlossEntry"] =
JSON("Abbrev","ISO 8879:1986-"+string(i),"Acronym","SGML","GlossSee","markup"
,"GlossTerm","Standard Generalized Markup Language","ID","SGML","SortAs","SGML");
GlossEntry["GlossEntry.GlossDef"] =
JSON("para","A meta-markup language, used to create markup languages such as DocBook.");
ge_GlossSeeAlsoRef = FindElement(GlossEntry["GlossEntry.GlossDef.GlossSeeAlso"]);
ge_GlossSeeAlsoRef["[]"] = "GML";
ge_GlossSeeAlsoRef["[]"] = "XML";
// Add it as an array element to the surrounding structure
JsonVar["glossary.GlossDiv.GlossList[]"] = GlossEntry;
end for
return string (JsonVar);
end
That produced this result:
{
"glossary": {
"GlossDiv": {
"GlossList": [
{
"GlossEntry": {
"Abbrev": "ISO 8879:1986-1",
"Acronym": "SGML",
"GlossDef": {
"GlossSeeAlso": [
"GML",
"XML"
],
"para": "A meta-markup language, used to create markup languages such as DocBook."
},
"GlossSee": "markup",
"GlossTerm": "Standard Generalized Markup Language",
"ID": "SGML",
"SortAs": "SGML"
}
},
{
"GlossEntry": {
"Abbrev": "ISO 8879:1986-2",
"Acronym": "SGML",
"GlossDef": {
"GlossSeeAlso": [
"GML",
"XML"
],
"para": "A meta-markup language, used to create markup languages such as DocBook."
},
"GlossSee": "markup",
"GlossTerm": "Standard Generalized Markup Language",
"ID": "SGML",
"SortAs": "SGML"
}
},
{
"GlossEntry": {
"Abbrev": "ISO 8879:1986-3",
"Acronym": "SGML",
"GlossDef": {
"GlossSeeAlso": [
"GML",
"XML"
],
"para": "A meta-markup language, used to create markup languages such as DocBook."
},
"GlossSee": "markup",
"GlossTerm": "Standard Generalized Markup Language",
"ID": "SGML",
"SortAs": "SGML"
}
}
],
"title": "S"
},
"title": "example glossary"
}
}
Enjoy the tool and the examples presented in this section.
Ole K Hornnes
Back to top
Tutorial: Use a sample EHF XML document to produce ACF code
For those unfamiliar with EHF (Electronic Trade Format) invoices, it's a comprehensive and intricate format. Crafting these invoices requires meticulous attention to detail, as even minor errors can lead to rejection. To simplify this process, I utilized a newly developed XML/JSON tool for creating ACF code that generates the required XML format. I divided the invoice into manageable sections, creating individual ACF functions for each. These sections include the root, document reference with attachments, supplier, customer, delivery, payment means, tax, legal monetary, and invoice lines. Each function was generated using the tool and customized with specific parameters to replace the sample text from the source XML. This approach, augmented by a helper function for formatting numbers to two decimal places (a requirement for PEPOL validation), significantly streamlined the process, taking just over an hour to assemble the complete document. This method exemplifies the efficiency and time-saving potential of the tool.
Tool Application Overview
I developed a straightforward FileMaker application featuring a layout with three distinct tabs: "Conversion", "Testing", and "Console". The "Conversion" tab presents two large text fields: the first for inputting XML/JSON source data and the second for displaying the generated ACF code. Additional fields are provided to name the conversion and to specify a function name for the resulting code. A portal on the left side facilitates easy navigation between different parts of the application. A conveniently placed button between the text fields triggers the conversion function.

The "Testing" tab has a similar layout, but with the generated code field repositioned to the left. To the right, there's a sizable field for the output of the tested code. A button is available to initiate code testing, which compiles and executes the code, outputting results in the adjacent field.

The "Console" tab is dedicated to displaying output from the code compilation process. Any compilation errors are prominently displayed in this tab.
This tool simplifies the process of deconstructing complex XML structures into individual records within a table. Users can efficiently generate code for each segment and then integrate these segments into the target ACF document, ultimately assembling a comprehensive solution for processing the full XML structure under examination.
The produced functions.
A helper function to format numbers with two decimal places.
Without this function, I got validation errors in PEPOL because the default number format has too many decimals. It was required with only 2 decimals.
function EHF_numbers ( float number )
return format ( "%.2f", number );
end
The Invoice Lines section
We call this function for each invoice line. The parameters can for example be pulled from the database using an SQL query,
Function EHF_Make_InvocieLine(int lineNo, string ProdID, string item, float count, float price, float sum, string ref, float VATpercent, string VATcode, string currency)
XML xmlvar;
xmlVar["cac:InvoiceLine"] =
XML("cbc:ID",lineNo,"cbc:InvoicedQuantity",EHF_numbers(count),"cbc:LineExtensionAmount",EHF_numbers(sum)
);
xmlVar["cac:InvoiceLine.cac:OrderLineReference"] =
XML("cbc:LineID",ref);
xmlVar["cac:InvoiceLine.cac:Item"] =
XML("cbc:Name",item);
xmlVar["cac:InvoiceLine.cac:Item.cac:SellersItemIdentification"] =
XML("cbc:ID",ProdID);
xmlVar["cac:InvoiceLine.cac:Item.cac:ClassifiedTaxCategory"] =
XML("cbc:ID",VATcode,"cbc:Percent",EHF_numbers(VATpercent));
xmlVar["cac:InvoiceLine.cac:Item.cac:ClassifiedTaxCategory.cac:TaxScheme"] =
XML("cbc:ID","VAT");
xmlVar["cac:InvoiceLine.cac:Price"] =
XML("cbc:PriceAmount",EHF_numbers(price));
// Assign attributes to the XML...
XMLattributes(xmlVar["cac:InvoiceLine.cbc:InvoicedQuantity"], XML("unitCode","NAR","unitCodeListID","UNECERec20");
XMLattributes(xmlVar["cac:InvoiceLine.cbc:LineExtensionAmount"], XML("currencyID",currency);
XMLattributes(xmlVar["cac:InvoiceLine.cac:Item.cac:ClassifiedTaxCategory.cbc:ID"], XML("schemeID","UNCL5305");
XMLattributes(xmlVar["cac:InvoiceLine.cac:Price.cbc:PriceAmount"], XML("currencyID",currency);
return XmlVar;
End
The EHF_Make_Suplier function
This is your client's company.
Function EHF_Make_Suplier(string OrgNr, string CompanyName, string Street, String City, string ZipCode, string Country, string VATcode, string Contact)
XML xmlvar;
xmlVar["cac:AccountingSupplierParty.cac:Party"] =
XML("cbc:EndpointID",OrgNr);
xmlVar["cac:AccountingSupplierParty.cac:Party.cac:PartyName"] =
XML("cbc:Name",CompanyName);
xmlVar["cac:AccountingSupplierParty.cac:Party.cac:PostalAddress"] =
XML("cbc:StreetName",Street,"cbc:CityName",City,"cbc:PostalZone",ZipCode
);
xmlVar["cac:AccountingSupplierParty.cac:Party.cac:PostalAddress.cac:Country"] =
XML("cbc:IdentificationCode",Country);
xmlVar["cac:AccountingSupplierParty.cac:Party.cac:PartyTaxScheme"] =
XML("cbc:CompanyID",VATcode);
xmlVar["cac:AccountingSupplierParty.cac:Party.cac:PartyTaxScheme.cac:TaxScheme"] =
XML("cbc:ID","VAT");
xmlVar["cac:AccountingSupplierParty.cac:Party.cac:PartyLegalEntity"] =
XML("cbc:RegistrationName",CompanyName,"cbc:CompanyID",OrgNr);
xmlVar["cac:AccountingSupplierParty.cac:Party.cac:PartyLegalEntity.cac:RegistrationAddress"] =
XML("cbc:CityName",City);
xmlVar["cac:AccountingSupplierParty.cac:Party.cac:PartyLegalEntity.cac:RegistrationAddress.cac:Country"] =
XML("cbc:IdentificationCode",Country);
xmlVar["cac:AccountingSupplierParty.cac:Party.cac:Contact"] =
XML("cbc:ID",Contact);
// Assign attributes to the XML...
XMLattributes(xmlVar["cac:AccountingSupplierParty.cac:Party.cbc:EndpointID"], XML("schemeID","NO:ORGNR");
XMLattributes(xmlVar["cac:AccountingSupplierParty.cac:Party.cac:PostalAddress.cac:Country.cbc:IdentificationCode"], XML("listID","ISO3166-1:Alpha2");
XMLattributes(xmlVar["cac:AccountingSupplierParty.cac:Party.cac:PartyTaxScheme.cbc:CompanyID"], XML("schemeID","NO:VAT");
XMLattributes(xmlVar["cac:AccountingSupplierParty.cac:Party.cac:PartyLegalEntity.cbc:CompanyID"], XML("schemeID","NO:ORGNR","schemeName","Foretaksregisteret");
XMLattributes(xmlVar["cac:AccountingSupplierParty.cac:Party.cac:PartyLegalEntity.cac:RegistrationAddress.cac:Country.cbc:IdentificationCode"], XML("listID","ISO3166-1:Alpha2");
return XmlVar;
End
The EHF_Make_Customer function
This is for the paying customer's details
Function EHF_Make_Customer(string OrgNr, string CustomerNo, string CompanyName, string Street, String City, string ZipCode, string Country, string VATcode, string Contact)
XML xmlvar;
xmlVar["cac:AccountingCustomerParty.cac:Party"] =
XML("cbc:EndpointID",OrgNr);
xmlVar["cac:AccountingCustomerParty.cac:Party.cac:PartyIdentification"] =
XML("cbc:ID",CustomerNo);
xmlVar["cac:AccountingCustomerParty.cac:Party.cac:PartyName"] =
XML("cbc:Name",CustomerNo);
xmlVar["cac:AccountingCustomerParty.cac:Party.cac:PostalAddress"] =
XML("cbc:StreetName","Street","cbc:CityName",City,"cbc:PostalZone",ZipCode);
xmlVar["cac:AccountingCustomerParty.cac:Party.cac:PostalAddress.cac:Country"] =
XML("cbc:IdentificationCode",Country);
xmlVar["cac:AccountingCustomerParty.cac:Party.cac:PartyTaxScheme"] =
XML("cbc:CompanyID",VATcode);
xmlVar["cac:AccountingCustomerParty.cac:Party.cac:PartyTaxScheme.cac:TaxScheme"] =
XML("cbc:ID","VAT");
xmlVar["cac:AccountingCustomerParty.cac:Party.cac:PartyLegalEntity"] =
XML("cbc:RegistrationName",CompanyName,"cbc:CompanyID","915903037");
xmlVar["cac:AccountingCustomerParty.cac:Party.cac:PartyLegalEntity.cac:RegistrationAddress"] =
XML("cbc:CityName",City);
xmlVar["cac:AccountingCustomerParty.cac:Party.cac:PartyLegalEntity.cac:RegistrationAddress.cac:Country"] =
XML("cbc:IdentificationCode",Country);
xmlVar["cac:AccountingCustomerParty.cac:Party.cac:Contact"] =
XML("cbc:ID",Contact);
// Assign attributes to the XML...
XMLattributes(xmlVar["cac:AccountingCustomerParty.cac:Party.cbc:EndpointID"], XML("schemeID","NO:ORGNR");
XMLattributes(xmlVar["cac:AccountingCustomerParty.cac:Party.cac:PartyIdentification.cbc:ID"], XML("schemeID","ZZZ");
XMLattributes(xmlVar["cac:AccountingCustomerParty.cac:Party.cac:PostalAddress.cac:Country.cbc:IdentificationCode"], XML("listID","ISO3166-1:Alpha2");
XMLattributes(xmlVar["cac:AccountingCustomerParty.cac:Party.cac:PartyTaxScheme.cbc:CompanyID"], XML("schemeID","NO:VAT");
XMLattributes(xmlVar["cac:AccountingCustomerParty.cac:Party.cac:PartyLegalEntity.cbc:CompanyID"], XML("schemeID","NO:ORGNR");
XMLattributes(xmlVar["cac:AccountingCustomerParty.cac:Party.cac:PartyLegalEntity.cac:RegistrationAddress.cac:Country.cbc:IdentificationCode"], XML("listID","ISO3166-1:Alpha2");
return XmlVar;
End
The EHF_Make_Delivery function
This is for the delivery address
Function EHF_Make_Delivery(string Street, string City, string ZipCode, string Country)
XML xmlvar;
xmlVar["cac:Delivery.cac:DeliveryLocation.cac:Address"] =
XML("cbc:StreetName",Street,"cbc:CityName",City,"cbc:PostalZone",ZipCode
);
xmlVar["cac:Delivery.cac:DeliveryLocation.cac:Address.cac:Country"] =
XML("cbc:IdentificationCode",Country);
// Assign attributes to the XML...
XMLattributes(xmlVar["cac:Delivery.cac:DeliveryLocation.cac:Address.cac:Country.cbc:IdentificationCode"], XML("listID","ISO3166-1:Alpha2");
return XmlVar;
End
The EHF_Make_PaymentMeans function
Here we have the invoice number, the due date, and the bank account number...
Function EHF_Make_PaymentMeans(string InvoiceNo, date dueDate, string PaymentMeansCode, string ToAccount)
XML xmlvar;
xmlVar["cac:PaymentMeans"] =
XML("cbc:PaymentMeansCode",PaymentMeansCode,"cbc:PaymentDueDate",string(dueDate, "%Y-%m-%d"),"cbc:PaymentID",InvoiceNo);
xmlVar["cac:PaymentMeans.cac:PayeeFinancialAccount"] =
XML("cbc:ID",ToAccount);
// Assign attributes to the XML...
XMLattributes(xmlVar["cac:PaymentMeans.cbc:PaymentMeansCode"], XML("listID","UNCL4461");
XMLattributes(xmlVar["cac:PaymentMeans.cac:PayeeFinancialAccount.cbc:ID"], XML("schemeID","BBAN");
return XmlVar;
End
The EHF_Make_TaxTotal function
This function makes the structure for Tax, and breakdown to all the Tax classes.
Function EHF_Make_TaxTotal(float SumTaxAm, array float TaxSubAm, array float Taxable, array string TaxCode, array float taxPercent)
XML xmlvar;
xmlVar["cac:TaxTotal"] =
XML("cbc:TaxAmount",EHF_numbers(SumTaxAm));
XMLref cac_TaxSubtotalRef = FindElement(xmlVar["cac:TaxTotal.cac:TaxSubtotal"]);
int x = sizeof (TaxSubAm );
int i=1;
// for (i=1, x)
xmlVar["cac:TaxTotal"] = XML("cac:TaxSubtotal", XML("cbc:TaxableAmount",EHF_numbers(Taxable[i]),"cbc:TaxAmount",EHF_numbers(TaxSubAm[i]),"cac:TaxCategory",
XML("cbc:ID",TaxCode[i],"cbc:Percent",EHF_numbers(taxPercent[i]),"cac:TaxScheme",XML("cbc:ID","VAT"))));
XMLattributes(xmlvar["cac:TaxTotal.cac:TaxSubtotal.cbc:TaxableAmount"], XML("currencyID","NOK");
XMLattributes(xmlvar["cac:TaxTotal.cac:TaxSubtotal.cbc:TaxAmount"], XML("currencyID","NOK");
XMLattributes(xmlvar["cac:TaxTotal.cac:TaxSubtotal.cac:TaxCategory.cbc:ID"], XML("schemeID","UNCL5305");
// end for
// Assign attributes to the XML...
XMLattributes(xmlVar["cac:TaxTotal.cbc:TaxAmount"], XML("currencyID","NOK");
return XmlVar;
End
The EHFMakeLegalMonetaryTotal function
This is for summing up the invoice structure.
Function EHF_Make_LegalMonetaryTotal(float LineExtAm, float TaxExclAm, float TaxInclAm, float RoundingAm, float PayAm, string currency)
XML xmlvar;
xmlVar["cac:LegalMonetaryTotal"] =
XML("cbc:LineExtensionAmount",EHF_numbers(LineExtAm),"cbc:TaxExclusiveAmount",EHF_numbers(TaxExclAm),"cbc:TaxInclusiveAmount",EHF_numbers(TaxInclAm)
,"cbc:PayableRoundingAmount",EHF_numbers(RoundingAm),"cbc:PayableAmount",EHF_numbers(PayAm));
// Assign attributes to the XML...
XMLattributes(xmlVar["cac:LegalMonetaryTotal.cbc:LineExtensionAmount"], XML("currencyID",currency);
XMLattributes(xmlVar["cac:LegalMonetaryTotal.cbc:TaxExclusiveAmount"], XML("currencyID",currency);
XMLattributes(xmlVar["cac:LegalMonetaryTotal.cbc:TaxInclusiveAmount"], XML("currencyID",currency);
XMLattributes(xmlVar["cac:LegalMonetaryTotal.cbc:PayableRoundingAmount"], XML("currencyID",currency);
XMLattributes(xmlVar["cac:LegalMonetaryTotal.cbc:PayableAmount"], XML("currencyID",currency);
return XmlVar;
End
The EHF_MakeAddDocRef
This function is for adding PDF files to the invoice, in the printed format. The parameter is amongst others the file path for the file. The function reads the file and converts it to BASE64 format for the XML tag.
Function EHF_MakeAddDocRef(string id, string docType, string filePath)
XML xmlvar;
string doc, base64text;
int x;
if (file_exists (filePath)) then
x = open ( filePath, "r");
doc = read ( x );
close (x);
base64text = BASE64_ENCODE ( doc );
xmlVar["cac:AdditionalDocumentReference"] =
XML("cbc:ID",id,"cbc:DocumentType",docType);
xmlVar["cac:AdditionalDocumentReference.cac:Attachment"] =
XML("cbc:EmbeddedDocumentBinaryObject",base64text);
// Assign attributes to the XML...
XMLattributes(xmlVar["cac:AdditionalDocumentReference.cac:Attachment.cbc:EmbeddedDocumentBinaryObject"], XML("mimeCode","application/pdf");
else
alert ( "Document does not exists");
end if
return XmlVar;
End
The Main function
This is the main function last, which calls all the other functions in sequence. I have for simplicity only added hard-coded values here, but it is easy to implement some SQL queries to pull the data needed from the FileMaker database.
Function EHF_GenEHFXML(string InvoiceID)
string Note = "Konsulentbistand vedr debugging av Diverse";
date IssueDate = date ( Now() ) ;
string OrderRef = "987654";
string currency = "NOK";
XML xmlvar;
xmlVar["Invoice"] =
XML("cbc:UBLVersionID","2.1","cbc:CustomizationID",
"urn:www.cenbii.eu:transaction:biitrns010:ver2.0:extended:urn:www.peppol.eu:bis:peppol5a:ver2.0:extended:urn:www.difi.no:ehf:faktura:ver2.0",
"cbc:ProfileID","urn:www.cenbii.eu:profile:bii05:ver2.0",
"cbc:ID",InvoiceID,"cbc:IssueDate",string(IssueDate,"%Y-%m-%d"),"cbc:InvoiceTypeCode","380",
"cbc:Note",Note,"cbc:DocumentCurrencyCode", currency);
xmlVar["Invoice.cac:OrderReference"] =
XML("cbc:ID",OrderRef);
// Assign attributes to the XML...
XMLattributes(xmlVar["Invoice"], XML("xmlns","urn:oasis:names:specification:ubl:schema:xsd:Invoice-2",
"xmlns:cac","urn:oasis:names:specification:ubl:schema:xsd:CommonAggregateComponents-2",
"xmlns:cbc","urn:oasis:names:specification:ubl:schema:xsd:CommonBasicComponents-2"
,"xmlns:ccts","urn:un:unece:uncefact:documentation:2","xmlns:qdt",
"urn:oasis:names:specification:ubl:schema:xsd:QualifiedDatatypes-2","xmlns:udt",
"urn:un:unece:uncefact:data:specification:UnqualifiedDataTypesSchemaModule:2");
XMLattributes(xmlVar["Invoice.cbc:InvoiceTypeCode"], XML("listID","UNCL1001");
XMLattributes(xmlVar["Invoice.cbc:DocumentCurrencyCode"], XML("listID","ISO4217");
xmlVar["Invoice"] = EHF_MakeAddDocRef ( InvoiceID, "Invoice "+InvoiceID , "~/Desktop/invoice_test.pdf");
xmlVar["Invoice"] = EHF_Make_Suplier("961718192", "My Good Consultant Company", "Vestfaret 77", "FREDRIKSTAD", "1633", "NO", "961718192MVA", "John Doe Jr.");
xmlVar["Invoice"] = EHF_Make_Customer("998997993", "00223", "Fredrich Clausen Company ", "Vestavind 66", "OSLO", "0978", "NO", "998997993MVA", "Karl Croch");
xmlVar["Invoice"] = EHF_Make_Delivery("Vestavind 66", "OSLO", "0978", "NO");
date dueDate = IssueDate + 14;
xmlVar["Invoice"] = EHF_Make_PaymentMeans (InvoiceID, string(dueDate, "%Y-&m-%d"), "31", "12345678911");
array float TaxSubAm, Taxable, taxPercent;
array string TaxCode;
float LineExtAm = 1000.0;
float TaxTotal = 250.0;
TaxSubAm[] = TaxTotal;
Taxable [] = LineExtAm;
taxPercent[] = 25.0;
TaxCode [] = "S";
xmlVar["Invoice"] = EHF_Make_TaxTotal(TaxTotal, TaxSubAm, Taxable, TaxCode, taxPercent);
xmlVar["Invoice"] = EHF_Make_LegalMonetaryTotal(LineExtAm, LineExtAm, LineExtAm+TaxTotal, 0, LineExtAm+TaxTotal, currency);
// Invoice Lines
// EHF_Make_InvocieLine(int lineNo, string ProdID, string item, float count, float price, float sum, string ref, float VATpercent, string VATcode, string currency)
xmlVar["Invoice"] = EHF_Make_InvocieLine(1, "K021", "Consultant Service", 0.5, 1000.0, 500.0, "1234", 25.0, "S", currency);
xmlVar["Invoice"] = EHF_Make_InvocieLine(2, "K022", "Meeting", 1.0, 500.0, 500.0, "1235", 25.0, "S", currency);
return string(XmlVar);
End
The product
It is a long XML, but it validates at PEPPOL. I have added this sample as a download for those interested.

Summary
Using so little time to craft all these details is a real time-saver. For most of us, it would be the difference between doing it or getting someone else to do it for many of us. One would use two weeks to craft all these details and get it correct, with a lot of study and trial and error along the way.
Download the demo application to test it for yourself, and have a lot of fun along the way.
Best Regards, Ole Kristian Ek Hornnes.
Back to top
Creating Complex XMLs Using the XML/JSON Development Tool
Crafting complex XML documents, often characterized by attributes in most nodes, can be a challenging task. Typically, in such documents, data is embedded in attributes rather than within XML tags. The XML/JSON development tool simplifies this process considerably.
Understanding XML Attributes
In standard XML, data values are usually placed between a start tag and an end tag. However, attributes are defined within the start tag itself as key/value pairs, instead of being enclosed between tags.
Example:
<Data ss:Type="String">WebShop orders</Data>
Here:
ss:Type="String"is an attribute.- "WebShop orders" is the data value.
Prettifying XML Documents
Working with sample XML documents is a recommended technique. If the sample is not formatted (i.e., the content is on a long, unindented line), you can 'prettify' it. Online tools are available for this purpose; simply search for "XML prettify online" to find several options.
Alternatively, Mac users can use the xmllint command-line tool:
$ cd Desktop
$ xmllint --format myUnprettyXML.xml > myPrettyXML.xml
$
After prettifying, the document can be opened in a plain text editor like TextMate or BBEdit.
Creating XML Snippets from a Complex Document
When you open a prettified XML template in a text editor, it's easy to copy valid XML snippets, including their end tags, to avoid parsing errors. For example:
<Style ss:ID="Default" ss:Name="Normal">
<Alignment ss:Vertical="Bottom"/>
<Borders/>
<Font ss:FontName="Calibri" x:Family="Swiss" ss:Size="12" ss:Color="#000000"/>
<Interior/>
<NumberFormat/>
<Protection/>
</Style>
In the development tool, this snippet translates to the following ACF code:
Function Excel_DefaultStyle()
XML xmlVar;
xmlVar["Style"] =
XML("Alignment","","Borders","","Font","",
"Interior","","NumberFormat","","Protection","");
// Assign attributes to the XML...
XMLattributes(xmlVar["Style"], XML("ss:ID","Default","ss:Name","Normal");
XMLattributes(xmlVar["Style.Alignment"], XML("ss:Vertical","Bottom");
XMLattributes(xmlVar["Style.Font"], XML("ss:FontName","Calibri","x:Family","Swiss","ss:Size","12",
"ss:Color","#000000");
return XmlVar;
End

You can easily replace any hardcoded values with function parameters for dynamic content creation.
Creating a Style Catalog
To create a style catalog, you can append multiple styles to the "Styles" tag. For example:
XML styles;
styles["Styles"] = Excel_DefaultStyle();
styles["Styles+"] = Excel_BoldTextStyle();
The "+" sign indicates appending a new style instead of replacing the existing one. This differs from the double square bracket notation, which would create multiple separate "styles" tags. The "+" variant is the correct approach in this context.
(Note: The "+" feature was introduced in plugin version 1.7.0.7.)
Clearing XML Variables Before Re-use
Use the clear(variable) command to reset an XML variable, especially useful in loops for building structures. For instance:
int i, lines = sizeof(Ordre_nr);
XML row;
for (i = 1, lines) {
clear(row);
// Add cells to the row...
row["Row+"] = Excel_TextCell(string(Ordre_nr[i]), "Default");
row["Row+"] = Excel_TextCell(string(Firma_ID[i]), "Default");
row["Row+"] = Excel_TextCell(l_Firma_navn[i], "Default");
...
...
excel["Workbook.Worksheet.Table+"] = row;
NumberOfRows++;
}
clear(row);
This approach ensures each new row in the loop is fresh and uncluttered, ready for new data.
Utilizing the Development Tool for Parsing Data
Efficient XML Parsing from Web Service Responses
When you receive an XML response from a web service and need to parse its data, our development tool can significantly streamline the process. It allows you to generate ACF code that replicates the structure of the received XML, facilitating easy parsing and data manipulation.
Convenient Code Generation for Custom Use
Instead of using the functions directly, consider them as a rich source for copy-and-paste operations. The tool generates functions with all the necessary paths, making it easier to extract and work with the specific data segments you need.
Handling Variable Web Service Responses
Web services often return different XML documents based on various states – a standard response, an error message, or variations tied to the specific nature of the requested data.
Intelligent Response to Non-Existent Nodes
Our tool has a unique approach to handling requests for values in non-existent nodes. Instead of returning an empty string – which could be confused with an empty node – it returns a question mark (“?”). This distinction allows for a more accurate interpretation of the web service response.
Example: Checking the Status of a Web Request
XML resp = HTTP_GET(.......);
if (resp["Data.Status.ErrorMessage"] == "?") {
// Operation successful: No error message present in the response
}
In this example, we use the response data to check if there’s an error message. The absence of an error (indicated by “?”) confirms that the request was processed successfully.
Back to top
Send an e-mail from The ACF plugin
The ACF plugin has evolved, and now we have the first function in the email functionality in testing. This is the send_email.
OK, you can send emails from FileMaker. But this function in the plugin adds new features to send emails, like styled HTML emails made from plain text.
- Easy configuration using the JSON framework.
- Have both HTML and PLAIN text in the same e-mail sent as a "multipart alternative".
- Easy add one or more attachments to the email
- Use the markdown to HTML functions to generate good-looking emails from pure text.
- Can add extra mail headers to the email if necessary, like subscription headers and more.
The demo mail application
We have made a demo mail application to showcase and test the e-mail functions. It contains three tables for this to work. We have one table for the e-mail account setup, one for the messages, and one for the attachments to the e-mails. They are all related.
- Having the account setup table, holding the mail server address, port, credentials, the from address, and two signatures for your mail. One for use in the HTML part, and one for the plain text part.
- The messages table contains fields for to, cc, bcc, subject, and message body. Also sent date-time, and the account relation.
- The attachment table contains fields for the attachment path, the foreign key for the message relation, and some calculated fields for display in a portal in the message window that shows the folder, the filename, and the file type.
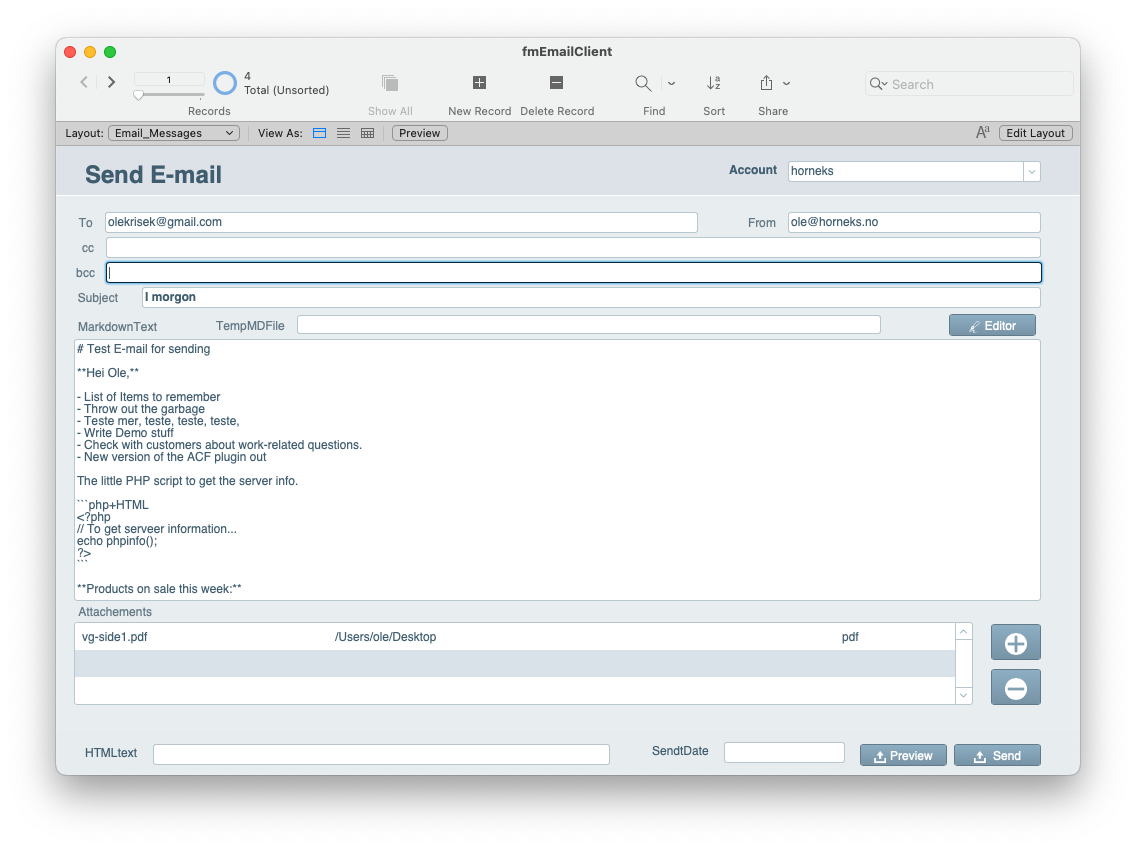
The window has some buttons:
- Editor, that launches an external editor for composing the text. You can write it directly in the message field, but using a MarkDown editor like Typora or similar offers a better writing experience. When hitting that button, a temporary file is made with the text, and, in my case, Typora opens. The button changes to "Load back" so that you can press and load the MarkDown text back to the record.
- A Preview button, that converts the MarkDown text to HTML, and shows the content in a web browser.
- Pluss and minus buttons right to the attachment portal, for adding attachments or removing them.
- Then you have the "Send" button, which also converts to HTML, and then compose a JSON object with all the parameters needed for sending. The account parameters, to, cc, bcc, Subject, content of MarkDown text for the plain text part, and the converted HTML document, and any attachments. Then it uses the
Send_emailfunction in the plugin to send it. You get an "OK" text back when complete.
Over 90% of the programming done in this application is done with ACF functions. This means that the button scripts are short 2-3 liners mostly. This makes the functions very easy to implement into any other application where this feature is needed. Maybe your target application already has the needed tables, so it is only possible to change their name in the ACF code to fit your target application.
A walkthrough of the ACF functions supporting the demo code
In the following boxes, I will show the source code in the ACF language that is loaded into the plugin to make it work.
Building JSON with the account parameters.
function emailServerPar (string ShortName)
ARRAY string SMTP_Host, SMTP_User, SMTP_Password, SMTP_Port, FromEmail, FromName, Signature, PlainSignature;
string sql = "SELECT
SMTP_Host,
SMTP_User,
SMTP_Password,
SMTP_Port,
FromEmail,
FromName,
Signature,
PlainSignature
FROM
Email_Accounts
WHERE
ShortName = :ShortName
INTO :SMTP_Host, :SMTP_User, :SMTP_Password, :SMTP_Port, :FromEmail, :FromName, :Signature, :PlainSignature
";
string res = ExecuteSQL (sql);
if ( sizeof (SMTP_User) == 0) then
return json("ERROR", "No Data retrieved in SQL query", "shortname", ShortName);
end if
JSON server;
server["server"] = JSON ("host", SMTP_Host[1], "port", SMTP_Port[1], "user", SMTP_User[1],
"password",SMTP_Password[1], "Signature", Signature[1],"PlainSignature", PlainSignature[1] );
return server;
end
ShortName is the key in the account table. We use an SQL query to get the account parameters. Then we create a JSON variable called server, with key/value pairs for all the parameters. This JSON is returned from the function. Calling this function with a valid account name from the account table returns a JSON object with all the necessary mail config data.
The AddAttachement function
This function is called when you press the "+" button right to the attachment portal. It selects a file, then finds out if it's added already, and if not, inserts a record in the attachment table.
function AddAttachement ()
string path = select_file ("Select file to add to the e-mail", desktop_directory());
string primkey, sql, res;
if ( path != "" ) then
primkey = Email_Messages::PrimaryKey;
sql = "SELECT FilePath FROM Email_Attachements WHERE fk_EmailMessage = :primkey AND FilePath = :path";
res = ExecuteSQL ( sql);
if ( res != "") then
alert ( "File allready added: " + res);
return "";
end if
sql = "INSERT INTO Email_Attachements (fk_EmailMessage, FilePath) VALUES (:primkey, :path)";
res = ExecuteSQL ( sql);
return res;
end if
return "";
end
The button script just calls this function and does a "refresh portal" script step to have it update the rows in it.
The Minus button just does a single "delete portal record" script step.
The Preview Mail function
This function is called when you hit the "Preview" button. The function converts the MarkDown formatted to HTML, saves it to disk, and returns the path to FileMaker. Then the script uses the "Open URL" script step. to launch Safari or any other web browser.
function PreviewMail ()
string acc = Email_Messages::Account;
string htmlfolder = Email_Accounts::HTML_Folder;
set_markdown_html_root ( htmlfolder );
string fileBase = htmlfolder+"/Temp_"+string(now(), "%Y%m%d_%h%i%s");
string mdFile = fileBase+".md";
string htmlFile = fileBase + ".html";
string mdContent = Email_Messages::MarkdownText;
JSON params = emailServerPar(acc); // the other function returns the server config...
// print string(params);
mdContent += params["server.Signature"];
int x = open(mdFile, "w");
write(x, mdContent);
close (x);
string res = markdown2html (mdFile, "solarized-dark,monokai", htmlFile);
return htmlFile;
end
We call the emailServerPar to get the config object since it contains the mail signature. The account has configured a folder for temporary storage, and styling in a Themes folder. We use this to create a temporary filename both for the MarkDown file and the HTML file, add the signature to the MarkDown text, and write it to disk. Then it uses set_markdown_html_root command for defining the work dir for the conversation. Finally, we use the ACF function markdown2html to complete the conversation. We return the path of the HTML file to FileMaker.
The Editor Button
This function is called when we hit the Editor button in the layout. We have a field in the messages containing the path for the temporary MarkDown document edited in an external editor. If this field is empty, we create a temporary file for the text, and set a FileMaker variable $$mdFile for the button script to set in the field. Then we simply return the original text. The function is called in a Set Field Script step, so the markdown text is updated in the record. If the field has a path, it means that we load it back, so we read the file and return the content. The $$mdFile variable is cleared, so the second set field in the button script sets the filename.
function Editor_button()
string MDText = Email_Messages::MarkdownText;
string tmpMDfile = Email_Messages::TempMDFile;
string htmlfolder = Email_Accounts::HTML_Folder;
string mdContent;
int x;
if ( tmpMDfile == "") then
tmpMDfile = htmlfolder+"/Temp_"+string(now(), "%Y%m%d_%h%i%s")+".md";
x = open (tmpMDfile, "w" );
write (x, Email_Messages::MarkdownText);
close (x);
$$mdFile = tmpMDfile;
return Email_Messages::MarkdownText;
else
x = open ( tmpMDfile, "r");
mdContent = read ( x);
close x;
$$mdFile = "";
return mdContent;
end if
return "OK";
end
The SendMail function
This function does the important work of assembling the JSON parameter object. We chose to use this method, as we otherwise would need to have a long list of parameters for the function. With JSON, all the parameters have key names that make it both easier to read and remember when using the function. Also easy to cut and paste it from somewhere else and just change the parameters to what fits for a particular use.
function SendMail ()
string htmlFile = PreviewMail();
string sql, primkey, res, acc = Email_Messages::Account;
JSON params = emailServerPar(acc);
int x;
x = open ( htmlFile, "r");
string htmlContent = read (x);
close (x);
string plainContent = regex_replace ("<[^>]*>", Email_Messages::MarkdownText, "") +"\r\n";
plainContent += params["server.PlainSignature"];
params["from"] = Email_Messages::From;
params["to"] = Email_Messages::to;
if (Email_Messages::cc != "" ) then
params["cc"] = Email_Messages::cc;
end if
if ( Email_Messages::bcc != "") then
params["bcc"] = Email_Messages::bcc;
end if
params["subject"] = Email_Messages::Subject;
params["body.plain"] = plainContent;
params["body.html"] = htmlContent;
// Add attachements
primkey = Email_Messages::PrimaryKey;
ARRAY STRING atts;
sql = "SELECT FilePath FROM Email_Attachements WHERE fk_EmailMessage = :primkey
INTO :atts";
res = ExecuteSQL ( sql);
if (sizeof (atts) > 0) then
params["attachments"] = atts;
end if
return send_email(params);
end
The function uses the preview function to generate the HTML file and then puts it into the body.html tag in the JSON. The plain content is washed for potential HTML codes that might appear in the MarkDown text. This is done using a regex_replace function.
Finally, we send the mail and return its result, which should normally be "OK".
If any error should occur, like malformatted email addresses, mail-server config issues, or anything like that, there will be raised an exception. If an Exception occurs that will terminate the ACF function, returning the error message instead.
Screenshots
Typora - External editor composing.

The received e-mail using the chosen theme. It lacks config for the table, but it's OK.
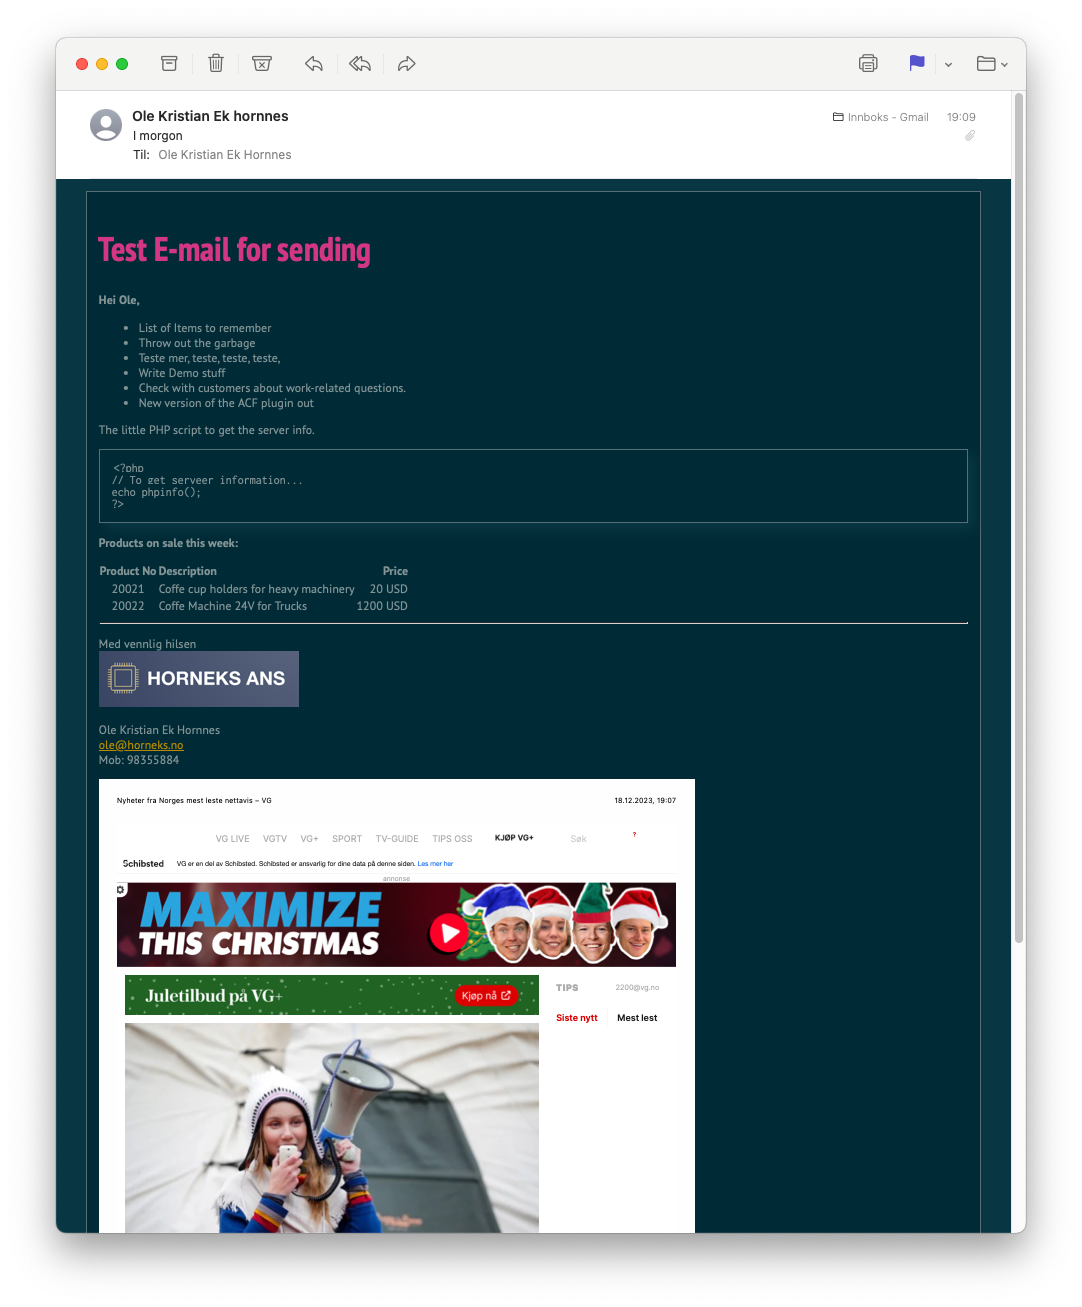
It is of course easy to design the template for anything you like.
You see the logo at the bottom of the mail. It comes from the signature in the account setup, just having an <img src="/path/to/logo/logo.png"/> along with the other texts in the signature. The logo is read by the send_email function and added as a related attachment to the mail and the image tag is changed to reference a content ID that the attachment is labeled with.
Deliverability
Of course, one important thing about mail sending is that the mail gets delivered. We have tested against the "MailTrap" email tool suite, to get a spam score report. Here is the result:
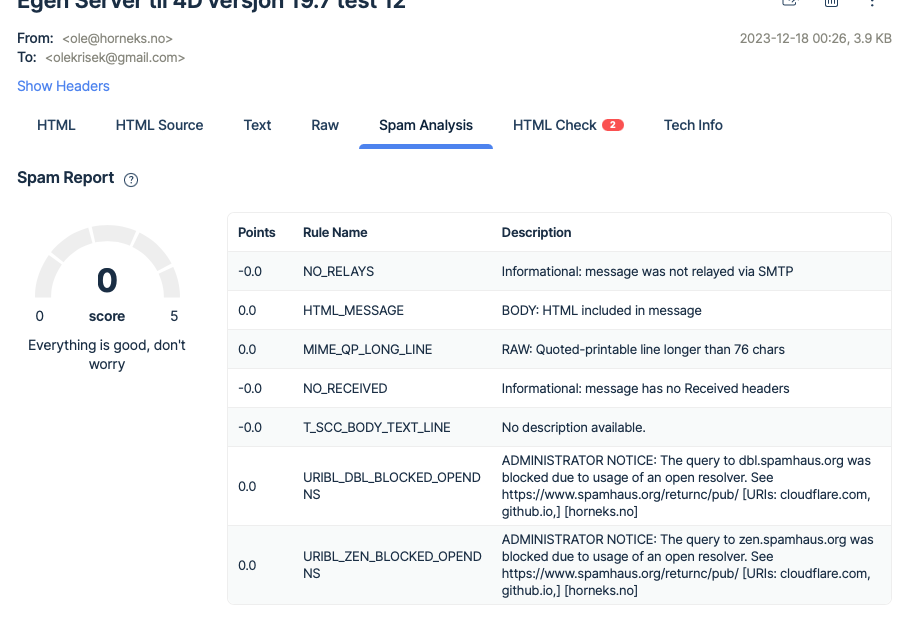
Conclusion
This package can easily be applied in a target application. It can be used for sending offers from a CRM system, Invoices, and order confirmations that are looking good. It is easy to have logos for your company. It is also very easy for a FileMaker script to create the MarkDown source for an automated e-mail function since MarkDown is just plain text with some codes in it to define the styling,
You can download the demo from the download section and it will also require Mac until the Windows version is released. The send_email function was introduced in the plugin version 1.7.0.10 which is also available for download.
Where can I download the demo?
The demo application is in the ACF-Plugin download package together with the plugin, all the other examples, and documentation.
Download the demo mail app and the ACF Plugin
Back to top
Tutorial: Implementing Two-Factor Authentication in FileMaker
In today's digital landscape, security is of paramount importance for IT systems. The principles outlined in this article can be employed to enhance the security of FileMaker clients in your corporate solution. Moreover, they can be seamlessly integrated into FileMaker websites using WebDirect, the PHP API, and more.
Additionally, this approach can serve as an added layer of security for web services that require credentials for access. By incorporating a one-time password (OTP) provided by FileMaker, web services can verify it alongside user credentials.
In this tutorial, I will introduce the new functions in the ACF-Plugin that enable the implementation of two-factor authentication.
What is OTP?
OTP stands for One-Time Password. It involves the use of a standardized computer algorithm to generate a 6-digit code that changes every 30 seconds. These 30-second intervals are referred to as "time slots." The generated code is based on the computer's clock on the device generating it. Most modern computers synchronize their time with network time servers, which typically ensures accurate timekeeping.
However, there may be instances where a user enters the code precisely as the time slot changes. To account for potential variations in computer times, it's advisable to verify the previous and subsequent time slots as well. The ACF plugin now includes functions for both verifying and generating OTP codes based on an OTP secret.
Enabling Two-Factor Authentication for FileMaker Client Users
In this setup, I have installed software on a web server called "zint", a versatile barcode generator capable of generating QR code images. To utilize zint's capabilities, I have provided a small PHP file on the web server that runs as a web service.
Below is the PHP code:
<?php
// Decode BASE64Url encoded text in the input.
function base64url_decode($data) {
$padded = str_pad($data, strlen($data) % 4, '=', STR_PAD_RIGHT);
return base64_decode(str_replace(['-', '_'], ['+', '/'], $padded));
}
if (isset($_GET["txt"])) {
$txt = base64url_decode($_GET["txt"]);
//
// You have to edit this path to point to some temporary storage.
$file = "/var/www/tools.horneks.no/tmp/" . md5(microtime()) . ".png";
$ht = "";
if (isset($_GET["h"])) {
$ht = "--height=" . $_GET["h"] . " ";
}
if (isset($_GET["bt"])) {
$bt = $_GET["bt"];
$cmd = "/usr/local/bin/zint -b $bt -o $file $ht -d " . '"' . $txt . '" 2>&1';
} else {
$cmd = "/usr/local/bin/zint -o $file $ht -d " . '"' . $txt . '" 2>&1';
}
$lines = array();
$res = exec($cmd, $lines);
header('Pragma: public');
header('Cache-Control: max-age=1');
header('Expires: ' . gmdate('D, d M Y H:i:s \G\M\T', time() + 1));
header('Content-Type: image/png');
echo readfile($file);
unlink($file);
}
?>
Now that we have our QR-Code web service up and running, let's explore three essential functions:
- Generate a Random OTP Secret: This function allows us to create a random OTP (One-Time Password) secret, an integral part of two-factor authentication.
- Verify a User-Supplied OTP Code: With this function, we can validate an OTP code provided by the user against the OTP secret.
- Generate QR Images Using Our Web Service: We'll utilize the following functions from the ACF-Plugin for these tasks: generate_OTP_secret, BASE64_ENCODE, HTTP_GET, and check_OTP_code.
These functions collectively enhance security and facilitate two-factor authentication in various applications, including FileMaker clients and web services.
// ACF Functions executed by the ACF plugin
function GenOTP_Secret ()
FunctionID 3602;
return generate_otp_secret();
end
// Function to use a web-service to generate the QR image.
function GeneratebarCode ( string secret, string name, string user, string company )
FunctionID 3600;
string totp = format ('otpauth://totp/%s:%s?secret=%s&issuer=%s', name, user, secret, company);
totp = substitute (totp, " ","%20");
totp = BASE64_ENCODE( totp, 3); // 3 means no linefeeds, BASE64Url format
string params = format ( "bt=%d&txt=%s", 58, totp);
string res = HTTP_GET ("http://tools.horneks.no/tools/barcodegen.php?"+params, "" );
res = BASE64_ENCODE (res);
// Format return for viewing in a web-viewer on the activate Two-factor form.
res = "data:text/html,<img src = 'data:image/png;base64," + res + "'/>";
return res;
end
// Verification function.
function VerifyOTPcreds (string secret, string OTPCode)
FunctionID 3601;
return check_otp_code ( secret, OTPCode,1);
end
After compiling and loading this solution into FileMaker, you can implement the following components:
- User Registration: If a user isn't already registered, you can create a registration process.
- Two-Factor Fields: Add fields related to two-factor authentication, including TwoFactorEnabled, TwoFactorSecret, and LastOTPCode.
- User Layout: Design a user-friendly layout with buttons for enabling and disabling two-factor authentication.
- Two-Factor Activation Card Layout: Create a card layout to guide users through the activation process. Display the two-factor secret for entry into an authenticator app and embed a web viewer to show a QR image for easy app integration.
- OTP Code Field: Include a field where users can enter the 6-digit OTP code generated by their authenticator app for verification before enabling two-factor authentication.
- Verify Button: Implement a "Verify" button to ensure users can authenticate successfully before enabling two-factor authentication.
These components, illustrated in the sample app, offer a minimalistic yet effective approach to enhancing security in your FileMaker solution.
Screenshot for a sample FileMaker App
For a visual representation of the sample app, refer to the provided images.
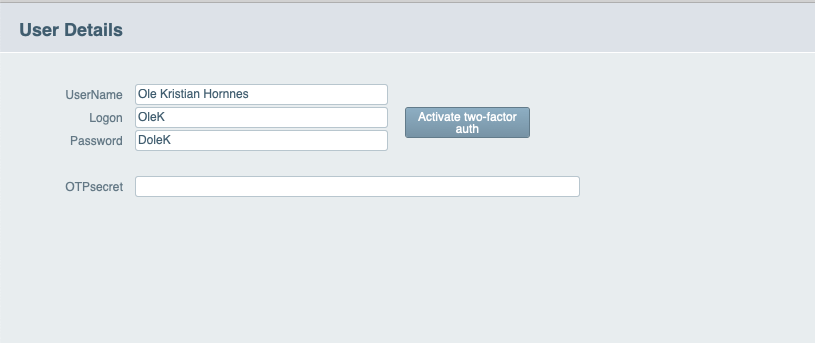
When the user clicks the "Activate Two-Factor" button, a new card appears with the QR code and OTP secret.
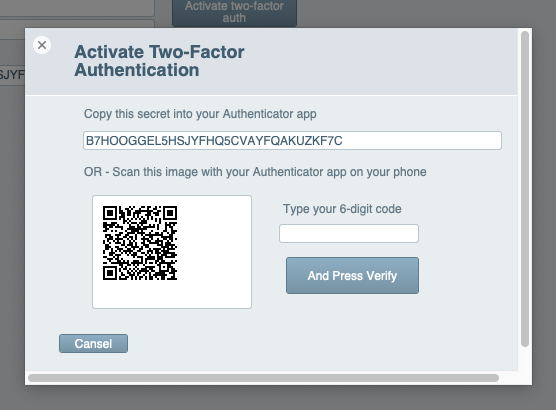
The user then configures the authenticator app using either the QR image or OTP secret. Once done, they receive a 6-digit code to enter into the card for verification.
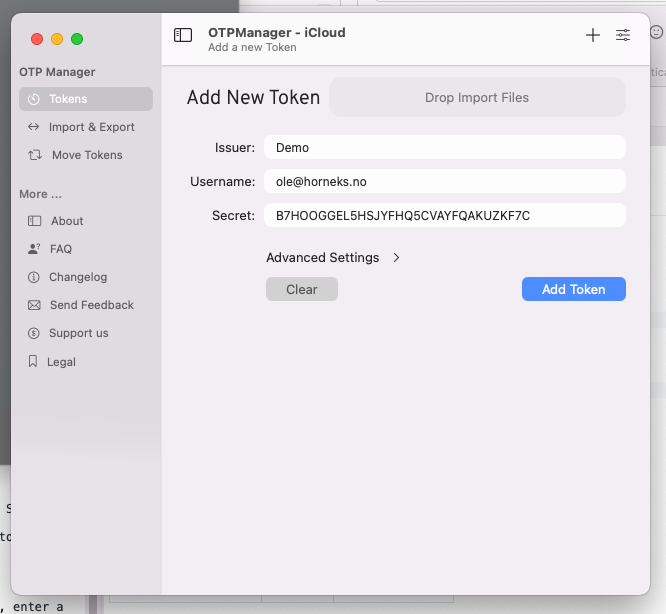
The authenticator app displays the correct code.

Upon entering the correct code, it verifies that the user has installed and configured the authenticator successfully. The card window is then closed, and two-factor authentication is activated.
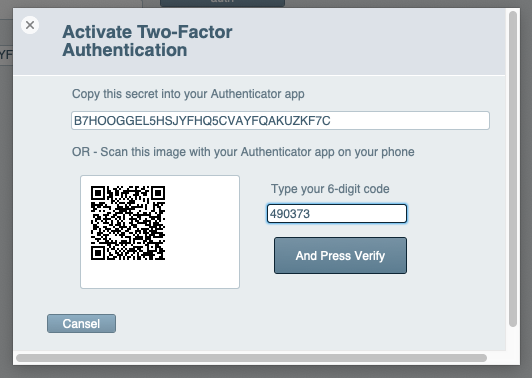
Voila, two-factor authentication is now activated, and the button switches to "Deactivate." If needed, the user can deactivate and reactivate it for use with a new phone.
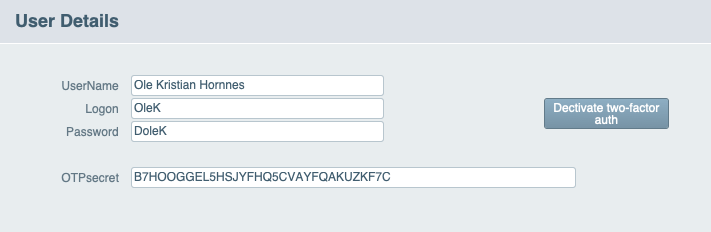
The logon dialog can now either:
If you are using FileMaker Account login, prompt the user for the two-factor code. If it's correct, allow access; otherwise, log them out. If you are not using an account login but instead use a common account with a custom login dialog, you can add a field for the two-factor code. In both cases, use the VerifyOTPcreds ACF function to validate the code.
Using OTP for Securing Web Services
Hackers and web bots constantly attempt to breach web services and systems. Log files on servers reveal hundreds of such attempts daily. Therefore, adding an extra layer of security is essential. HTTPS encrypts traffic, but hackers still try various username/password combinations. With the ACF plugin, FileMaker can generate and send OTP codes alongside credentials. Even if a hacker matches the username and password, without the OTP code that changes every 30 seconds, they cannot access your service.
Here is one simple function for producing OTP code from FileMaker:
// ACF function to get a new OTP code for sending to the web service.
function GenOTPcode ( string secret )
return get_otp_code( secret );
end
Web services must also generate OTP codes for verification. Here's a PHP function for generating and verifying OTP codes:
<?php
// When we verify, you can give $window parameter value of 1, which means
// it will generate codes for the previous slot, this slot, and the next slot.
// If any match, it returns true, otherwise false.
function VerifyOTPcode ($secret, $GivenOTP, $window) {
for ($i = -$window; $i <= $window; $i++) {
if ( generate_OTP_code ( $secret, $i ) == $GivenOTP ) {
return true;
}
}
return false;
}
?>
This function can be used to enhance security for web services.
Here is the generator functions:
<?php
function base32_decode($input) {
$base32Chars = 'ABCDEFGHIJKLMNOPQRSTUVWXYZ234567';
$base32Values = array_flip(str_split($base32Chars));
$output = '';
$buffer = 0;
$bufferSize = 0;
foreach (str_split($input) as $char) {
$charValue = $base32Values[$char];
$buffer = ($buffer << 5) | $charValue;
$bufferSize += 5;
if ($bufferSize >= 8) {
$output .= chr(($buffer >> ($bufferSize - 8)) & 0xFF);
$bufferSize -= 8;
}
}
return $output;
}
function generate_OTP_code($secret, $window = 0, $testcounter = 0) {
// Decode the base32 secret key
$decodedSecret = base32_decode($secret);
// Get the current Unix time as the counter
$currentTimestamp = time();
$counter = floor($currentTimestamp / 30); // 30-second time slots
// Use the test counter if provided (for testing purposes)
if ($testcounter != 0) {
$counter = $testcounter;
}
$counter += $window;
// Pack the counter as a 64-bit integer in network byte order (big-endian)
$packedCounter = pack('N*', 0) . pack('N*', $counter);
// Calculate the HMAC-SHA1 hash
$hmacResult = hash_hmac('sha1', $packedCounter, $decodedSecret, true);
// Extract the 4 bytes at the offset and convert them to a 32-bit integer
$offset = ord($hmacResult[19]) & 0x0F;
$truncatedCode = (
((ord($hmacResult[$offset + 0]) & 0x7F) << 24) |
(ord($hmacResult[$offset + 1]) << 16) |
(ord($hmacResult[$offset + 2]) << 8) |
ord($hmacResult[$offset + 3])
);
// Apply a modulo operation to obtain a 6-digit OTP code
$otpCode = str_pad(($truncatedCode % 1000000), 6, '0', STR_PAD_LEFT);
return $otpCode;
}
?>
Example use:
// Example usage:
$secretKey = "YOUR_SECRET_KEY"; // Replace with your actual secret key
$otp = generate_OTP_code($secretKey);
echo "OTP: $otp";
Using this function, you can verify the code by comparing it to the OTP generated.
The Window parameter is used for selecting the previous slot (-1), this slot (0), or the next slot (1). By generating OTP codes for all three slots and verifying that one of them is correct, you can grant valid access to the web service.
Remember that the OTP secret must also be present in the application using the service and the web service itself, along with the credentials.
Practical test with OTP and Basic Authentication for the document service
I have made support for both OTP-based authentication to the document service and Basic-Authentication to the web service itself.
- Basic Authentication is a server configuration. It means that you simply put a username and password in the folder for the web server. If you navigate to the service with a web browser you will simply be asked for credentials before the web page is shown. Nobody needs to show this web page of the document service, as it is a SOAP service. Having basic authentication on this will give you an added layer of security.
- OTP-based authentication for the SOAP service, means that we add an OTP code along with the credentials that the server will verify.
The great news is that we now have implemented this in the document-service functions for accessing the web service. We only need to tell the plugin about the OTP secret, and eventually user and password for the site itself.
The configuration object you can read about on the web service has to be altered to activate this function:
"ENDPOINT-URL:" & Preferences::remDocURL & "¶" &
"USER:" & Preferences::remDocUser & "¶" &
"PASSWORD:" & Preferences::remDocPassword & "¶" &
"DOCENCRYPTION-KEY:" & $key & "¶" &
If ( Preferences::DocOTPsecret ≠ ""; "OTP-SECRET:" & Preferences::DocOTPsecret & "¶"; "") &
If ( Preferences::BasicAuthUser ≠ "";
"BASICAUTH-USER:" & Preferences::BasicAuthUser & "¶" &
"BASICAUTH-PASS:" & Preferences::BasicAuthPass & "¶"; "")
Then the result of this is encrypted with the plugin functions, and gives an object like this.
Document Access Package
========== PARAMETERS =========
+wKVV8CWFGYJjHR4BjvHhWomAkw6SRkHLzM/Ghk4kHer7MnOYI30nDwVv+534trQzeluRQkH
yl5wPhdfa4AI2QGLBmDzVbVSmIr+MtJgZKDUOXalkEgVTPn1qRVu+5mFXoWdE7s5MncZykb5
fkl/APNDKR/BoHuCRmZg9H+OsVLrvBqRzni7UK5YQYL+fRt0/l5iqeNS7JIKC6ECFBVjQy1C
JA19VISdQPRtJ/WjbpWLoHfVwZ/fb/gm1aLsYmWrvCHHrEUYHoip949PPzHs98eTlT9wEEQV
RkIDour4y/V5fuBDDLHpxjbpWV55QreBI28Kv+5E3Lqgi0/ObWEb7INiwdSaR47b3+5BYpWj
tkqCxOAg7wdywWSJxclfGezp===
======= END PARAMETERS ======
Using this object in the plugin's authentication function is all, then both saving documents to the web service as encrypted documents and reading documents go automatically.
I have now tested everything, and all works as expected.
The updated files for the SOAP service are available in the download area.
Thank you for reading.
Regards, Ole Kristian Ek Hornnes
Back to top
Example: Simplifying Dynamic Portal Sorting
A highly requested feature in FileMaker is the ability to sort portals in layouts for various columns, both in ascending and descending directions. There are multiple solutions to achieve this, but here's an approach that's quick to implement without the need for complex relationship changes. It assumes you already have a relationship with the portal table to display data.
Description
This solution relies on two global fields in the portal table and one calculated field:
- SortField: A calculated field that returns text.
- SortColumn: A global field of number type, stored.
- SortDirection: A global field of number type, stored.
In your layout setup, choose the SortField as the sorting field in ascending order.
To implement this, you need two arrow icons and an invisible button for each column. The arrow icons are conditionally hidden, showing only the one that matches the current sort direction and column.
The Calculation
In your calculation, create a mechanism to determine the field selected by the SortColumn. Typically, this involves a case statement for each column number, returning the value for the field displayed in the sorted column. For example:
case (
MyTable::SortColumn = 1; MyTable::FirstName;
MyTable::SortColumn = 2; MyTable::LastName;
MyTable::SortColumn = 3; MyTable::Position;
MyTable::SortColumn = 4; MyTable::Salary;
MyTable::ID
)
However, when dealing with numeric columns, it's essential to address sorting discrepancies. Since the SortField is a text field, it doesn't sort numeric values correctly, especially when they have varying digit counts. To address this, you can use a calculation like this:
right(" " & Round(MyTable::Salary; 2); 10)
Replace the use of MyTable::Salary in the initial calculation with this fixed-length text string calculation.
Changing the Sort Column and Direction
To change the sort column and direction, use the invisible buttons in the column headings. But what about the sort direction? This is where the ACF-Plugin can be valuable with two functions: - dsPD_Text2Hex: Converts a string to a hexadecimal representation. - dsPD_Text2HexInv: Produces the inverse hexadecimal representation.
For example, using these functions:
dsPD_Text2Hex("ABC") & ¶ &
dsPD_Text2Hex("DEF") & ¶ &
dsPD_Text2HexInv("ABC") & ¶ &
dsPD_Text2HexInv("DEF")
This will create the following result:
414243
444546
BEBDBC
BBBAB9
Sorting with either dsPD_Text2Hex or dsPD_Text2HexInv will give you the opposite sorting direction, maintaining an ascending sort in the portal. Since the SortField isn't intended for display in the portal, it doesn't matter whether it contains text or hexadecimal numbers. Adjust the calculation as follows:
Let ([
v = case ( MyTable::SortColumn = 1; MyTable::FirstName;
MyTable::SortColumn = 2; MyTable::LastName;
MyTable::SortColumn = 3; MyTable::Position;
MyTable::SortColumn = 4; right(" " & Round(MyTable::Salary; 2);10);
right(" " & MyTable::ID;10) )
];
if ( MyTable::SortDirection = 1;
dsPD_Text2Hex(v);
dsPD_Text2HexInv(v) ))
Since you've already used the ACF-Plugin for these functions, consider creating an ACF function for cleaner calculations.
ACF Function: FormatNumber
Here's how you can create the ACF function FormatNumber:
function FormatNumber(float n, int len, int dec)
functionID 3506;
string f = "%" + format("%d.%df", len, dec);
return format(f, n);
end
Lets test this function in the data-viewer:
":" & ACFU_FormatNumber(3.1415; 10; 2) & ":"
Give this result:
: 3.14:
Using this, our calculation becomes this:
Let ([
v = case ( MyTable::SortColumn = 1; MyTable::FirstName;
MyTable::SortColumn = 2; MyTable::LastName;
MyTable::SortColumn = 3; MyTable::Position;
MyTable::SortColumn = 4; ACFU_FormatNumber (MyTable::Salary; 10; 2);
/* else */ ACFU_FormatNumber (MyTable::ID; 10; 0 ) );
v = if (v = "";" "; v ) // So the blank fields are not on top in the Descending direction.
];
if ( MyTable::SortDirection = 1;
dsPD_Text2Hex(v);
dsPD_Text2HexInv(v) ))
Now, we can just alter the field sort-direction where "1" means ascending, and any other value will sort descending.
Since both The fields SortDirection and SortColumn are referenced in the calculation. Changing those will make FileMaker recalculate the values.
Note: If your column contains a very long text, then it´s advisable to use the Left function and only return the first 50 characters or something.
The Script for the Buttons
A FileMaker script is essential to change the sort order since it involves multiple steps. Ensure that your portal has a name; for example, MyPortal. Here's a sample script:
Set Variable [$Column; Get(ScriptParameter)]
If [$Column = MyTable::SortColumn]
# Change Sort Direction only:
Set Field [MyTable::SortDirection; If (MyTable::SortDirection = 1; 0; 1)]
Else
Set Field [MyTable::SortColumn; $Column]
Set Field [MyTable::SortDirection; 1] // Ascending for a different column
End If
Commit Record/Request [With Dialogs: Off]
Refresh Portal ["MyPortal"]
Execute this script for each of the invisible column heading buttons by passing the column number as the script parameter.
Hiding the Arrows
To hide the arrows for columns other than the one actively sorted, and to show the correct arrow for the sort direction, two additional ACF functions have been created:
function HideUpArrow ( int column, int SortColumn, int SortDirection )
FunctionID 3506;
bool hide = true;
if ( column == SortColumn && SortDirection == 1) then
hide = false;
end if
return hide;
end
function HideDownArrow ( int column, int SortColumn, int SortDirection )
FunctionID 3507;
bool hide = true;
if ( column == SortColumn && SortDirection != 1) then
hide = false;
end if
return hide;
end
Apply these functions in the "Hide Object When" field, which can be found in the rightmost tab when clicking on an arrow in layout mode, Just paste in this calculation for the UP-arrow in column 1:

ACFU_HideUpArrow(1; MyTable::SortColumn; MyTable::SortDirection)
And for the Down-arrow of column 1:
ACFU_HideDownArrow(1; MyTable::SortColumn; MyTable::SortDirection)
The formula can be copied to the other columns, by just changing the column number for that column. (2, 3, 4... )
This setup should provide a smooth sorting functionality for your portal. Good luck!
Download and Demo Material
A Demo can be downloaded at our download site (link below the picture)

The Links
Sorting multiple columns
I have been asking if this solution also can sort multiple columns, and the answer is Yes, with a few slight modifications. I have made a separate demo for multicolumns so that we keep the single-column demo intact.
When clicking on a different column heading than the one actively sorted, holding the "ALT" key on the keyboard should add a column to the sort criteria.
Structural changes
The SortColumn field should be changed to type TEXT, as we intend to have a comma-separated list of column numbers in it. One number for each column.
Changes to the calculation
Moving the calculation into an ACF function is probably the most easy way to do it. The purpose here is to make a concatenated value for the SortField. Then you will need one such calculation function for each different table that is used for portal-sorting in your application.
Here is the multicolumn implementation for our MyTable portal:
/*
Calculation to go into the MyTable::SortField. Use dsPD_Text2Hex, dsPD_text2HexInv in that
calculation as needed.
*/
function SortCalcMyTable ()
FunctionID 3508; // Unique ID for this function.
array string aSort = explode ( ",", MyTable::SortColumn);
int no = sizeof ( aSort ), i;
string k;
string val = "";
for ( i=1, no)
k = aSort[i];
if ( k == "1" ) then
val += MyTable::FirstName;
elseif ( k == "2" ) then
val += MyTable::LastName;
elseif ( k == "3" ) then
val += MyTable::Position;
elseif ( k == "4" ) then
val += FormatNumber (MyTable::Salary, 10, 2);
else
val += FormatNumber (MyTable::ID, 6, 0 );
end if
end for
if ( val == "" ) then
val = " ";
end if
return val;
end
Then the calculation in our SortField is changed to this:
Let ([
v = ACFU_SortCalcMyTable
];
if ( MyTable::SortDirection = 1;
dsPD_Text2Hex(v);
dsPD_Text2HexInv(v) ))
Changes to the button script
The button script for the invisible buttons, change the script to look like this:
Set Variable [$Column; Get(ScriptParameter)]
# Suppose there are not more than 9 columns, otherwise we can use the alphabet too.
If [Position ( MyTable::SortColumn ; $Column ; 1 ; 1 )>0]
If [Position ( MyTable::SortColumn ; "," ; 1 ; 1 )>0 and Get(ActiveModifierKeys) = 8]
# We are in Multi-sort mode, remove the column instead, and don't change direction
Set Field [MyTable::SortColumn; Substitute ( MyTable::SortColumn ; "," & $column ; "" )]
# Or if it was the first in the list
Set Field [MyTable::SortColumn; Substitute ( MyTable::SortColumn ; $column ; "" )]
Else
# Change Sort Direction only:
Set Field [MyTable::SortDirection; If (MyTable::SortDirection = 1; 0; 1)]
End If
Else
# Get(ActiveModifierKeys) returns 8 for the alt key on Mac, can check this for Windows too.
if [Get(ActiveModifierKeys) = 8 and MyTable::SortColumn ≠ ""]
Set Field [MyTable::SortColumn; MyTable::SortColumn & "," & $Column]
Else
Set Field [MyTable::SortColumn; $Column]
End If
Set Field [MyTable::SortDirection; 1] // Ascending for a different column
End If
Commit Record/Request [With Dialogs: Off]
Refresh Portal ["MyPortal"]
Changes to Hide arrow functions
The Hide Arrows functions need also some change. We assume that we only use a single digit for the column numbers, or we can also use the alphabet. Here are the new versions of it:
function HideUpArrow ( string column, string SortColumn, int SortDirection )
FunctionID 3506;
bool hide = true;
if ( pos (SortColumn, column )>=0 && SortDirection == 1) then
hide = false;
end if
return hide;
end
function HideDownArrow ( string column, string SortColumn, int SortDirection )
FunctionID 3507;
bool hide = true;
if ( pos (SortColumn, column )>=0 && SortDirection != 1) then
hide = false;
end if
return hide;
end
That would be all, or the portal can now be sorted in any number of columns we want.
Here is what it looks like with sort on Last name, First name:

Download the Multi Sort Demo
This MultiSort demo can be downloaded at this link:
Formatting other datatypes and values
It might happen that your portal contains rows containing other values that should not be sorted purely alphabetically. For example, month names should be sorted according to the calendar. Day names should be sorted according to the position in the week. Scientific numbers as text like 6.02E-23 should be written as a float number with many digits to be able to sort them chronologically. Finally, electronic component markings like resistors or capacitors values often come as 10K or 2R2 for 10 000 ohms and 2.2 ohms respectively.
In the following sections, I will present ACF functions for formatting them with respect to sorting order so that the sort becomes correct.
Date values
Date values should be sorted in Year-month-day format to be correctly sorted. Usually, the countries have different display formats for date, like day-month-year or month-day-year, that do not work well when it comes to sorting. Here is a function for date formatting that can be applied to our sorting solution:
/*
For date-sorting, returns a 6-digit date in the format YYMMDD
*/
function FormatDate ( date d )
FunctionID 3510;
return string (d, "%y%m%d");
end
Timestamp Values
Here are two scenarios, one where we have a field of type timestamp, and the second where we have a text field with a timestamp value ( maybe imported from some external system ). Here is the first scenario:
/*
For timestamp formatting where the field is of type TimeStamp
returns a string in format YYYYMMDD HHMMSS
Use lowercase "y" instead of uppercase "Y" to have 2 digit year.
*/
function FormatTimeStamp ( timestamp ts )
FunctionID 3511;
return string (ts, "%Y%m%d %H%M%S");
end
For string timestamps, there are also various formats, namely the SQL format can be sorted as text directly as it already has a year-month-day structure in it. If the format follows the date formatting in your country, we need to split apart the timestamp into date and time, and then merge them together again with the new format. The function below can be altered to accept a specific date format in your timestamp, commenting out the active d= assignment and uncommenting the other, where you specify the date format you have in your field.
/*
For timestamp as a string in the format used to display timestamps in your country.
*/
function FormatTimeStampAsString ( string s )
timestamp ts;
date d;
// Uncomment the version needed, and comment out the version not needed.
// d = date ( left(s,10), "%d/%m/%Y"); // like 31/12/2022
d = date ( left(s,10)); // Default format
s = string ( d, "%Y%m%d") + substring ( s, 10);
ts = s;
return ts ;
end
Month names
We have made a couple of functions here, for converting the month names into a 2-digit sorting value. There is one function for each language for 9 different languages. They can of course be edited to the language version you have if it's not in the list. Just copy the function needed. They all use one function in common, namely Find_in_array that needs to be copied in addition. Remember to put them in order so that referenced functions are defined above the place where they are used (since the ACF compiler is a one-pass compiler).
Here is the Find\_In\_Array function:
/*
Find_in_array - Find the index in an array for a given string.
Common for all the month names and weekday names sort.
Must be defined above where it is used.
*/
function Find_In_Array ( array string arr, string s )
int l = sizeof (arr);
int i;
for (i=1, l)
if ( arr[i] == s) then
return i;
end if
end for
return -1;
end
And here comes the format month names functions (one for each language, copy the ones for the languages you need, or translate if it lack in the list.
/*
Format English month names, as two-digit month numbers:
*/
function FormatMonthNameEng (string s )
FunctionID 3520;
array string names = { 'January', 'February', 'March', 'April', 'May', 'June',
'July', 'August', 'September', 'October', 'November', 'December' };
int i = Find_In_array (names, s);
if ( i<0) then
i = 99;
end if
return format ("&02d", i);
end
/*
Format Spanish month names, as two-digit month numbers:
*/
function FormatMonthNameSpa (string s)
FunctionID 3521;
array string names = { 'enero', 'febrero', 'marzo', 'abril', 'mayo', 'junio',
'julio', 'agosto', 'septiembre', 'octubre', 'noviembre', 'diciembre' };
int i = Find_In_array(names, s);
if (i < 0) then
i = 99;
end if
return format("&02d", i);
end
/*
Format French month names, as two-digit month numbers:
*/
function FormatMonthNameFra (string s)
FunctionID 3522;
array string names = { 'janvier', 'février', 'mars', 'avril', 'mai', 'juin',
'juillet', 'août', 'septembre', 'octobre', 'novembre', 'décembre' };
int i = Find_In_array(names, s);
if (i < 0) then
i = 99;
end if
return format("&02d", i);
end
/*
Format German month names, as two-digit month numbers:
*/
function FormatMonthNameGer (string s)
FunctionID 3523;
array string names = { 'Januar', 'Februar', 'März', 'April', 'Mai', 'Juni',
'Juli', 'August', 'September', 'Oktober', 'November', 'Dezember' };
int i = Find_In_array(names, s);
if (i < 0) then
i = 99;
end if
return format("&02d", i);
end
/*
Format Norwegian month names, as two-digit month numbers:
*/
function FormatMonthNameNor (string s)
FunctionID 3524;
array string names = { 'januar', 'februar', 'mars', 'april', 'mai', 'juni',
'juli', 'august', 'september', 'oktober', 'november', 'desember' };
int i = Find_In_array(names, s);
if (i < 0) then
i = 99;
end if
return format("&02d", i);
end
/*
Format Sedish month names, as two-digit month numbers:
*/
function FormatMonthNameSwe (string s)
FunctionID 3525;
array string names = { 'januari', 'februari', 'mars', 'april', 'maj', 'juni',
'juli', 'augusti', 'september', 'oktober', 'november', 'december' };
int i = Find_In_array(names, s);
if (i < 0) then
i = 99;
end if
return format("&02d", i);
end
/*
Format Danish month names, as two-digit month numbers:
*/
function FormatMonthNameDan (string s)
FunctionID 3526;
array string names = { 'januar', 'februar', 'marts', 'april', 'maj', 'juni',
'juli', 'august', 'september', 'oktober', 'november', 'december' };
int i = Find_In_array(names, s);
if (i < 0) then
i = 99;
end if
return format("&02d", i);
end
/*
Format Polish month names, as two-digit month numbers:
*/
function FormatMonthNamePol (string s)
FunctionID 3527;
array string names = { 'styczeń', 'luty', 'marzec', 'kwiecień', 'maj', 'czerwiec',
'lipiec', 'sierpień', 'wrzesień', 'październik', 'listopad', 'grudzień' };
int i = Find_In_array(names, s);
if (i < 0) then
i = 99;
end if
return format("&02d", i);
end
/*
Format Chinese month names, as two-digit month numbers ( are they similar in Japan?)
*/
function FormatMonthNameChi (string s)
FunctionID 3528;
array string names = { '一月', '二月', '三月', '四月', '五月', '六月',
'七月', '八月', '九月', '十月', '十一月', '十二月' };
int i = Find_In_array(names, s);
if (i < 0) then
i = 99;
end if
return format("&02d", i);
end
Thanks to chatGPT that helped me translate for all those languages.
Sorting on weekday names
Here are the functions for weekday names. There are functions for the same 9 languages and also one for Japanese, just copy the ones that are relevant to you. Those also use the same function `Find_In_Array´ described in the section above.
/*
Format week-day names as two-digit numbers for sorting in the portal.
*/
// English
function FormatWeekDayNamesEng (string s)
FunctionID 3529;
array string names = { 'Monday', 'Tuesday', 'Wednesday', 'Thursday', 'Friday', 'Saturday', 'Sunday' };
int i = Find_In_array(names, s);
if (i < 0) then
i = 99;
end if
return format("&02d", i);
end
// Spanish
function FormatWeekDayNamesSpa (string s)
FunctionID 3530;
array string names = { 'lunes', 'martes', 'miércoles', 'jueves', 'viernes', 'sábado', 'domingo' };
int i = Find_In_array(names, s);
if (i < 0) then
i = 99;
end if
return format("&02d", i);
end
// French
function FormatWeekDayNamesFra (string s)
FunctionID 3531;
array string names = { 'lundi', 'mardi', 'mercredi', 'jeudi', 'vendredi', 'samedi', 'dimanche' };
int i = Find_In_array(names, s);
if (i < 0) then
i = 99;
end if
return format("&02d", i);
end
// German
function FormatWeekDayNamesGer (string s)
FunctionID 3532;
array string names = { 'Montag', 'Dienstag', 'Mittwoch', 'Donnerstag', 'Freitag', 'Samstag', 'Sonntag' };
int i = Find_In_array(names, s);
if (i < 0) then
i = 99;
end if
return format("&02d", i);
end
// Norwegian
function FormatWeekDayNamesNor (string s)
FunctionID 3533;
array string names = { 'mandag', 'tirsdag', 'onsdag', 'torsdag', 'fredag', 'lørdag', 'søndag' };
int i = Find_In_array(names, s);
if (i < 0) then
i = 99;
end if
return format("&02d", i);
end
// Swedish
function FormatWeekDayNamesSwe (string s)
FunctionID 3534;
array string names = { 'måndag', 'tisdag', 'onsdag', 'torsdag', 'fredag', 'lördag', 'söndag' };
int i = Find_In_array(names, s);
if (i < 0) then
i = 99;
end if
return format("&02d", i);
end
// Danish
function FormatWeekDayNamesDan (string s)
FunctionID 3535;
array string names = { 'mandag', 'tirsdag', 'onsdag', 'torsdag', 'fredag', 'lørdag', 'søndag' };
int i = Find_In_array(names, s);
if (i < 0) then
i = 99;
end if
return format("&02d", i);
end
// Polish
function FormatWeekDayNamesPol (string s)
FunctionID 3536;
array string names = { 'poniedziałek', 'wtorek', 'środa', 'czwartek', 'piątek', 'sobota', 'niedziela' };
int i = Find_In_array(names, s);
if (i < 0) then
i = 99;
end if
return format("&02d", i);
end
// Chinese
function FormatWeekDayNamesChi (string s)
FunctionID 3537;
array string names = { '星期一', '星期二', '星期三', '星期四', '星期五', '星期六', '星期日' };
int i = Find_In_array(names, s);
if (i < 0) then
i = 99;
end if
return format("&02d", i);
end
// japanese
function FormatWeekDayNamesJpn (string s)
FunctionID 3538;
array string names = { '月曜日', '火曜日', '水曜日', '木曜日', '金曜日', '土曜日', '日曜日' };
int i = Find_In_array(names, s);
if (i < 0) then
i = 99;
end if
return format("&02d", i);
end
Sorting electronic component values
As this is a special subject for many, some might need it for solutions that contain a bill of materials for electronic devices for example.
Electronic component marking for resistors, capacitors, and inductors follows a special pattern.
- Resistors marked 4K7, which means 4700 ohms, also sometimes marked as 4.7Kohm
- 4.7 uF, also sometimes just 4u7, means 4.7 * 10-6, or 0.0000047
- 100pF is 100*10-12 or 0.00000000001 F
To sort such columns logically can be done with this format function. It is fixed to 30 characters with, and 15 decimals - as we work with both very small numbers and big numbers at the same time.
/*
Format Electronic Component Value
*/
function FormatElectronicComponentValue ( string s )
functionID 3540;
double n;
double factor;
string regex = "^([0-9,.]+)([RpnuµmkKM])?(\d*)([FfHhΩom])?";
string ns, nf, nd, nu, f;
if (regex_match ( regex, s) ) then
ns = regex_replace ( regex, s, "$1");
nf = regex_replace ( regex, s, "$2");
nd = regex_replace ( regex, s, "$3");
nu = regex_replace ( regex, s, "$4");
if ( nf == "R" ) then
factor = 1;
elseif (nf == "p" ) then
factor = 10^-12;
elseif (nf == "n" ) then
factor = 10^-9;
elseif (nf == "u" || nf == "μ") then
factor = 10^-6;
elseif (nf == "m" && nu=="H") then
factor = 10^-3;
elseif (nf == "m" || nf=="M" ) then
factor = 10^6;
elseif (nf == "k" || nf == "K" ) then
factor = 1000;
else
factor = 1;
end if
ns = ns + "." + nd;
n = double ( ns ) * factor;
else
n = double ( s );
end if
return format ( "%30.15f", n);
end
Conclution
The solution is simple to implement. Now we have two versions, one for single-column sort, and another that is multi-column sort. We also have a library for special format functions to be able to sort on diverse values that one can have. The functions in Chapter 3 must be seen as a library, there is no need to have all those functions in most solutions. If it is actually to edit some of the ACF functions presented here, have a look at the videos I have made.
The ACF plugin is a versatile plugin that covers all those areas shown in the example section. It can be bought for as little as 79 USD on our webshop on the main site. This is a one-off price and no subscriptions.
I hope this can be used for some out there. Send me a message on the contact form on the main site, if you have any questions.
- Ole K Hornnes
Back to top
Example: Luhn Algorithm - Generate Mod10 KID Control Digit
This example demonstrates how to add a modulo-10 (Mod10) control digit to a string of numbers using the Luhn algorithm. The Luhn algorithm is widely used for validating credit card numbers and other identification numbers.
For more details, you can refer to Wikipedia's article about the Luhn Algorithm.
Example Function:
function AddMod10(string number)
array int digits;
int l = length(number);
int i;
// Check if the input contains only digits.
if (regex_match("\d+", number)) then
// Build an array of integers.
for (i = 1, l)
digits[] = ascii(substring(number, i - 1, 1)) - 48;
end for
// Back traverse every second digit and double it. If > 9, subtract 9.
for (i = l, 1, -2)
digits[i] = digits[i] * 2;
if (digits[i] > 9) then
digits[i] = digits[i] - 9;
end if
end for
// Calculate the sum of all digits.
int sum;
for (i = 1, l)
sum += digits[i];
end for
// Calculate the control digit.
int digx = mod(sum * 9, 10);
return number + digx;
else
return "ERROR: Expects only digits as parameter: " + number;
end if
end
Result Test:
// For the example from the Wikipedia article mentioned above:
// 7992739871x
Set Variable ($KID; ACF_run("AddMod10"; "7992739871"))
// The return value will be: 79927398713, where the control digit is 3.
References:
Comparison with Standard Custom Functions:
In this example, we've implemented the Luhn algorithm to generate a Mod10 control digit for a given string of numbers. We also perform error checking to ensure that the source string contains only digits. This approach is designed to catch any unexpected characters in the input.
For comparison, there are standard custom functions available on Brian Dunning's website that provide similar functionality:
However, it's worth noting that these functions may not perform the same level of error checking as the example provided here. Using regular expressions to validate the input can help prevent errors and ensure accurate results.
This section provides a detailed example of how to implement the Luhn algorithm to generate a Mod10 control digit for a string of numbers in ACF, including error checking to ensure the input consists of digits only.
Back to top
Here's the revised text for the example of a standard library:
An Example of a Standard Library
Many developers create a standard library for functions they use in every development project. This library can be initialized in the startup script where the binary code loads from a text field in a preference table or a similar location. For this purpose, you can create fields named ACFPack1, ACFPack2, ACFPack3, and ACFPack4. You can easily add more fields if you need more than four packages.
Here's an example calculation you can use in a "Set Variable" script step to load these packages:
Let( [
v = If (not IsEmpty ( Preferences::ACF_Pack1) ; ACF_Install_base64Text( Preferences::ACF_Pack1 ); "") ;
v = v & If (not IsEmpty ( Preferences::ACF_Pack2) ; ACF_Install_base64Text( Preferences::ACF_Pack2 ); "") ;
v = v & If (not IsEmpty ( Preferences::ACF_Pack3) ; ACF_Install_base64Text( Preferences::ACF_Pack3 ); "") ;
v = v & If (not IsEmpty ( Preferences::ACF_Pack4) ; ACF_Install_base64Text( Preferences::ACF_Pack4 ); "")
];
v
)
This calculation checks if there's content in each of the ACFPack fields and uses the ACFInstall_base64Text function to load the packages. You can add your code to one of the empty slots in these fields. Once you're finished, you can move your code to another package that contains the complete collection of functions.
Example:
This example demonstrates how you can use this approach to create a reusable library of functions that you can easily incorporate into your FileMaker solutions. It simplifies the process of managing and sharing common functionality across multiple projects.
package bootstrap "Functions to facilitate load and save source and binary files";
// Load some content from a file.
function LoadFile (string filename)
FunctionID 200;
string content;
int x;
x = open (filename, "r");
content = read (x);
close ( x ) ;
return content;
end
// Save some content on a file.
function SaveFile (string filename, string content )
FunctionID 201;
int x;
x = open (filename, "w");
write (x, content);
close ( x );
return 1;
end
// Select a file and return its content.
function SelectFile (string startPath, string Prompt)
FunctionID 202;
string cc = "";
string filename = select_file (Prompt, startPath);
if (filename != "") then
cc = LoadFile(filename);
end if
// Make also the filename available from FileMaker after the content is read.
$$FileName = filename;
return cc;
end
// Select a folder on the file system
function SelectFolder (string Prompt)
FunctionID 203;
string cc = "";
string folder = select_directory(Prompt);
return folder;
end
// Ask for a FileName to save to.
function SelectSaveAsFile (string prompt, string defname, string defdir)
FunctionID 204;
string filename = save_file_dialogue (prompt, defname, defdir) ;
return filename;
end
/*
Function to make 000 grouping with space, and decimal "comma" that is used in Norway.
*/
function BelFormat ( float bel )
bool negative;
if (bel < 0.0) then
negative = true;
bel = -bel;
end if
long reminder, f;
int ore;
string result = "";
reminder = bel;
ore = round ( (bel - reminder ) *100, 0);
// print "\n:" + reminder;
while ( reminder > long(0) )
// print "\n" + reminder;
f = mod ( reminder, 1000);
reminder = reminder / 1000;
if (reminder > long(0)) then
result = format ( " %03ld", f) + result;
else
result = string ( f ) + result;
end if
end while
if (negative) then
result = "-" + result;
end if
print "Time Used: " + uSec();
return format ( "%s,%02d", result, ore);
end
The last function "BelFormat" used to format number with space as 1000 separator and comma. Another variant of this would be to use a reg-ex function instead - dramatically reducing the complexity of the function.
This regex was found on: regexr.com
Like this:
function BelFormat ( float bel )
functionID 230;
string sbel = substitute ( format ( "%.2f", bel ), ".", "," ) ;
return regex_replace ( "\d{1,3}(?=(\d{3})+(?!\d))", sbel, "$& ") ;
end
Using this function, the following numbers get translated:
| Input to the function | Result |
|---|---|
| 1234 | 1 234,00 |
| 10469236 | 10 469 236,00 |
| 400,49 | 400,49 |
| 4000,228 | 4 000,23 |
| 40000,228 | 40 000,23 |
| 4369825,66 | 4 369 825,66 |
| -200000 | -200 000,00 |
| 123456789 | 123 456 789,00 |
Back to top
Updating Currencies from a Web Service
In this example, we demonstrate how to use ACF to fetch data from a web service and update a local currency table with this information. To accomplish this, we pull currency names from a local table and construct requests to the web service. For this example, we use an external plugin called Troi URL, which will later be integrated into the ACF plugin itself.
Table Definition
Here is the definition of the currency table:

Example
package Currencies "Functions to Update Currency Table";
/*
- Create a request URL to Norges Bank WEB-service for currency information.
*/
function request_url(string kurskode)
string url = format("https://data.norges-bank.no/api/data/EXR/B.%s.NOK.SP?startPeriod=%s&EndPeriod=%s&format=csv-:-comma-false-y&lastNObservations=1",
kurskode, string(date(now()) - 7, "%Y-%m-%d"), string(date(now()), "%Y-%m-%d"));
return url;
end
/*
- Fetch all the tracked currency codes from db_Currency, get the exchange rate (spot), and update the table.
*/
function UpdateCurrencyTable_NorgesBank()
string avail = "AUD, BDT, BGN, BRL, BYN, BYR, CAD, CHF, CNY, CZK, DKK, EUR, GBP, HKD, HRK, HUF, IDR, ILS, INR, ISK, JPY, KRW, LTL, MMK, MXN, MYR, NZD, PHP, PKR, PLN, RON, RUB, SEK, SGD, THB, TRY, TWD, USD, ZAR";
string kurser = ExecuteSQL("SELECT Valutakode, Valutanavn FROM db_Currency"; "||"; "|*|");
array string a_kurs = explode("|*|", kurser), a_line, resLines, resFields;
int ant = sizeof(a_kurs);
int i;
string url, result, dato, val, kurskode, sql;
for (i = 1, ant)
a_line = explode("||", a_kurs[i]);
kurskode = a_line[1];
if (kurskode != "NOK") then
$url = request_url(a_line[1]);
result = @TURL_Get("-Encoding=UTF8"; $url)@;
print "-" * 80 + "\n" + result + "\n";
resLines = explode("\n", result); // We always get two lines: header + data line
resFields = explode(",", substitute(resLines[2], "\"", ""));
dato = resFields[1];
val = resFields[2];
sql = format("UPDATE db_Currency SET Valutadato = DATE '%s', ValutaKurs = %s WHERE Valutakode = '%s'", dato, val, kurskode);
result = ExecuteSQL(sql);
end if
end for
return "OK";
end
In this example, we first create a request URL to a web service provided by Norges Bank to obtain currency information. We then fetch all the tracked currency codes from the local db_Currency table, retrieve the exchange rate (spot) from the web service, and update the table with the obtained data.
This example demonstrates how ACF can be used to interact with web services and update local databases with external data.
Back to top
Test Arrays as Parameters
In this section, we'll demonstrate the use of arrays as parameters by running the "arrtest2" function, which showcases how arrays are passed and modified within functions.
Example:
package ArrayParTest "Test Array as Parameter";
function arrtest1(array string bb)
int k = sizeof(bb);
print k + "\n";
bb[] = "Test second last row";
bb[] = "Test last row";
return bb;
end
function arrtest2()
array string xx = {"Test1", "test2", "test3"};
array string b2 = arrtest1(xx);
b2[] = "b2 altered"; // Demonstrating that xx and b2 are different arrays.
int i;
int x = sizeof(b2);
for (i = 1, x)
print "\n" + b2[i];
end for
print "\n" + "-" * 80;
// Arrays as parameters are transferred by reference, so altering it in the "arrtest1" function
// should be effective in the source as well.
x = sizeof(xx);
for (i = 1, x)
print "\n" + xx[i];
end for
return 1;
end
Console Output After Running arrtest2():
3
Test1
test2
test3
Test second last row
Test last row
b2 altered
--------------------------------------------------------------------------------
Test1
test2
test3
Test second last row
Test last row
In this example, we define two functions: arrtest1 and arrtest2. arrtest2 demonstrates how arrays are passed as parameters and how changes made to the array within arrtest1 affect the source array in arrtest2. The console output showcases the behavior of these arrays and their modifications.
Back to top
Example: Dynamic Value List in FileMaker
Many individuals, including myself, have encountered challenges when dealing with the concept of dynamic Value Lists in FileMaker. Consider a scenario where you need to scan a folder and populate a Value List with the files from that folder. This allows users to select a file from a popup or dropdown list in a layout. While FileMaker is incredibly flexible when it comes to creating Value Lists based on relational structures, it lacks a straightforward method for creating Value Lists from a text source. Even using a field with an unstored calculation doesn't always work as expected.
Some have attempted to create a relationship to a second instance of a table with an "X" relationship, which, despite being considered unconventional, has sometimes worked. However, relying on such an approach can be risky, as it may not be supported in future FileMaker versions.
Fortunately, there's a more reliable solution. We can create a ValueList table with fields like Primary Key, ListName, and ListValue. Optionally, you can include a user-ID field if you wish to customize lists for different users. I've developed an ACF function that populates the ValueList table with items from a text-based list. It creates a record in the table for each list item, associating each record with the appropriate ValueList name. When you need to update the list later, you can remove unwanted records and add missing ones.
The function I'm about to introduce accomplishes precisely that. To use it, you'll need a stored calculation field that contains the list name, ensuring it's indexed as it won't change. Create a second instance of the ValueList table in the relationship graph, let's call it "ValueList_MyList1" as an example. Establish a relationship (=) to this instance from your calculated field. When defining the Manage ValueLists dialog, select only the records that follow this relationship, and you're all set.
Now, whenever you need to update a Value List from a script, run our ACF function with the items you want in a variable or a text field. The selection in your Value List will be instantly updated, making it versatile for various selection tasks with the right relationship and necessary values in your table.
In this specific example, we have a folder containing files, and we want to create a Value List that mirrors the files in that folder. We're using the List_files function to retrieve a list of files from the folder, returning a text variable with one line per file. These files serve as templates for a document system, and we want users to select a template from a dropdown list.
Here's the ACF code used for this purpose:
// Update the ValueList table to stay in sync with our File List
function UpdateValueList(string listName, string listItems)
// Create an SQL recordset of all the currently present values.
string sql = format("SELECT ValueText, PrimaryKey FROM ValueLists WHERE ListName = '%s'", listName);
int rs = SQL_Query(sql);
// Get the row count
int rc = SQL_GetRowCount(rs);
array string row;
// Get an array of the items we want.
array string NewList = explode("\r", listItems);
string item, pk, res;
int i, j, nlc = sizeof(NewList);
bool found;
// Loop through all list items we have
for (i = 1, rc)
row = SQL_GetRow(rs, i - 1); // First row is number 0.
item = row[1];
found = false;
// Check if we have it in our new list.
for (j = 1, nlc)
if (NewList[j] == item)
found = true;
NewList[j] = ""; // If found, clear the item to avoid duplication.
end if
end for
if (!found)
// If not found, delete the item from the ValueList table.
res = ExecuteSQL(format("DELETE FROM ValueLists WHERE PrimaryKey='%s'", row[2]));
end if
end for
// We have removed unwanted list items; now, create those that are missing.
for (i = 1, nlc)
if (NewList[i] != "")
// Adjust the SQL statement if you want to include user or function fields.
sql = format("INSERT INTO ValueLists (ListName, ValueText) VALUES('%s', '%s')", listName, NewList[i]);
res = ExecuteSQL(sql);
if (res != "")
print "\n" + sql + "\n" + res; // Print errors to the console if any.
end if
end if
end for
// Close the result set from the first Query.
SQL_Close(rs);
return "OK";
end
// Call this function from FileMaker using ACF_Run("UpdateTemplatesList") in a Set Variable script step.
function UpdateTemplatesList()
string fileList = list_files ( Preferences::TemplateDir ) ;
string res = UpdateValueList("Templates", fileList);
return res;
end
With this approach, you can easily update the ValueList table whenever necessary, modifying only the entries that require changes.
Back to top
An XML Export Example
Occasionally, you may need to export data from a table in XML format. This example demonstrates how to achieve this using ACF.
NOTE: The example code here was written before the ACF-plugin got its own XML implementation. The example is now far more easy. Look at the bottom of the article for the new version.
Example Code:
Package XMLDump "Dump SQL result to an XML file";
function XMLtag (string tag, string value, int tabs)
string result;
value = substitute ( value, "&", "&amp;");
string t = "\t"*tabs;
if (value == "") then
result = t+"<"+tag+"/>\n";
else
result = t+"<" + tag + ">" + value + "</" + tag + ">\n";
end if
return result;
end
function XMLtag2 (string tag, string value, int tabs)
string result;
string t = "\t"*tabs;
if (value == "") then
result = t+"<"+tag+"/>\n";
else
result = t+"<" + tag + ">\n" + value + "\n"+t+"</" + tag + ">\n";
end if
return result;
end
function XMLdumpDataset (string filename, string MasterKey, string DetailRecordKey, string DetailKeys, string SQLresult, string FieldSeparator, string RecordSeparator)
array string Records = explode ( RecordSeparator, SQLresult);
array string Keys = explode ( FieldSeparator, DetailKeys);
array string Fields;
int i,j, numRecords = sizeof ( Records ), numFields = sizeof (Keys);
string result = "";
string fres ;
// Produce the XML content.
for (i = 1, numRecords)
Fields = explode ( FieldSeparator, Records[i]);
if (sizeof ( Fields ) != numFields ) then
throw format ("Different number of fields and keys: Fields:%d, Keys:%d ", sizeof ( Fields ), numFields) ;
end if
fres = "";
for (j = 1, numFields)
fres += XMLtag(Keys[j], Fields[j], 2);
end for
result += XMLtag2 ( DetailRecordKey, fres, 1);
end for
// Add master key
if (MasterKey != "") then
result = XMLtag2(MasterKey, result, 0);
end if
// Write to file, or return result if no filename.
if (filename != "") then
int x = open (filename, "w");
write (x, "<?xml version='1.0' encoding='UTF-8' standalone='no'?>\n");
write (x, result );
close (x);
result = "OK";
end if
long tu = uSec();
print "Time used : " + tu + format (" (%-.6f sec)", tu/1.0E6);
return result;
end
FileMaker Script to Execute the Dump:
// Calculation used in the "export button" in the layout:
// Prototype:
// ACF_run("XMLdumpDataset"; text_filename; text_MasterKey; text_DetailRecordKey;
// text_DetailKeys; text_SQLresult; text_FieldSeparator; text_RecordSeparator)
// ==> Return type = text
Set field [Preferences::gResult;
ACF_run("XMLdumpDataset"; Contacts::gFileName; "Contacts"; "Contact";
"ID||FirstName||LastName||Address1||Address2||Zip||City||Country||Email||Phone||Mobile";
ExecuteSQL ( "SELECT ID,FirstName,LastName,Address1,Address2,Zip,City,Country,Email,Phone,Mobile FROM Contacts" ; "||" ; "|*|" ); "||"; "|*|")]
After running this on approximately 2000 contacts, inspecting the console shows:
Time used : 400447 (0.400447 sec)
This time includes writing 450KB of data to the output file. It's important to note that the SQL query time is not included, as it occurs before entering the function. With 400 milliseconds for 2000 contacts, it averages to 0.2 milliseconds per contact—a respectable performance.
The resulting file structure resembles the following:
<?xml version='1.0' encoding='UTF-8' standalone='no'?>
<Contacts>
<Contact>
<ID>1000</ID>
<FirstName>Ole Kristian Ek</FirstName>
<LastName>Hornnes</LastName>
<Address1>Gluppeveien 12B</Address1>
<Address2>Innerst i Hørnet</Address2>
<Zip>1614</Zip>
<City>FREDRIKSTAD</City>
<Country>NO</Country>
<Email>ole@webapptech.no</Email>
<Phone>46908981</Phone>
<Mobile>46908981</Mobile>
</Contact>
<Contact>
<ID>1001</ID>
<FirstName>Roffe</FirstName>
<LastName>Hansen</LastName>
<Address1>Linjegata 12</Address1>
<Address2>Oppgang B</Address2>
<Zip>1600</Zip>
<City>FREDRIKSTAD</City>
<Country>NO</Country>
<Email>roffe@b.com</Email>
<Phone>222222</Phone>
<Mobile>98765432</Mobile>
</Contact>
...
... (439KB of data)
...
</Contacts>
This XML file can be used for various purposes, such as data interchange or further processing.
Screenshots from the Test Application:

Same example with plugin version 1.7.0.8
We have moved the ExecuteSQL into the plugin to take advantage of the new SQL functions in the plugin as well. We use the XML datatype to craft the XML. We have one function to create the contact containing all the elements of the contact. This function was made with the dev tool using one record in the XML as a sample.
Function CreateContact(string id, string firstName, string lastname, string add1, string add2,
string zip, string city, string country, string email, string phone, string mobile)
XML xmlvar;
xmlVar["Contact"] =
XML("ID", id, "FirstName", firstName,"LastName", lastname
,"Address1",add1,"Address2",add2,"Zip",zip
,"City",city,"Country",country,"Email",email
,"Phone",phone,"Mobile",mobile);
return XmlVar;
End
// Since we have moved the SQL inside the function,
// We only need a filename to save the file as parameter.
function XMLdumpDataset (string filename)
string sql = "SELECT ID, FirstName, LastName, Address1, Address2, Zip, City,
Country, Email, Phone, Mobile
FROM Contacts
INTO :ID, :FirstName, :LastName, :Address1, :Address2, :Zip,
:City, :Country, :Email, :Phone, :Mobile";
ARRAY string ID;
ARRAY string FirstName;
ARRAY string LastName;
ARRAY string Address1;
ARRAY string Address2;
ARRAY string Zip;
ARRAY string City;
ARRAY string Country;
ARRAY string Email;
ARRAY string Phone;
ARRAY string Mobile;
string res = executeSQL ( sql ) ;
int i,j, numRecords = sizeof ( FirstName );
// Produce the XML content.
XML contacts;
for (i = 1, numRecords)
contacts["Contacts+"] = CreateContact(ID[i], FirstName[i], LastName[i],
Address1[i], Address2[i], Zip[i], City[i], Country[i],
Email[i], Phone[i], Mobile[i]);
end for
if (filename != "") then
int x = open (filename, "w");
write (x, string (contacts );
close (x);
result = "OK";
end if
long tu = uSec();
print "Time used : " + tu + format (" (%-.6f sec)", tu/1.0E6);
return string(contacts);
end
This example demonstrates how to efficiently export data to an XML file using ACF, making it a valuable tool for handling structured data in your FileMaker solutions.
Back to top
Rolling Up MySQL Connector in the ACF Plugin
Working directly with MySQL databases from the FileMaker application can be highly beneficial. Instead of relying on APIs to communicate with web-based systems, you can interact directly with the web-system's database. This enables you to extract or update data instantly from the FileMaker system without the need for any middleware systems.
While it's possible to use FileMaker's external data sources dialogue to add ODBC connections to tables and then script updates, this might not be the most efficient approach for all scenarios. ODBC also requires the installation of ODBC drivers on client computers for all users. In contrast, working directly with the ACF functions can be more efficient and doesn't necessitate ODBC drivers. This feature will be available when version 1.6.3.0 of the ACF plugin is released.
Let's take a look at an example of a function used to delete spam from a support system. In this case, we're dealing with the osTicket support system, which occasionally receives spam emails. With a relatively simple ACF function, 114 spam entries across four tables in the osTicket system were deleted in less than half a second.
Here's the ACF function used for this purpose:
function connect_support_db ()
int db = mysql_connect ("<host>", "3306", "<user>", "<password>", "<database name>");
return db;
end
function delete_support_spam ()
int db;
db = connect_support_db ();
string sql = 'SELECT tem.id, ti.ticket_id, te.id, th.id, te.title, tem.headers FROM ost_thread_entry_email as tem
left outer join ost_thread_entry as te on te.id = tem.thread_entry_id
left outer join ost_thread as th on th.id = te.thread_id
left outer join ost_ticket as ti on ti.ticket_id = th.object_id
where tem.headers like "%X-Halon-SPAM: YES%" or te.title ="Undelivered Mail Returned to Sender";';
string saker = ExecuteMySQL ( db, sql, "|*|", "||") ;
array string rader, kolonner;
int norader, i;
array string tem, ti, th, te;
if ( saker != "") then
rader = explode ( "|*|", saker);
norader = sizeof ( rader );
for ( i=1, norader)
kolonner = explode ( "||", rader[i]);
tem[] = kolonner[1];
ti[] = kolonner[2];
te[] = kolonner[3];
th[] = kolonner[4];
end for
else
mysql_close ( db );
return "No SPAM found";
end if
string res;
res = ExecuteMySQL(db, "DELETE FROM ost_thread_entry_email WHERE id IN (" + implode (",", tem ) + ")");
res += ExecuteMySQL(db, "DELETE FROM ost_thread_entry WHERE id IN (" + implode (",", te ) + ")");
res += ExecuteMySQL(db, "DELETE FROM ost_thread WHERE id IN (" + implode (",", th ) + ")");
res += ExecuteMySQL(db, "DELETE FROM ost_ticket WHERE ticket_id IN (" + implode (",", ti ) + ")");
mysql_close ( db );
return "OK " + norader + " SPAMs deleted.";
end
The process started with SQL development in MySQL Workbench, examining the tables in the osTicket support database, identifying where the tickets are stored, and exploring related tables. After analyzing the patterns in the spam tickets, the SQL query was crafted to fetch the IDs of related records. The SQL was tested to ensure it didn't produce false positives, and then it was integrated into the ACF function.
The result? Over 100 spam tickets removed in less than half a second. To improve the cleanliness of the support system further, an additional condition was added to identify spam tickets generated by the "mail delivery subsystem."
Working with Result Sets
The ExecuteMySQL function in ACF is similar to FileMaker's ExecuteSQL. It returns the result as a delimited text with row and column delimiters. To work with this data, you need to parse it into separate rows and fields. However, in ACF, you have arrays, making parsing more straightforward.
Furthermore, ACF introduces the concept of result sets, allowing you to work with structured data directly. This means you can perform a SQL query and return a handle to a result set. With this handle, you can iterate through rows and columns efficiently.
For MySQL, you can use associative arrays, enabling you to access data using column names as string indexes. In contrast, FileMaker SQL doesn't provide column names in its results, so you must always supply a field list in your SQL queries.
Here's an example of how you can print support emails using result sets:
function print_support_emails ()
int db;
db = connect_support_db ();
int x = mysql_query ( db, "SELECT * FROM c1support.ost_email;");
int i, y = mysql_getrowcount ( x );
print
"row count: " + y + ", res-set id: " + x;
array string row;
for ( i=1, y)
row = mysql_getrow ( x );
print row['email'] + "\n";
end for
mysql_close ( db );
return "OK";
end
Ole K System Developer
Back to top
Function: Example - Calculate Invoice Lines using SQL
In FileMaker, scripting applies to the current layout in the relationship graph. For an Invoice, the layout position is for the Invoice table, and the InvoiceLines are in a related table shown in a portal on the invoice layout. Calculations on the invoice line can be done as calculated fields or as calculations done when lines change. In this solution (a real example), three sets of sum fields were used on the invoice line. One set was calculated fields, one set was indexed fields, and the last set was calculations that either picked values from the calculated field or the indexed field depending on the invoice approval state. The indexed fields had to be updated in the approval routine. As FileMaker's function for this had some issues, this ACF function was created to perform the calculations on the fields instead.
The ACF Functions:
package InvoiceCalculations "Functions to do invoice calculations";
// Allow us to check the version of the routines and reload if too old or not installed.
function InvCalc_Version ()
return 12.0;
end
// Decide what fields need to be updated and create SQL assignments for the update part.
// Output on inconsistency: <field>=<new value>
function checkConsistency (float dbval, float calcval, string FieldName)
if (dbVal == calcval) then
return "";
else
return format ("%s=%f", FieldName, calcval);
end if
end
// Do the calculation for all invoice lines and update those that need an update.
function ApproveInvoiceLinesCalc (string invoiceNumber)
// Get a resultset of all the invoice lines for the invoice.
int lq = SQL_query ("SELECT Auto_nr, Antall, Kostpris, Salgspris_u_MVA, MVA_kode, MVA_prosent, Rabatt_belop, Rabatt_prosent, in_Linjesum_avgiftspliktig, in_Linjesum_avgiftsfritt, in_Linjesum_u_MVA, in_Linjesum_kostpris, in_Linjesum_fritt_og_pliktig, in_Linjesum_rabatt, in_Linjesum_m_MVA, in_Linjesum_MVA, in_Linjesum_DG, in_Linjesum_DB FROM db_InvoiceDescriptions WHERE Faktura_nr=" + invoiceNumber);
// Declarations
float Linjesum_avgiftspliktig, Linjesum_avgiftsfritt, Linjesum_u_MVA, Linjesum_kostpris, Linjesum_fritt_og_pliktig, Linjesum_rabatt, Linjesum_m_MVA, Linjesum_MVA, Linjesum_DG, Linjesum_DB;
float line_net, linemva, mvapro, rabpro, rabbel, line_kostpris, line_db, line_dg;
int num_rows = SQL_getRowCount (lq);
print format ("Number of Invoice Lines: %d\n", num_rows);
int i, ll;
string res, upds;
array string row, upd, empty;
// Loop through the invoice lines
for (i = 1, num_rows, 1)
// The SQL_getRow returns an array, allowing us to access each column in the recordset individually.
// The first parameter is the handle, and the second is the row number, starting with "0".
row = SQL_getRow (lq, i-1);
// print ("Columns: " + string (sizeof (row)) + " : " + row[1]);
// As all columns are text from the SQL, we need to use the float function to convert to float (actually double)
Linjesum_avgiftspliktig = float (row[9]);
Linjesum_avgiftsfritt = float (row[10]);
Linjesum_u_MVA = float (row[11]);
Linjesum_kostpris = float (row[12]);
Linjesum_fritt_og_pliktig = float (row[13]);
Linjesum_rabatt = float (row[14]);
Linjesum_m_MVA = float (row[15]);
Linjesum_MVA = float (row[16]);
Linjesum_DG = float (row[17]);
Linjesum_DB = float (row[18]);
mvapro = float (row[6]);
line_net = float (row[2]) * float (row[4]);
if (row[8] == "") then
rabbel = float (row[7]);
else
rabbel = line_net * float(row[8]) / 100.0;
end if
line_net = line_net - rabbel;
upd = empty; // Empty array
line_kostpris = float (row[3]) * float (row[2]);
line_db = line_net - line_kostpris;
// Calculate linjesum-DG
if (line_net == 0 && line_db == 0) then
line_dg = 0;
elseif (line_db < 0 && line_net == 0) then
line_dg = -100;
elseif (line_db < 0) then
line_dg = abs(line_db) * 100 / line_net * -1;
elseif (line_net == 0) then
line_dg = 100;
else
line_dg = line_db * 100 / line_net;
end if
// Check consistency between db-values and our calculations.
// The checkConsistency functions is defined near the top.
if (mvapro == 0) then
upd[] = checkConsistency (Linjesum_avgiftspliktig, 0, "in_Linjesum_avgiftspliktig");
upd[] = checkConsistency (Linjesum_avgiftsfritt, line_net, "in_Linjesum_avgiftsfritt");
upd[] = checkConsistency (Linjesum_u_MVA, line_net, "in_Linjesum_u_MVA");
upd[] = checkConsistency (Linjesum_fritt_og_pliktig, line_net, "in_Linjesum_fritt_og_pliktig");
upd[] = checkConsistency (Linjesum_MVA, 0.0, "in_Linjesum_MVA");
upd[] = checkConsistency (Linjesum_m_MVA, line_net, "in_Linjesum_m_MVA");
else
linemva = line_net * mvapro / 100;
upd[] = checkConsistency (Linjesum_avgiftspliktig, line_net, "in_Linjesum_avgiftspliktig");
upd[] = checkConsistency (Linjesum_avgiftsfritt, 0, "in_Linjesum_avgiftsfritt");
upd[] = checkConsistency (Linjesum_u_MVA, line_net, "in_Linjesum_u_MVA");
upd[] = checkConsistency (Linjesum_fritt_og_pliktig, line_net, "in_Linjesum_fritt_og_pliktig");
upd[] = checkConsistency (Linjesum_MVA, linemva, "in_Linjesum_MVA");
upd[] = checkConsistency (Linjesum_m_MVA, line_net + linemva, "in_Linjesum_m_MVA");
end if
upd[] = checkConsistency (Linjesum_kostpris, line_kostpris, "in_Linjesum_kostpris");
upd[] = checkConsistency (Linjesum_DB, line_db, "in_Linjesum_DB");
upd[] = checkConsistency (Linjesum_DG, line_dg, "in_Linjesum_DG");
// Now we have the "upd" array, containing assignments for update, or empty if the field does not need an update.
// Implode creates a comma-separated string with potential to have excessive commas in it because of the empty array rows.
// Get rid of the excessive commas.
upds = implode (",", upd);
upds = substitute (upds, ",,", ","); // We need to do this Several times, since
upds = substitute (upds, ",,", ","); // ,,,, => ,,
upds = substitute (upds, ",,", ","); // ,, => , and so on.
upds = substitute (upds, ",,", ",");
upds = substitute (upds, ",,", ",");
// There might be a comma at the end; we need to get rid of this.
// If the last empty rows end up with a single comma.
ll = length(upds);
if (ll != 0) then
if (right (upds, 1) == ",") then
upds = left (upds, ll-1);
end if
end if
// Anything to do? Run the Update SQL. "upds" now contains a comma-separated list of assignments.
if (upds != "") then
// Craft the SQL
upds = format ("UPDATE db_InvoiceDescriptions SET %s WHERE Auto_nr=%s", upds, row[1]);
// Run it.
res = ExecuteSQL (upds); // Execute the UPDATE;
print (upds + "\n" + res + "\n"); // For debugging, see the console.
if (res != "") then // Non-blank result indicates an SQL error.
SQL_close (lq);
return res;
end if
end if
end for
SQL_close (lq);
return "OK";
end
In the approval script, we now just call this, instead of the old function that was buggy.
// In the FileMaker Script to approve the invoice.
Set Variable [ $res; ACF_Run("ApproveInvoiceLinesCalc"; InvoiceHeader::InvoiceNo)]
if ( $res = "OK")
// Everything went OK
else
// Handle the error.
end if
This implementation handled the unstability issue 100%.
References:
- SQL functions
Back to top
Example - Importing Timesheets from Kimai to FileMaker
Kimai is an open-source timesheet application written in PHP. It's easy to install on a web-hosting server, configure with users, customers, projects, activities, and more. However, as FileMaker enthusiasts, we often need this data within FileMaker itself. While a web-based system is excellent for tracking registrations, as managers, we require this data in FileMaker for more comprehensive analysis and integration. The solution presented here involves using an ACF function to seamlessly import all registrations into a timesheet table in FileMaker. Once the data is within FileMaker, you can use it for various purposes, including invoicing. You can also extend this example by creating new projects and customers directly from FileMaker.
Setting Up Kimai:
To implement this solution, I set up an EC2 instance on Amazon, installed the ispConfig control panel, and then deployed Kimai on a web site. Kimai offers an export function that allows you to export data to Excel, which I imported into FileMaker manually. While this approach worked, it involved repetitive manual operations. Therefore, I used the ACF plugin to create a function that interacts directly with the MySQL database of Kimai.
Alternate solution without ACF
While it is possible to pull this off without ACF, I think this solution presented here gives you a very fine-tuned and direct solution to the task. Doing it without ACF would require you to buy a ODBC driver software for your Mac, and then configure it to work with Kimai. Then in FileMaker you could connect the tables kimai2_timesheet, kimai2_projects, kimai2_customers, kimai2_activities and kimai2_users as external data-sources. Then use the "import" script-step in filemaker to import the data.
Timestamp Challenges:
During this process, I encountered timestamp discrepancies between the MySQL database and FileMaker. The MySQL timestamps were in Zulu time, while the imported timestamps were in the local time zone, two hours ahead. To resolve this, I added a timestamp conversion step to the function, aligning the times accurately.
Database table in FileMaker:
Here is the Table setup for the "TimeSheet" table in FileMaker.
| FieldName | Datatype | Description |
|---|---|---|
| FromTS | TimeStamp | Starting time for the timesheet record |
| ToTS | TimeStamp | Ending time for the timesheet record |
| Kimai_ID | Number | The ID from the timesheet table in Kimai, if needed to link in other operations |
| UserName | TEXT | The username in Kimai |
| RegDate | TimeSTamp | The registration date and time |
| Customer | TEXT | The Customer owning the prosject that has been working on |
| Project | TEXT | The Project name |
| Activity | TEXT | The Activity name (product for invoicing) |
| Duration | TIME | The duration for the activity, as time (HH:MM:SS) |
| Description | TEXT | The Work Description the user has endtred in Kimai |
| DurationDec | Calculation, Number | = Hour ( Duration ) + ( Minute ( Duration )/60 ) + (Seconds ( Duration) / 3600 ) |
You can then create the neccessary relations in FileMaker and add some calculated fields to whatever neccessary. If you allready has this table, but different names you can adjust the SQL insert in the ACF function to fit whatever needed in your solution.
As in my example, I say that activity named FREE should not be invoiced, and "MEETINGS" should go with 60% timeconsume for invoicing. I have then added those two calculations.
| FieldName | Datatype | Description |
|---|---|---|
| TimeFactor | Calculation, Number | = Case ( Activity="FREE" ; 0 ; Activity="MEETINGS" ; 0,6 ; 1) |
| TimeToInvoice | Calculation, Number | = DurationDec*TimeFactor |
ACF Functions:
See the source code of the ACF functions below:
Package Kimai "ACF functions for Kimai integration"
// Some utility functions
// -----------------------------------------------------
// MySQL connection function. Makes it easy to connect from other functions as well, if example is extended with other functions.
function connect_kimai_db ()
// set in your own values below to do a successfull connect.
int db = mysql_connect ("kimai host", "3306", "mysql user", "mysql password", "kimai databasename");
return db;
end
// Do string to timestamp conversion. Using "dformat" as filemakers current date format.
function SQL_to_timestamp ( string s, string dformat )
timestamp ts;
date d = date ( left(s,10), "%Y-%m-%d");
s = string ( d, dformat) + substring ( s, 10);
ts = s;
return ts ;
end
// The main function to be called from a FileMaker script
// ------------------------------------------------------
function sync_timesheet ()
string dformat;
// Auto-detect date format used by FileMaker, for use in timestamp asignments.
dformat = @date(11;12;2023)@;
dformat = substitute ( dformat, "11", "%m");
dformat = substitute ( dformat, "12", "%d");
dformat = substitute ( dformat, "2023", "%Y");
// Connect to the mySQL database
int db = connect_kimai_db();
// Set up the mysql query to fetch the new rows we haven't imported before.
string sql = "SELECT ts.id, ts.user, ts.activity_id, ts.project_id as projectID, cust.id as customerID,
start_time, end_time, duration, description, pro.name as proName, cust.name as custName, act.name as actName,
exported, u.username
FROM kimai2_timesheet as ts
left join kimai2_projects as pro on pro.id = ts.project_id
left join kimai2_customers as cust ON cust.id = pro.customer_id
left join kimai2_activities as act ON act.id = ts.activity_id
left join kimai2_users as u ON u.id = ts.user
WHERE exported=0;";
int rs = MySQL_Query ( db, sql );
int rrc = mySQL_GetRowCount (rs);
string dur, res;
array string remrow;
int i, import_count=0, h, m, s;
array string doneIDs;
timestamp rts1, rts2;
// Process each row in a loop
for ( i = 1, rrc )
remrow = mySQL_GetRow (rs);
// print format ("\nColumns for row %d: %d", i, sizeof ( remrow ));
// Duration in Kimai is in seconds, convert it to a TIME format.
s = long ( remrow[8] );
h = s / 3600 ; s = s - h*3600;
m = s / 60; s = s - m*60;
dur = format("%02d:%02d:%02d", h, m, s);
// Adjust the timestamps to local time-zone
rts1 = SQL_to_timestamp(remrow[6], dformat)+7200;
rts2 = SQL_to_timestamp(remrow[7], dformat)+7200;
remrow[6] = string ( rts1, "%Y-%m-%d %H:%M:%S");
remrow[7] = string ( rts2, "%Y-%m-%d %H:%M:%S");
// Create the SQL for insert into TimeSheet table
sql = format ( "INSERT INTO TimeSheet (Kimai_ID, UserName, RegDate, FromTS, ToTS, Customer, Project, Activity,Duration, Description)
VALUES (%d, '%s',TIMESTAMP '%s', TIMESTAMP '%s', TIMESTAMP '%s', '%s', '%s', '%s', TIME '%s','",
int(remrow[1]),remrow[14],remrow[6],remrow[6], remrow[7], remrow[11],
remrow[10], remrow[12], dur )
+ substitute(remrow[9],"'", "\'")+"')";
// Run the SQL
print "\n"+sql;
res = executeSQL ( sql ) ;
if ( res == "" ) then
import_count += 1; // Successfull insert
doneIDs[]=remrow[1];
else
print "\n"+res; // Some error
end if
end for
// Update the Timesheet with the "exported" field set to 1, so we dont import it next time.
if ( sizeof (doneIDs)>0) then
sql = format ( "UPDATE kimai2_timesheet SET exported=1 WHERE id IN (%s)", implode ( ",",doneIDs));
print "\n"+sql+"\n";
res = executeMySQL (db, sql);
print res;
end if
// Close the database
mysql_close ( db);
// Return status to the calling script.
if (rrc != import_count) then
return format ("Some records did not import well, %d imported, %d has errors, See the console output for details",
import_count, rrc-import_count);
else
$ImportStatus = format ("Success: %d timesheets imported", import_count);
return "OK";
end if
end
A button to run this:
A script haveing this script step will run your import, suppose we have a field in our table, as a global field to hold the console output, so we can see how the import perform. The $res variable should be exmined for the "OK" return from the function. If it throws some error, they could be present in a custome dialogue, to example.
Set variable [$res; ACF_Run ("sync_timesheet")]
Set field [AnyTable::Console; ACF_GetConsolleOutput]
If [$res ≠ "OK"]
Show Custom Dialog ["Import errors"; $res]
else
Show Custom Dialog ["Import Success"; $ImportStatus]
End If
Run this script after adding one new timesheet in Kimai, shows this console output (From the print statements in the code). Also a success message with one new timesheet.
INSERT INTO TimeSheet (Kimai_ID, UserName, RegDate, FromTS, ToTS, Customer, Project, Activity,Duration, Description)
VALUES (35, 'olekeh',TIMESTAMP '2023-10-12 12:45:00', TIMESTAMP '2023-10-12 12:45:00', TIMESTAMP '2023-10-12 13:00:00', 'TestCompany LTD', 'Project-X', 'MEETINGS', TIME '00:15:00','Phone meeting with Gjerterude, looking at the statistics')
end-for
UPDATE kimai2_timesheet SET exported=1 WHERE id IN (35)
Data Processing:
Once the ACF function syncs the data from Kimai into FileMaker, you can effectively manage, analyze, and utilize the timesheets for various tasks. With the data in FileMaker, you can perform invoicing, reporting, and other essential operations.
References:
With this solution, you can effortlessly import and synchronize timesheets from Kimai into FileMaker, streamlining your workflows and enhancing your data management capabilities.
Uppdate for the new ACF-Plugin version 1.7.0
The SQL routines for both mySQL and FileMaker SQL have been rewritten, and we have in place a new exciting placeholder concept for the SQL sentences making it easier to craft SQL's, and also the INTO definition to allow SQL queries to hand the result directly into arrays, making the source code far more readable and with higher quality. See the example of the function I modified to use those concepts. It is backward compatible, but we need testing and this was a good candidate for test:
function sync_timesheet ()
int db = connect_kimai_db();
// Declare the data-arrays for the mysql query
array int aKimaiID;
array timestamp aStartTime;
array timestamp aEndTime;
array int aDuration;
array string aDescription;
array string aProject;
array string aCustomer;
array string aActivity;
array string aUserName;
// declare the variables for insert.
int KimaiID;
string User, Customer, Project, Activity, Description;
date tsDate;
timestamp from, to;
// The SQL
string sql = "SELECT ts.id, start_time, end_time, duration, description, pro.name as proName, cust.name as custName,
act.name as actName, u.username
FROM kimai2_timesheet as ts
left join kimai2_projects as pro on pro.id = ts.project_id
left join kimai2_customers as cust ON cust.id = pro.customer_id
left join kimai2_activities as act ON act.id = ts.activity_id
left join kimai2_users as u ON u.id = ts.user
WHERE exported=0
INTO :aKimaiID, :aStartTime, :aEndTime, :aDuration, :aDescription, :aProject, :aCustomer, :aActivity, :aUserName";
string rs = executeMySQL ( db, sql );
if ( rs != "OK") then
throw rs;
end if
int rrc = sizeof ( aKimaiID );
string res;
time dur;
int i, import_count=0, h, m, s;
array string doneIDs;
bool found;
timestamp rts1, rts2;
for ( i = 1, rrc )
s = aDuration[i];
h = s / 3600 ; s = s - h*3600;
m = s / 60; s = s - m*60;
dur = format("%02d:%02d:%02d", h, m, s);
// Prepare the values
KimaiID = aKimaiID[i];
User = aUserName[i];
tsDate = date (aStartTime[i]);
from = aStartTime[i];
to = aEndTime[i];
Customer= aCustomer[i];
Project = aProject[i];
Activity= aActivity[i];
Description = aDescription[i];
// Insert into FileMaker table.
sql = "INSERT INTO TimeSheet (Kimai_ID, UserName, RegDate, FromTS,
ToTS, Customer, Project, Activity,Duration, Description)
VALUES ( :KimaiID, :User, :tsDate, :from, :to, :Customer, :Project,
:Activity, :dur, :Description)";
res = executeSQL ( sql ) ;
if ( res == "" ) then
import_count += 1; // Successfull insert
doneIDs[]=string ( KimaiID);
else
print "\n"+res; // Some error
return res; // throw res;
end if
end for
// The insert is complete. Now, update the Kimai timesheet table
// with "exported" to true, so we don't pull those records next time.
if ( sizeof (doneIDs)>0) then
sql = format ( "UPDATE kimai2_timesheet SET exported=1 WHERE id IN (%s)", implode ( ",",doneIDs));
res = executeMySQL (db, sql);
end if
mysql_close ( db);
if (rrc != import_count) then
return format ("Some records did not import well, %d imported, %d has errors, See the console output for details", import_count, rrc-import_count);
else
$ImportStatus = format ( "Success: %d timesheets imported", import_count);
return "OK";
end if
end
Back to top
Sending Form Data from FileMaker to a Web Service
Web services come in many different formats, be it JSON, XML, or simple HTML form data. The latter, though comprehensive to post from FileMaker, is rather easy to post from an HTML page with fields for manual data entry.
Example:
Let's assume we have an HTML form like this:
<!DOCTYPE html>
<html>
<head>
<title>Sample Form with File Upload</title>
</head>
<body>
<form action="target_url_here" method="POST" enctype="multipart/form-data">
<label for="name">Name:</label>
<input type="text" id="name" name="name" required><br><br>
<label for="address">Address:</label>
<input type="text" id="address" name="address" required><br><br>
<label for="city">City:</label>
<input type="text" id="city" name="city" required><br><br>
<label for="zip">Zip:</label>
<input type="text" id="zip" name="zip" required><br><br>
<label for="email">Email:</label>
<input type="email" id="email" name="email" required><br><br>
<label for="file">Upload a File:</label>
<input type="file" id="file" name="file"><br><br>
<input type="submit" value="Submit">
</form>
</body>
</html>
The POST request sent to the web server looks like this:
Content-Type: multipart/form-data; boundary=----WebKitFormBoundary7MA4YWxkTrZu0gW
----WebKitFormBoundary7MA4YWxkTrZu0gW
Content-Disposition: form-data; name="name"
John Doe
----WebKitFormBoundary7MA4YWxkTrZu0gW
Content-Disposition: form-data; name="address"
123 Main Street
----WebKitFormBoundary7MA4YWxkTrZu0gW
Content-Disposition: form-data; name="city"
Sample City
----WebKitFormBoundary7MA4YWxkTrZu0gW
Content-Disposition: form-data; name="zip"
12345
----WebKitFormBoundary7MA4YWxkTrZu0gW
Content-Disposition: form-data; name="email"
johndoe@example.com
----WebKitFormBoundary7MA4YWxkTrZu0gW
Content-Disposition: form-data; name="file"; filename="example.txt"
Content-Type: text/plain
[Contents of the uploaded file go here]
----WebKitFormBoundary7MA4YWxkTrZu0gW--
If the file(s) are binary, they usually need to be in base64-encoded format.
Sending data from FileMaker to a web service in this format can be challenging, especially when you have to attach Base64-encoded files to the post.
In this practical example, we need to send an invoice to a service to produce EDI documents in an Electronic Trade Format (EHF) for a customer, and we are using a web service to create the XML. The service accepts up to five attached PDF files with the invoice, including the invoice itself. To easily send this data, we have created a custom function to format the POST data as shown above and send it. We initially developed this solution some time ago, and now, I have recreated it with the ACF plugin to improve error handling and readability.
When it comes to error handling, ACF provides automatic exception handling. In the event of an exception occurring within the code, such as a FileMaker calculation returning a question mark (?), our previous custom function failed to detect and handle this appropriately. Consequently, it continued execution, leading to inaccurate results that were not easily discernible to the user.
In the new functions, I deliberately introduced an error to test the error handling mechanism. To my satisfaction, the system promptly responded with the following message:

Now, we can handle the situation and get correct result produced.
The error shown, was the return from the call to the function, so we check for the text ERROR in it....
# Create and send the Invoice
Set Variable [$EHF; Value: ACFU_EHFService ($$ApiKey;......)]
# Did it go well?
If [Position ( Left ( $EHF ; 100 ) ; "ERROR" ; 1 ; 1 ) > 0]
Show Custom Dialog ("Error during EHF generation"; $EHF)
Exit Script [Text Result: $EHF]
End If
...
...
Additionally, I have created a YouTube video explaining the functionality, including the Base64 encoding of binary files.
The ACF code is provided below, allowing you to copy and paste it into your own ACF libraries and customize it according to the web service requirements.
The example includes the use of two other plugins too. The TROI_Url, and Baseelements.
package EHFsupportFunctions "Support functions for the EHF package 2";
function GetNameFromPath ( string path )
FunctionID 3001;
if ( isWindows ) then
path = substitute ( path, "\\", "/");
end if
return regex_replace ("^(.*\/)?(.+\.[a-zA-Z0-9]{1,10})$", path, "$2");
end
/*
ACF functions and FileMaker calculation engine uses different variables. ACF variables is local to the plugin.
When doing an assignment like '$$LastPost = postdata', the plugin in fact do a FileMaker calculation
like:
Let([$$LastPost = "<text content in postdata>"];"")
That calculation assign the value to the FileMaker variable.
However, if the length of the text is more than 32K, this will fail due to limitations in string literals.
We use a Getter function to pull this off instead as we asume the length of postdata will be considerably longer.
Global declaration - Technique to handle large text assignment from function.
*/
string LastEHFPost;
// Getter function...
function GetLastEHFPost ()
FunctionID 3501; // makes ACFU_GetLastEHFPost when called from FileMaker directly without ACF_Run.
return LastEHFPost;
end
function EHFAttachement (string path, string Name, string Boundary )
if ( path == "" ) then
return "";
end if
string fn = GetNameFromPath(path);
string v = Boundary;
v = v + format ('Content-Disposition: form-data; name="%s"; filename="%s"\r\n', Name, fn);
v = v + "Content-Type: text/plain\r\n\r\n";
// Use system commands to convert attachement to Base64.
string base64path;
base64path = path+".base64";
// Different commands for Mac and Windows
if ( isMac ) then
// Adjust absolute paths to match standard unix paths.
if ( left ( path, 8) != "/Volumes" && left ( path, 6) != "/Users" && left (path,1) == "/") then
path = "/Volumes"+path; // Paths lack /Volumes as start... - like "/Macintosh HD...."
base64path = "/Volumes"+base64path;
end if
$$syscmd = format ('openssl base64 -in "%s" -out "%s"', path, base64path);
else
$$syscmd = format('cmd.exe /c certutil -f -encode "%s" "%s"', path, base64path);
end if
// Verify that the file exists.
if ( ! file_exists ( path ) ) then
throw format ("ERROR: The Attached file '%s' at the path '%s' does not exists", fn, path );
end if
// Use Baseellements plugin to perform the system command
$$SysRes = @BE_ExecuteSystemCommand ( $$syscmd ; 10000 )@;
// Retrieve the base64 text
int x = open (base64path, "r" );
string base64 = read (x);
close (x);
if ( isWindows ) then
// CertUtil makes a Certificate header and trailer that need to be removed.
base64 = between (base64, "-----BEGIN CERTIFICATE-----\r\n", "-----END CERTIFICATE-----");
end if
// cleanup
string res = delete_file ( base64path);
// return the part...
return v + base64;
end
function FormField (string vb, string name, string content)
return format ('%sContent-Disposition: form-data; name="%s"\r\n\r\n', vb, name) + content + "\r\n";
end
function EHFService ( string APIkey, string Bank, string FirmaNavn, string Adresse1, string Adresse2,
string Postnr, string Sted, string OrgNr, string InvoiceBlock,
string AttPath1, string AttDesc1,
string AttPath2, string AttDesc2,
string AttPath3, string AttDesc3,
string AttPath4, string AttDesc4,
string AttPath5, string AttDesc5 )
FunctionID 3502; // makes ACFU_EHFService when called from FileMaker directly without ACF_Run.
// Remove non-numeric characters from the Org-number
OrgNr = regex_replace ( "[^0-9]",OrgNr, "");
// format the post data to look like its sent from a HTML form.
string vb1 = "----WebKitFormBoundaryvaBIACFqQXnhryXmJxO";
string vb2 = "--" + vb1 + "\r\n";
string vb3 = "--" + vb1 + "--\r\n";
string vUrl = "https://gw.ccx.no/ws/EHF20/";
string h1 = "APIkey||Bank||FirmaNavn||Adresse1||Adresse2||Postnr||Sted||OrgNr" + Char(10);
string h2 = APIkey + "||" + Bank + "||" + FirmaNavn + "||" + Adresse1 + "||" + Adresse2 + "||" +
Postnr + "||" + Sted + "||" + OrgNr ;
// Build the Post...
string postData = FormField ( vb2, "CompanyDetails", h1+h2) +
FormField ( vb2, "InvoiceDetails", InvoiceBlock) +
FormField ( vb2, "File1Desc", AttDesc1) +
FormField ( vb2, "File2Desc", AttDesc2) +
FormField ( vb2, "File3Desc", AttDesc3) +
FormField ( vb2, "File4Desc", AttDesc4) +
FormField ( vb2, "File5Desc", AttDesc5) +
EHFAttachement ( AttPath1, "File1", vb2) +
EHFAttachement ( AttPath2, "File2", vb2) +
EHFAttachement ( AttPath3, "File3", vb2) +
EHFAttachement ( AttPath4, "File4", vb2) +
EHFAttachement ( AttPath5, "File5", vb2) + vb3;
// $$LastPost = postData;
// Use a different technique to assign the postdata to filemaker variable, as mention above.
LastEHFPost = postData;
string cc = @@Let([
v = "";
$$LastPost = ACFU_GetLastEHFPost
];
v)@@;
// Use Troi_URL plugin to send the data to the web-service.
string res = eval (format ('TURL_SetCustomHeader("-unused " ; "Content-Type: multipart/form-data; boundary=%s")', vb1) );
string post = format('TURL_Post( "-TimeoutTicks=5000 -NotEncoded -Encoding=UTF8" ;"%s";$$LastPost)', vUrl);
string resData = eval ( post);
res = @TURL_SetCustomHeader("-unused "; "")@;
return resData;
end
Speed Comparison
With both the new and old functions available simultaneously, conducting a speed comparison was a straightforward process.
The plugin provides two functions for measuring execution time: ACF_StartDurationTimer and ACF_GetDuration_uSec. To perform the test, I modified the script calling the functions as follows:
# Measure the ACF Method
Set Variable [$t1; ACF_StartDurationTimer]
Set Variable [$EHF; Value: ACFU_EHFService ($$ApiKey;......)]
Set Variable [$t1; ACF_GetDuration_uSec]
# then $t1 contains the number of uSeconds between start and get.
# To compare use the old standard custom functions:
Set Variable [$t2; ACF_StartDurationTimer]
Set Variable [$EHF; Value: EHFService ($$ApiKey;......)]
Set Variable [$t2; ACF_GetDuration_uSec]
# Then $t2 contains the number of uSec for this method.
# Now we can present both.
Show Custom Dialog ["Time Consume:";"ACF Function: " & $t1 & ¶ & "Standard function: " & $t2]
It is anticipated that this process may take some time to execute, as it encompasses both the conversion of attachments to base64 format and the utilization of an external web service to generate the XML, in addition that we also are handling text in order of megabytes. The numbers are in microseconds.
I attempted the process multiple times, and the results consistently fell within the same time range. On each occasion, the ACF function executed twice as quickly. 0.25 seconds versus 0.5 seconds, approximately.

Considering that the response time for the web service and the base64 conversion remain consistent in both cases, when we account for these times during the comparison, it becomes evident that the ACF functions execute remarkably quickly. Although I haven't precisely measured these times, I estimate they would be at least 150-200 milliseconds. Let's assume 150 milliseconds, leaving us with 100 milliseconds for the ACF and 320 milliseconds for the standard custom function, making the ACF solution approximately three times faster. If it were 200 milliseconds, then the ACF time would be 50 milliseconds and the standard time 270 milliseconds, translating to roughly 5.4 times faster. This outcome is close to what we've seen in comparison to earlier studies.
Modifications after rewritten to ACF-Plugin version 1.7.0
With the new functions built into the plugin, we are not dependent on any other plugin anymore for this to work. It's both simpler implementation, and easier to follow.
Please note that in the ACF functions, the 'string' data type can accommodate both text and binary content. This is in contrast to the FileMaker 'TEXT' data type, which is not suitable for binary content due to the presence of special byte meanings within the 'TEXT' data type. In the 'string' data type used in the ACF plugin, all strings are bytes and they have a defined length. FileMaker employs 'Container Fields' for storing binary data, but there is no corresponding variable type for them. Therefore, within the ACF plugin, containers are not necessary, as we can work with strings.
Here is the source code for the 1.7.0 adjustments. (Of course, the old code also works...)
package EHFsupportFunctions "Support functions for the EHF package 3
This package requires plugin version 1.7.0 as it uses its built-in HTTP_POST and BASE64_ENCODE functions
instead of the base elements plugin and TROI_URL functions.
";
function GetNameFromPath ( string path )
FunctionID 3001;
if ( isWindows ) then
path = substitute ( path, "\\", "/");
end if
return regex_replace ("^(.*\/)?(.+\.[a-zA-Z0-9]{1,10})$", path, "$2");
end
function EHFAttachement (string path, string Name, string Boundary )
if ( path == "" ) then
return "";
end if
string fn = GetNameFromPath(path);
string v = Boundary;
v = v + format ('Content-Disposition: form-data; name="%s"; filename="%s"\r\n', Name, fn);
v = v + "Content-Type: text/plain\r\n\r\n";
// Different commands for Mac and Windows
if ( isMac ) then
if ( left ( path, 8) != "/Volumes" && left ( path, 6) != "/Users" && left (path,1) == "/") then
path = "/Volumes"+path; // Paths lack /Volumes as start... - like "/Macintosh HD...."
end if
end if
// Verify that the file exists.
if ( ! file_exists ( path ) ) then
throw format ("ERROR: The Attached file '%s' at the path '%s' does not exist", fn, path );
end if
// Retrieve the content
int x = open (path, "r" );
string binary_content = read (x);
close (x);
// Convert to BASE64
string base64 = BASE64_ENCODE (binary_content);
// return the part...
return v + base64+"\r\n";
end
function FormField (string vb, string name, string content)
return format ('%sContent-Disposition: form-data; name="%s"\r\n\r\n', vb, name) + content + "\r\n";
end
function EHFService ( string APIkey, string Bank, string FirmaNavn, string Adresse1, string Adresse2,
string Postnr, string Sted, string OrgNr, string InvoiceBlock,
string AttPath1, string AttDesc1,
string AttPath2, string AttDesc2,
string AttPath3, string AttDesc3,
string AttPath4, string AttDesc4,
string AttPath5, string AttDesc5 )
FunctionID 3502; // makes ACFU_EHFService when called from FileMaker directly without ACF_Run.
// Remove non-numeric characters from the Org-number
OrgNr = regex_replace ( "[^0-9]",OrgNr, "");
// format the post data to look like its sent from a HTML form.
string vb1 = "----WebKitFormBoundaryvaBIACFqQXnhryXmJxO";
string vb2 = "--" + vb1 + "\r\n";
string vb3 = "--" + vb1 + "--\r\n";
string vUrl = "https://mytestserver.com/ws/EHF20/";
string h1 = "APIkey||Bank||FirmaNavn||Adresse1||Adresse2||Postnr||Sted||OrgNr" + Char(10);
string h2 = APIkey + "||" + Bank + "||" + FirmaNavn + "||" + Adresse1 + "||" + Adresse2 + "||" +
Postnr + "||" + Sted + "||" + OrgNr ;
// Build the Post...
string postData = FormField ( vb2, "CompanyDetails", h1+h2) +
FormField ( vb2, "InvoiceDetails", InvoiceBlock) +
FormField ( vb2, "File1Desc", AttDesc1) +
FormField ( vb2, "File2Desc", AttDesc2) +
FormField ( vb2, "File3Desc", AttDesc3) +
FormField ( vb2, "File4Desc", AttDesc4) +
FormField ( vb2, "File5Desc", AttDesc5) +
EHFAttachement ( AttPath1, "File1", vb2) +
EHFAttachement ( AttPath2, "File2", vb2) +
EHFAttachement ( AttPath3, "File3", vb2) +
EHFAttachement ( AttPath4, "File4", vb2) +
EHFAttachement ( AttPath5, "File5", vb2) + vb3;
// Send the data to the web service using our new HTTP_POST function.
// Make the headers for the request:
string hdrs = format ( "Content-Type: multipart/form-data; boundary=%s",vb1 );
// Then send the data
string resData = HTTP_POST ( vUrl, postData, hdrs);
return resData;
end
Back to top
Markdown Functions
In this section, we provide an example of a package that facilitates the creation of HTML files from Markdown documents. Markdown is a popular format for technical documentation due to its focus on clean, readable text, easy integration of code examples, and support for images and hyperlinks. We have integrated Markdown conversion functions into the ACF language to simplify the process of generating HTML documents.
The result is a blistering fast end product, the html files loads extremely fast, are looking good, and the functions to do the converting is also very fast. We processed the 50 documents in this manual in less than 0.5 seconds in total. With the CSS files, you can style the documents in any way you want.
Background
For our documentation project, we've chosen to create HTML documents from Markdown source files. To achieve this, we use a FileMaker application that includes:
- A preferences table where path configurations and other fixed settings are stored.
- A document table to manage manual documents.
- A category table to organize document categories.
- A template for new documents to streamline the creation process.
Workflow
The Markdown to HTML conversion process involves three phases:
- Pre-processing: This step involves copying images from Markdown documents to the HTML/images folder and updating image URLs in the Markdown documents to point to their new locations.
- Markdown to HTML Conversion: The Markdown documents are converted to HTML using ACF functions.
- Post-processing: After conversion, we add a header and a left column navigation bar to the HTML documents.
Pre-processing
In the pre-processing phase, we perform the following tasks:
- Extract image tags from Markdown documents.
- Rewrite image URLs to point to their new locations.
- Copy image files to the desired HTML/images folder.
The Markdown image tag has this format:

We use a regular expression to extract image tags from the Markdown document. The regex pattern !\[[^\]]*\]\(((.+?\/)?([^\/)]+))\) captures image tags, including full paths, directory paths, and file paths.
This is explained this way: (Screen shot from regex101.com)

Here is the different Paths we need to take care of:
Original Image path when dragged into the MarkDown document from the Desktop:
../../../Desktop/imageab.png
Relative Image path for its new location as seen from the MarkDown document:
../html_root_folder/images/imageab.png
Resulting image path in the HTML document:
images/imageab.png
The absolute path of the document folder is:
/Users/ole/Projects/ACFmanual/mdDocs/
The absolute path of the HTML path is:
/Users/ole/Projects/ACFmanual/html_root_folder/
Now, we have some filesystem fun to pick apart all these paths and copy files. This is done in the MoveImages function seen below.
Markdown to HTML Conversion
After completing the pre-processing stage, we have all the referenced images available in the HTML/images folder. We utilize the built-in functions in the ACF language to perform the Markdown to HTML conversion. This function requires the source Markdown file, style/theme information defined for the markdown2html ACF function, and the destination HTML file to be created.
Once this function is executed, we obtain a bare HTML file that contains only the text and images from the Markdown document, without any navigation, headers, or additional elements. To transform this into a comprehensive manual, we require additional elements, which are handled by the post-processing function.
Post-processing
The post-processing function's role is to integrate the generated HTML into a complete page that includes a left sidebar, top bar, navigation, and bottom section.
- The left navigation menu needs to be generated. We retrieve all the documents from a table named ACF_Documents, extracted from the database using an SQL query. The left navigation menu is then constructed in a loop, organizing documents into category sections and using HTML ul/li tags. CSS styling is applied to enhance its appearance.
- The original HTML file is read and divided into the HEAD and BODY sections.
- The content for the top bar is sourced from user preferences.
- All these components, including DIV tags to structure the complete document, are placed into an array.
- We utilize the implode function to merge all the parts within this array to create the final document.
- A simple substitution is employed to remove certain image path prefixes in a cleanup operation.
- We iterate through all the documents again, replacing titles within the document with links leading to their respective pages.
Finally, the fully assembled HTML file is written back to disk, completing the process.
The ACF code functions sumary
Here's a breakdown of the functions involved in Markdown conversion:
The Package Header:
package MarkDownFunctions "MarkDown funksjoner for dok prosjektet...";The Function for Preprocessing the Markdown Document and Copying Image Files:
This function extracts image tags from the Markdown document, copies image files to the HTML/images folder, and updates image URLs.
function MoveImages(string SourceFile, string html_root, string relpath)The Post-processing Function to Add Header and Left Column to the Document:
This function adds a header and a left column navigation bar to the generated HTML document.
function post_processing(string htmlfile, string removeText)The Markdown Document Conversion Function:
This function orchestrates the entire Markdown to HTML conversion process.
function ConvertMarkdown(string sourcefile, string htmlfile, string html_root, string style, string codestyle, string removeText)A Utility Function to Create HTML Filenames:
This function generates HTML filenames based on the Markdown file's name.
function createHTML_Filename(string file, string html_path)
The full listing Listing:
The Package Header:
package MarkDownFunctions "MarkDown funksjoner for dok prosjektet...";
Here is the MoveImages function:
function MoveImages ( string SourceFile, string html_root, string relpath )
print "MoveImages enters....";
int x = open ( SourceFile, "r" );
string md = read (x ) ;
close ( x ) ;
print "Pre prosessing";
string regex = "!\[[^\]]*\]\(((.+?\/)?([^\/)]+))\)"; // used to extract image tags...
// gr 0 = full match, gr 1 = full path, gr 2 = directory path, gr 3 = file path.
array string tags = regex_extract ( regex, md ) ;
int no = sizeof ( tags ) ;
if ( no == 0 ) then
print "Pre prosessing - no tags";
return "";
end if
// Getting the Markdown document folder where relative images starts from.
string docFolder = regex_replace ( "^(.+\/)[^\/]+$", SourceFile, "\1" ) ;
int i, cnt = 0;
string fulltag, fullpath, fileFullPath, dir, file, newPath, newRelPath, newtag, res;
// Loop all tags, and process each one of them.
for ( i= 1, no)
print "\n" + tags[i];
fulltag = getValue ( tags[i], 1);
fullpath = getValue ( tags[i], 2);
fileFullPath = fullpath;
dir = getValue ( tags[i], 3);
file = getValue ( tags[i], 4);
if ( file_exists ( fullpath ) == 0 ) then
// probably a relative path. Prefix with doc folder to get absolute path.
fullpath = docFolder + fullpath;
end if
if ( file_exists ( fullpath ) ) then
newRelPath = relpath + "images/" + file;
newPath = html_root + "/images/" + file;
if ( file_exists ( newPath ) == 0) then
res = copy_file ( fullpath, newPath ) ;
if ( res == "OK") then
newtag = substitute ( fulltag, fileFullPath, newRelPath ) ;
md = substitute ( md, fulltag, newtag ) ;
cnt++;
end if
end if
end if
end for
if ( cnt > 0 ) then
// save the modified MarkDown document. Take a backup first, in case we did something nasty...
res = copy_file ( SourceFile, SourceFile+".bak" ) ;
// Write back to file.
x = open ( SourceFile, "w" );
write ( x, md ) ;
close ( x ) ;
end if
return "OK";
END
The Post processing function to add header and left column to the document:
function post_processing (string htmlfile, string removeText)
/* Called from ConvertMarkdown
Open the generated HTML document, that is a plain page of the markdown doc,
and put on a header, and a left navigation bar.
*/
print "post processingn";
int x = open ( htmlfile, "r" );
string html = read (x ) ;
close ( x ) ;
string body_part = between ( html, "<body>", "</body>" ) ;
string head_part = between ( html, "<head>", "</head>" ) ;
string stylesheet = '<link rel="stylesheet" type="text/css" href="include/css/style.css">';
string top_bar = Preferences::topp_nav;
// Build the left nav
string left_nav = Preferences::Left_nav;
doclist = @ExecuteSQL ( "SELECT Title, slug_filename, Category FROM ACF_Documents LEFT OUTER JOIN ACF_Categories as c ON c.PrimaryKey = Category_UUID ORDER BY Sorting, Category" ; "||" ; "|*|")@;
print doclist; // Debugg print to consolle.
array string docs = explode ("|*|", doclist ), flt ;
int noDocs = sizeof ( docs );
int i;
string curCat = "noone";
for (i = 1, noDocs)
flt = explode ( "||", docs[i]);
if (flt [3] != curCat ) then
if ( curCat != "noone") then
left_nav += "</ul>\n";
end if
left_nav += "<h4>" + flt[3] + "</h4>\n";
left_nav += '<ul class="linklist">\n';
curCat = flt[3];
end if
left_nav += "<li>" + flt[1] + "</li>\n";
end for
left_nav += "</ul>\n";
// Merge the parts
array string fileparts = {"<!DOCTYPE html>\n<head>", head_part, stylesheet, "</head>\n<body>",
'<div class="hd">', top_bar,
'</div><div class="content_band"><div class="left">',left_nav,
'</div><div class="content">', body_part,
"</div></div>", "</body>n</html>\n" };
string result = implode ( "\n", fileparts ) ;
// Remove Image path prefixes
result = substitute (result, removeText, "");
// substitute all titles in the documents with a link to that page.
for (i = 1, noDocs)
flt = explode ( "||", docs[i]);
// result = substitute (result, flt[1], '<a href="'+flt[2]+'">' + flt[1]+"</a>");
// Improved: Use regex-replace instead to substitute titles matching whole words
// and not part of words, that looks i bit strange.
result = regex_replace ( "\b"+flt[1]+"\b", result, '<a href="'+flt[2]+'">' + flt[1]+"</a>");
end for
// Write back to file.
x = open ( htmlfile, "w" );
write ( x, result ) ;
close ( x ) ;
print "End-post-processingn";
return "OK";
end
The markdown document conversion function:
This function below uses the two functions above to complete the full conversion.
function ConvertMarkdown (string sourcefile, string htmlfile, string html_root, string style, string codestyle, string removeText)
print "Convert markdown enters....\n";
set_markdown_html_root ( html_root ) ;
string sf = sourcefile, df = htmlfile;
$$SourceFile = "";
if (sf == "") then
sf = select_file ("Velg en Markdown Fil?");
$$SourceFile = sf;
end if
if (sf != "") then
if (df == "") then
df = save_file_dialogue ("Lagre fil som?", "xx.html", html_root);
end if
if (df != "") then
// Pre processing - Handle images in document.
string res = MoveImages ( sf, html_root, removeText );
// Main conversion
res = markdown2html (sf, style+","+codestyle, df);
// Post processing...
res = post_processing (df, removeText);
end if
end if
return "OK";
end
A small utility function to produce html filenames:
function createHTML_Filename ( string file, string html_path )
string newfile = substitute ( lower(file), " ", "_");
newfile = substitute ( newfile, ":", "_");
if (right(html_path, 1) != "/") then
html_path += "/";
end if
return html_path + newfile + ".html";
end
This example demonstrates how ACF can be used to automate the conversion of Markdown documents into HTML, making it easier to manage technical documentation projects.
Back to top
Practical Example - Read CREMUL payments file and update database
This is a complete example of how to parse and import data from a CREMUL (Credit Transfer Initiation) payments file into a database using ACF (Advanced Custom Functions for FileMaker) functions. Here's a breakdown of what this code does:
It defines several functions for creating SQL insert statements for different types of data, such as message headers, sequences, and transactions.
It reads the contents of a CREMUL file and splits it into segments, where each segment is separated by a single apostrophe ('').
It then iterates through the segments and processes each one based on its type, extracting relevant information and populating variables.
The code organizes the data into three arrays:
dataMHfor message headers,dataSQfor sequences, anddataTRfor transactions.It inserts the data from these arrays into the corresponding database tables using SQL insert statements.
The code also performs some data validation and error checking to ensure that the CREMUL file is well-formed.
It includes a function
import_cremul_select_filethat allows the user to select a CREMUL file interactively and then import its data into the database.
This code is intended to be used as part of a system for processing and storing payment data from CREMUL files, making it easier to generate reports for the financial department. The code appears to be well-documented and includes error handling to ensure that data is imported correctly.
Please note that to use this code effectively, you would need to integrate it with your FileMaker structure. Additionally, you may need to customize the code to match the specific database schema and requirements of your application.
The Cremul File Format
Here is a little sample of a CREMUL file we are going to read into the database. Usually there is several segments on each line only separated by a single apostrophe (').
UNH+4+CREMUL:D:96A:UN'
BGM+435+20010629170120128'
DTM+137:20010629:102'
LIN+1'
DTM+209:20010418:102'
BUS++DO++230:25:124'
MOA+349:124113,53'
RFF+ACK:01918100001'
DTM+171:20010418:102'
FII+BF+97600224105'
SEQ++1'
DTM+203:20010418:102'
FII+OR+83801915348'
RFF+ACD:101089152'
RFF+AEK:91521461'
MOA+143:3808,11'
NAD+PL+++HANS ESPEN'
INP+BF+2:SI'
FTX+AAG+++FROM?:HANS ESPEN PAID ON?: 18.04.01'
PRC+8'
DOC+999+0000773500050154208143212'
MOA+12:3808,11'
GIS+37'
SEQ++2'
DTM+203:20010418:102'
FII+OR+36251403893'
RFF+ACD:362589343'
RFF+AEK:53191521504'
MOA+143:4843,44'
NAD+PL+++Erik Jensen'
INP+BF+2:SI'
FTX+AAG+++FROM?: Erik Jensen PAID ON?: 18.04.01'
PRC+8'
DOC+999+0000773500050209408106755'
MOA+12:4843,44'
GIS+37'
SEQ++3'
DTM+203:20010418:102'
FII+OR+36260900980'
RFF+ACD:362689451'
RFF+AEK:94510009'
MOA+143:115461,98'
NAD+PL+++Øystein Gudmonson'
INP+BF+2:SI'
FTX+AAG+++FROM?: 3626.09.00980 PAID ON?: 18.04.01'
PRC+8'
DOC+999+0000773500050211808028787'
MOA+12:115461,98'
GIS+37'
UNT+50+4'
ACF Functions Example:
Here is the import function to parse this format. Then update the three database tables,
- Header
- Sequences
- Transactions
This makes it easy to generate a report for the Financial department...
package cremul_import "Functions to read and import CREMUL data into database tables. ";
/*
The functions below are used to create SQL insert VALUES part that is put into arrays in the main function.
The arrays are then merged with a comma separator to be all inserted in one single INSERT INTO SQL command. One for each file.
*/
function createMessageHeader ( string MessageRef, date MessageDate, string FilePath )
string FileName = regex_replace("^(.+)/(.+\..+)$", FilePath, "\2");
string ImpBy = @get(AccountName)@;
string TimeStampNow = string ( now()+3600, "%Y-%m-%d %H:%M:%S");
string data = format ( "('%s',DATE '%s', '%s', '%s', TIMESTAMP '%s', '%s')",
MessageRef, string (MessageDate, "%Y-%m-%d" ), FileName, FilePath, TimeStampNow, ImpBy);
return data;
end
function createSequenceLIN ( string MessageRef, int LIN, date ProcDate,
string BUSCat, float SeqAm, string SEQBankRef, date valDate, string RecAccNo)
string data = format ( "('%s',%d, DATE '%s', '%s', %.4f,'%s',DATE '%s','%s')",
MessageRef, LIN, string (ProcDate, "%Y-%m-%d" ),BUSCat, SeqAm, SEQBankRef,
string (valDate, "%Y-%m-%d" ), RecAccNo);
return data;
end
function createTransaction ( string MessageRef, int LIN, int seq, date recDate, string ArcRef, string OppdragRef,
float transfAm, string PayerAccNo, string PayerName, string Freetext, string INP, int Proc, string DocRef,
float ProcAm, int genInd, string NADPL, string KID)
if ( PayerName == "" ) then
PayerName = NADPL;
end if
string data = format ( "('%s',%d, %d, DATE '%s', '%s', '%s', %.4f, '%s', '%s', '%s', '%s', %d, '%s', %.4f, %d, '%s')",
MessageRef, LIN, seq, string (recDate, "%Y-%m-%d" ), ArcRef, OppdragRef,
transfAm, PayerAccNo, PayerName, Freetext, INP, Proc, DocRef,
ProcAm, genInd, KID);
return data;
end
/*
Helper functions to facilitate some operations in the main function.
*/
function assert ( string value, string v1, string v2, string message)
if (value == v1 || value == v2 ) then
return true;
else
throw "ERROR Assert " + message + " value: " + value;
end if
return false;
end
function getDate (string datevalue, string formatcode )
date dateval;
bool b1 = assert (formatcode, "102", "203", "Invalid formatcode in DTM, should be 102 or 203, is: " );
if ( formatcode == "102") then
dateval = date (datevalue, "%Y%m%d" );
elseif ( formatcode == "203" ) then
dateval = date (left ( datevalue, 8 ) , "%Y%m%d" );
else
end if
return dateval;
end
function getAmounth ( string number )
double xx = double ( substitute (number, ",", "."));
return xx;
end
/*
Here is the main function. It can be called with a file-path to the CREMUL file, OR use the
import_cremul_select_file () in the bottom to get a select dialogue to pick the file.
*/
function import_cremul ( string filename )
int x = open ( filename, "r"); // Plugins Exception handler handles any error and abort
// the functions returning a proper error message back to FileMaker.
string cremul_data = read ( x );
close ( x ) ;
/*
Each segment is terminated by a single aphostrophe ('). The file can contain several segments on one line.
Remove all the line-separator (CR / LF) to get a long string of segments each terminated by the (').
Then - split in a array of segments to parce each one on a loop.
*/
// Clean and split the file in segments.
cremul_data = substitute ( cremul_data, "\r", "");
cremul_data = substitute ( cremul_data, "\n", "");
cremul_data = substitute ( cremul_data, "\t", "");
array string cremul_segments = explode ( "'", cremul_data);
array string subsegs, subsub;
array string dataMH, dataSQ, dataTR; // The data arrays for the table data in SQL VALUES format. To be inserted in tables at the end.
int noSegments = sizeof (cremul_segments );
bool b1;
string MessageIdentifier, UniqueMessageNumber, BUScat, refPostingACK, refCT, refArchive, refOrderNumber,
receivingAccountNumber, payersAccountNumber, PayersName,
NAD_MR, NAD_PL, INP, FriTekst, KID;
date DocumentDate, ReceivedDate, ProcessedDate, ValueDate, NETSProcessingDate;
float totalAmount, transactionAmount; // float are doubles in ACF - really.
int segNo, noSubSegs, currentMessageStart, LevB_LIN, sequence;
string subSegStart;
for ( segNo = 1, noSegments )
if ( cremul_segments[segNo] != "") then
print "\n" + segNo + ": "+ cremul_segments[segNo];
subsegs = explode ( "+", cremul_segments[segNo]);
noSubSegs = sizeof ( subsegs );
subSegStart = subsegs[1];
subSegStart = regex_replace ( "^(\\s|\\n|\\r)*(.*)(\\s|\\n|\\r)*$",subSegStart, "\2");
if ( subSegStart == "UNH" ) then // Start of Message.
// UNH+1+CREMUL:D:96A:UN
MessageIdentifier = subsegs[2];
currentMessageStart = segNo;
if ( subsegs[3] != "CREMUL:D:96A:UN") then
throw "Cremul document is not according to standard: CREMUL:D:96A:UN, but instead: "
+ subsegs[3] + " Contact your software vendor to update CREMUL Import to this standard.";
end if
elseif (MessageIdentifier == "" ) then
throw "ERROR cremul file lacks Message identifier";
elseif (subSegStart == "BGM") then // Beginning of message
// BGM+435+1999090813150001
UniqueMessageNumber = subsegs[3];
b1 = assert ( subsegs[2], "435", "455", "BGM Header invalid code, should be 435 or 455, is: ");
elseif (subSegStart == "DTM") then
// DTM+137:19970303:102
// DTM+137:200003031208:203
subsub = explode ( ":", subsegs[2]);
if (subsub[1]== "137" ) then
DocumentDate = getDate (subsub[2], subsub[3] );
elseif ( subsub[1]== "171" ) then
NETSProcessingDate = getDate (subsub[2], subsub[3] );
elseif ( subsub[1]== "203" ) then
ReceivedDate = getDate (subsub[2], subsub[3] );
elseif ( subsub[1]== "193" ) then
ProcessedDate = getDate (subsub[2], subsub[3] );
elseif ( subsub[1]== "209" ) then
ValueDate = getDate (subsub[2], subsub[3] );
else
throw "Invalud DTM Date Qualifier: " + subsub[1];
end if
elseif (subSegStart == "LIN") then
// Starts level B ( Sequence numbers unique inside this level. )
// If sequence number set, flush transactions as we start on a new B segment.
// LIN+1
if ( LevB_LIN != 0) then
dataTR[] = createTransaction ( UniqueMessageNumber, LevB_LIN, sequence, ReceivedDate,
refArchive, refOrderNumber,
transactionAmount, payersAccountNumber, PayersName, FriTekst, INP, 0, "",
0.0, 0, NAD_PL, KID);
sequence = 0;
transactionAmount = 0.0;
refArchive = "";
refOrderNumber = "";
payersAccountNumber = "";
PayersName = "";
NAD_PL = "";
FriTekst = "";
KID = "";
INP = "";
end if
LevB_LIN = subsegs[2];
elseif (subSegStart == "BUS") then
// BUS++DO++230:25:124
subsub = explode ( ":", subsegs[5]);
BUScat = subsegs[3]+"."+subsub[1];
elseif (subSegStart == "MOA") then
// MOA+349:124113,53
subsub = explode ( ":", subsegs[2]);
if ( subsub[1] == "60" || subsub[1] == "346" || subsub[1] == "349" || subsub[1] == "362") then
totalAmount = getAmounth (subsub[2]);
elseif ( subsub[1] == "143" ) then
transactionAmount = getAmounth (subsub[2]);
else
end if
/* TODO: Find the use of those codes...
36 (Converted amount)
60 (Final (posted) amount)
98 (Original amount – the original amount to be paid)
119 (Received amount)
143 (Transfer amount) */
elseif (subSegStart == "RFF") then
// RFF+ACK:00430409720 - (Bank reference – posted amount)
// RFF+CT:001005001 - (AutoGiro agreement ID)
// RFF+ACD:*94011106 - (Bank reference = Archive reference. The customer should tell the
// archive reference to the bank if the customer has questions about a specific transaction)
// RFF+AEK:6011489652 - (Payment order number. Bankgiro note number is unique. The
// number does not have to be unique when other payment instruments are used)
subsub = explode ( ":", subsegs[2]);
if ( subsub[1] == "ACK") then
refPostingACK = subsub[2];
elseif ( subsub[1] == "CT" ) then
refCT = subsub[2];
elseif ( subsub[1] == "ACD" ) then
refArchive = subsub[2];
elseif ( subsub[1] == "AEK" ) then
refOrderNumber = subsub[2];
else
// Other refs: ABO, ACK, AFO, AGN, AHK, RA, TBR
// Investigate the use of those.
end if
elseif (subSegStart == "FII") then
// FII+BF+12345678901 - Kontnummer til mottaker
// FII+OR+36251403893 - Betalt fra konto
// FII+OR+23510524047:Jenny Petterson
subsub = explode ( ":", subsegs[3]);
if ( subsegs[2] == "BF") then
receivingAccountNumber = subsub[1];
elseif ( subsegs[2] == "OR") then
payersAccountNumber = subsub[1];
if ( sizeof ( subsub ) > 1) then
PayersName = subsub[2];
else
PayersName = "";
end if
else
// no other known codes....
end if
elseif (subSegStart == "SEQ") then
// Start a new sequence
// Flush old values to payment table, if sequence is different than 0.
// SEQ++1
// Within same level B (starts with the LIN-segment), the first underlaying transaction on level C
// starts with SEQ+1, the second transaction starts with SEQ+2, the third transaction starts with SEQ+3 etc.
// (Data element 1050 Sequence number)
if ( sequence != 0 ) then
// flush previous transaction, empty trans data.
dataTR[] = createTransaction ( UniqueMessageNumber, LevB_LIN, sequence, ReceivedDate,
refArchive, refOrderNumber,
transactionAmount, payersAccountNumber, PayersName, FriTekst, INP, 0, "",
0.0, 0, NAD_PL, KID);
transactionAmount = 0.0;
refArchive = "";
refOrderNumber = "";
payersAccountNumber = "";
PayersName = "";
NAD_PL = "";
FriTekst = "";
KID = "";
INP = "";
end if
sequence = int( subsegs[3] );
if (sequence == 1 ) then
if ( LevB_LIN == 1) then
// Flush the message header
dataMH[] = createMessageHeader ( UniqueMessageNumber, DocumentDate, filename );
end if
// Flush the LIN header
dataSQ[] = createSequenceLIN ( UniqueMessageNumber, LevB_LIN, NETSProcessingDate,
BUScat, totalAmount, refPostingACK, ValueDate, receivingAccountNumber);
end if
elseif (subSegStart == "NAD") then
// Name and address (M1)
// NAD+MR+00123456789-001234567 - Mottakers ORG nummer
// NAD+PL+++Bjarne Frogner AS++Asker++1370 - Beatlers detaljer:
// NAD+PL+++Erik Jensen
// NAD_MR, NAD_PL
if ( subsegs[2] == "MR" ) then
// Mottaker
NAD_MR = subsegs[3];
elseif ( subsegs[2] == "PL" ) then
// Betaler
NAD_PL = subsegs[5];
end if
elseif (subSegStart == "INP") then
// Instruction to parties (M 1)
// INP+BF+2:SI
subsub = explode ( ":", subsegs[3]);
INP = subsub[2];
elseif (subSegStart == "FTX") then
// Free text (C 1)
// FTX+REG++14+Import of Toyota-cars
// FTX+AAG+++Tandberg Data
FriTekst = subsegs[5];
elseif (subSegStart == "PRC") then
// PRC Process identification
// Not in NETS documentation
elseif (subSegStart == "DOC") then
// Document/message details
// Not in NETS documentation Den Danske Bank har ref på dette. her ligger KID
// DOC+999+0000773500050154208143212
if ( subsegs[2] == "999") then
KID = subsegs[3];
end if
elseif (subSegStart == "GIS") then
// General indicator (M 1)
// GIS+10 - (Declaration is nessecary)
elseif (subSegStart == "UNT") then
// Message trailer (M 1)
// UNT+25+1
if ( int ( subsegs[2] ) != segNo - currentMessageStart + 1 ) then
throw "Number of lines in Message does not comform with the message trailer: " + subsegs[2]
+ "/" + (segNo - currentMessageStart + 1) + " / MessageID:" + UniqueMessageNumber;
end if
// TODO: Complete the update of the payments table and related tables.
dataTR[] = createTransaction ( UniqueMessageNumber, LevB_LIN, sequence, ReceivedDate,
refArchive, refOrderNumber,
transactionAmount, payersAccountNumber, PayersName, FriTekst, INP, 0, "",
0.0, 0, NAD_PL, KID);
//
transactionAmount = 0.0;
refArchive = "";
refOrderNumber = "";
payersAccountNumber = "";
PayersName = "";
NAD_PL = "";
FriTekst = "";
KID = "";
INP = "";
// Verify the sum of the amounths and the total.
currentMessageStart = 0;
MessageIdentifier = "";
else
throw "Unidentified code in CREMUL file: " + subSegStart;
end if
end if
end for
if ( MessageIdentifier != "") then
throw "CREMUL File is not complete. Last segment not terminated with Message Trailer (UNT)";
end if
/*
If we arrive here, the parsing is successfull, but we haven't done anything to the database yet. Lets update the database.
Use the data arrays for header, sequences and transactions to insert into tables.
The data is allready in SQL VALUES format in the three arrays dataMH, dataSQ, and dataTR.
Use the "implode" function to merge the arrays into comma-separated lists and insert all records for that table using one INSERT statement.
INSERT INTO TABLE (field list) VALUES ( record 1 data ),(record 2 data),(record 3 data),(record 4 data)...
*/
// Header
string res = ExecuteSQL ( "INSERT INTO PaymentMessage (MessageRef, MessageDate, FileName,FilePath, ImportedTimeStamp, ImportedBy) VALUES " +
implode ( ",", dataMH));
// sequences
string res2 = ExecuteSQL ( "INSERT INTO PaymentSequences (MessageRef, LIN, NETSProcessingDate, BusCategory,
SequenceAmounth, SequenceBankreference, ValDate, ReceiversAccountNumber) VALUES " +
implode ( ",", dataSQ));
// Transactions
string SQL3 = "INSERT INTO PaymentTransaction (MessageRef, LIN_ID, SequneceNo, ReceivedDate, ArkivRef,
OppdragRef, TransfAmounth, PayerAccountNumber, PayerName, Freetext, INP, Proc, DocRef, ProcAmounth, GeneralIndicator, KID) VALUES " +
implode ( ",", dataTR);
string res3 = ExecuteSQL (SQL3);
if ( res == "" && res2 == "" && res3 == "") then
return "OK";
end if
return format ( "ERROR SQL Insert res (MH): %s, (SQ): %s, (TR):%s\n", res, res2, res3);
end
function import_cremul_select_file ()
string FileName = select_file ("Select a CREMUL FILE?", desktop_directory());
if ( FileName != "") then
return import_cremul ( FileName );
end if
return "OK"; // user cancelled the File Selcet Dialogue.
end
After we run this function on our test Database with the above example CREMUL file. We got this data

References:
Back to top
Concatenating Files for a Book
During my documentation project, I encountered the need to concatenate multiple Markdown documents into a single comprehensive document. I initially used a FileMaker Script to achieve this and subsequently ran the Markdown conversion to generate a complete HTML file with all the pages combined.
However, I faced some formatting issues during this process. Notably, numerous extra blank lines were being inserted into the text. Upon investigation, I realized that this was due to formatting applied by FileMaker to files with alternate line breaks. FileMaker uses CR (Carriage Return), whereas most pure text editors on Mac use LF (Line Feed). The issue likely arose because LF was converted to CRLF, and when written back, the Markdown converter interpreted the extra CR as blank lines.
To address this, I decided to create an ACF function to handle the concatenation process. This approach provided me with full control over the text within the documents. Additionally, I started by creating a Table of Contents (TOC) section with all the document titles, making it easier to navigate through this lengthy document.
The implementation of this approach was an immediate success. You can view the resulting concatenated document for this manual by clicking the following link: ACF_book.html
Here's a snippet of the ACF function responsible for this operation:
function create_ebook_html ( string book, string html_path, string bookname )
if ( bookname == "") then
throw "Missing bookname";
end if
string s, d;
string sql = format ( "SELECT cat.Sorting, doc.Sorting, doc.DocumentRelPath, doc.Title, cat.Category,
doc.cCategoryText,doc.PrimaryKey FROM ACF_Documents as doc
LEFT OUTER JOIN ACF_Categories as cat ON cat.PrimaryKey = doc.Category_UUID
LEFT OUTER JOIN Books as bk ON bk.PrimaryKey = doc.BookUUID
WHERE bk.Title='%s'
ORDER BY cat.Sorting, doc.Sorting, doc.Title", book);
string sf = ACF_Documents::DocumentRelPath; // Any document in the book. We only want the directory path.
string sourcePath = regex_replace("^(.+)/(.+\..+)$", sf, "\1")+"/";
// print sourcePath;
// return "Debug";
int rs = SQL_Query (sql);
int rc = SQL_getRowCount ( rs );
int md = open ( sourcePath+bookname+".md", "w");
write (md, "# "+Books::HeadingTitle+"\n\n");
int i,x;
array string row;
string curcat = "---", cont, anchor;
// TOC ( Table of Content )
write ( md, "## TABLE OF CONTENT\n\n");
for ( i=1, rc )
row = SQL_GetRow ( rs, i-1);
if ( row[6] != curcat ) then // Category headings in the toc.
write ( md, "\n###"+row[6]+"\n\n");
curcat = row[6];
end if
write ( md, "- [" +row[4]+"](#"+row[7]+ ")\n");
end for
write ( md, "---\n");
// The Main content - from all the MD files.
curcat = "---";
for ( i=1, rc )
row = SQL_GetRow ( rs, i-1);
if ( row[6] != curcat ) then
write ( md, "# "+ row[6]+"\n\n");
curcat = row[6];
end if
x = open (row[3], "r" );
cont = read ( x );
anchor = '<a id="'+row[7]+'"></a>';
write ( md, anchor+"\n"+cont+"\n\n");
close ( x );
write ( md, "<br><hr>[Back to top](#toc_0)\n\n");
end for
close ( md ) ;
sql_close ( rs );
res = EasyConvertMarkdown (sourcePath+bookname+".md", html_path+"/"+bookname+".html", html_path,
ACF_Documents::Style,ACF_Documents::Codestyle, Preferences::ImageTagRemoveText);
// Copy the neccessary files to a new folder.
// Copy file also copies directories.
destfolder = html_path + "/" + bookname + "/";
if ( directory_exists (html_path + "/" + bookname)) then
res = delete_directory ( html_path + "/" + bookname );
end if
res = create_directory (html_path + "/" + bookname ) ;
res = copy_file ( html_path+"/"+bookname+".html", destfolder+"index.html");
res = copy_file ( html_path+"/images", destfolder+"images");
res = copy_file ( html_path+"/css", destfolder+"css");
res = copy_file ( html_path+"/include", destfolder+"include");
res = create_directory ( html_path+ "/" +bookname + "/themes/markdown" );
res = copy_file ( html_path+"/themes/markdown/" + ACF_Documents::Style, destfolder+"themes/markdown/"+ ACF_Documents::Style);
s= html_path+"/themes/code/style/" + ACF_Documents::Codestyle;
d= destfolder+"themes/code/style/"+ ACF_Documents::Codestyle;
res = create_directory ( destfolder+"themes/code/style");
res = copy_file ( s, d);
s= html_path+"/themes/code/style/" + ACF_Documents::Style;
d= destfolder+"themes/code/style/"+ ACF_Documents::Style;
res = copy_file ( s, d);
$$BookHTML = html_path+"/"+bookname+"/"+"index.html";
end
- The function above does much more than the old FileMaker script below does. It is now a more complete solution to combine many separate MarkDown documents into One, and then create a HTML book from it.
- The "EasyConvertMarkdown" function, employed in the script above, is a modified version of the "ConvertMarkdown" function showcased in the "Markdown functions" example. It also utilizes a distinct script known as "EasyPostProcessing." Notably, it differs from the original function in that it doesn't create a left sidebar Table of Contents (TOC). Instead, it allready has the TOC at the top of the document. This adjustment makes it particularly well-suited for printing or generating PDFs. If you're interested in obtaining a copy of this function, please feel free to send me a message. And on the Script for the button:
- The ACF function also provides interlinking from the TOC to the various articles in the book. It also provides link for "go to top" at end of each article.
- The ACF function also copies the neccessary files to a new folder, including the selected theme files in the themes directory, the CSS styles and the images folder, and of course the new html file we have produced. This is convenient if one wants to have a HTML manual included on the install media, not having all the html files on the media.

References:
- Markdown Function, Example
Back to top
Example: Merging WORD Template Document with Tags
A common requirement in many systems is the ability to create documents from a template and merge them with content from a database. While several plugins are available for this purpose, this example demonstrates how to achieve it using the ACF plugin.
Microsoft Word supports various document formats, including DOCX, DOC, RTF, and more. The DOCX format is essentially a ZIP archive, while the DOC and RTF formats represent single-file documents.
The easiest way to perform merge operations would, of course, involve plain text documents, as they do not contain any formatting information. However, this approach would not provide the flexibility to format the document as desired. You could consider using the MarkDown format and then converting it to an HTML file, but this method does not support document styles such as headers, footers, and other requirements for paper documents or PDFs. The DOCX format can be challenging to process, as it involves a zipped document structure. The DOC format is a binary format and not easily handled for merging purposes. On the other hand, the RTF format is a text-based format but contains numerous formatting directives. This is the format we have chosen for our approach to merging documents.
In this solution, we use the RTF format for the template and then save the result with a .doc extention. This prompts Word to open it in compatibility mode, which is perfectly acceptable. You can later save it as DOCX if that's the desired format.
Let's take a closer look at the RTF format. If you save a Word document as RTF and open it in a plain text editor, you'll notice numerous directives starting with a backslash. These are directives that define various parameters for the document.
Suppose we opt to use double angle brackets on each side of our merging-tag, like this:
<<Name>>
Our task is to open the RTF template, locate all the tags, and replace them with actual database content. While this may seem straightforward, issues can arise when users apply formatting within the tags. For instance, a tag like <<Address>> may become distorted if a user applies the "Bold" style to only the Address word of the tag, resulting in something like this:
<<}{\rtlch\fcs1 \ab\af31507 \ltrch\fcs0 \b\insrsid5650507\charrsid15009246 Address}{\rtlch\fcs1 \af31507 \ltrch\fcs0 \insrsid5650507 >>
How can we address this challenge?
Answer: We can use regular expressions. Specifically, we'll employ a carefully crafted regular expression with the ACF function regex_extract. This function allows us to extract tags from the document in a way that facilitates safe replacements, even when the tags contain formatting codes.
In regular expressions, we use "groups" (enclosed in parentheses) to extract specific portions of a match. With regex_extract, we obtain an array with one row for each match in the document. Each row contains a delimited list, including the full match and all the groups within it. One group contains the bare tag-name without the << >> markers allowing us to identify the merge-tag itself.
Here is the regular expression used in this solution. If you are not familiar with regex, its OK, I have made and tested it:
string reg = "<<((?:€€[a-z0-9]*|\\}|\\{|\\s)*)([a-z0-9.\-_æøåÆØÅA-Z]*)((?:€€[a-z0-9]+|\\}|\\{|\\s)*)>>";
This regex captures four groups:
- The full match
- Formatting before the tag
- The tag itself
- Formatting codes after the tag
When performing replacements in the document, we replace the full match (1) with (2) followed by the text corresponding to (3) and (4).
As the backslash character (\) has a special meaning in regex and string literals in our code, and the document contains this character for each of the directives it would be hard to distinguish them from each other. To simplify the regex, we temporary use double euro signs (€€) as placeholders for backslashes in the document, making the regex easier to construct. After processing, we replace these placeholders back with backslashes.
In the example below, we've created a function to simplify the retrieval of tag text based on a tag's name, called GetSubstitute. This function accepts a tag as input and generates the corresponding text for that tag. While you can customize this function to suit your specific requirements, we've reserved the tag date to automatically return today's date in text format. Otherwise, we assume that the tag refers to a local variable in the script, which is set using the Set Variable script step. In this case, the tag name should be prefixed with a dollar sign ($). This allows the calling script to prepare all the tags referenced in the document before invoking the MergeRTFDocument function to complete the merge.
As mentioned earlier, RTF, being a Microsoft format, uses ISO-8859-1 encoding instead of UTF-8. To ensure that text from FileMaker, which is in UTF-8 encoding, displays correctly in the document, we need to perform a conversion. We accomplish this by using the ACF function from_utf, which takes the text as the first parameter and the encoding name as the second.
The ACF function eval is employed to retrieve the text from the locally prepared script variable in the calling script. If the variable happens to be nonexistent, FileMaker will return an empty string, causing the corresponding tag to be omitted from the document.
Here's the complete example:
Package DocuLib "Library for documentation project"
function DocuLib_Version ()
return 10;
end
// Function to get the text to replace in the tag.
function GetSubstitute(string tag)
string ret;
if ( tag == "Date") then
ret = string(now(), "dd.mm.yyyy");
else
// Ref a FileMaker variable used from the calling script.
// As the text should be in ISO-8859-1 format, we do a conversion as well.
ret = from_utf( eval ( '$'+tag), "ISO-8859-1");
end if
// handle new-line characters in the replacement text, put on some RTF newline directives
ret = substitute ( ret, char(13), "\r€€par ");
return ret;
end
// Perform the actual tag replacement.
function MergeRTFDocument ( string template, string outPutDoc )
string docu;
// if empty template, then get the user to select it.
if ( template == "") then
template = select_file ("Select a RTF File?");
end if
// If the user cancels the file selection, return an empty string.
if ( template == "") then
return "";
end if
// Get the content of the selected document.
int x = open ( template, "r");
docu = read ( x ) ;
close (x);
// Substitute double euro signs to simplify the regex.
docu = substitute ( docu, "\\", "€€");
// Define the regex pattern.
string reg = "<<((?:€€[a-z0-9]*|\}|\{|\s)*)([a-z0-9.\-_æøåÆØÅA-Z]*)((?:€€[a-z0-9]+|\}|\{|\s)*)>>";
// Extract the tags from the document.
array string results = regex_extract ( reg, docu,"|*|");
array string match;
int i, z = sizeof ( results);
string s1, s2, s3;
// Loop through all the matches.
for ( i=1, z)
match = explode ( "|*|", results[i]);
s1 = match[2]; // Formatting before
s2 = match[4]; // Formatting after
// Replace the full match, call our "GetSubstitute" function to obtain the text for the tag.
docu = substitute ( docu, match[1], s1+GetSubstitute (match[3])+s2 );
end for
// Replace the euro signs back with backslashes.
docu = substitute ( docu , "€€", "\\");
// Create a new document with the .doc extension.
if ( outPutDoc == "") then
outPutDoc = template + ".doc";
end if
// Write the modified content to the new document.
x = open ( outPutDoc, "w");
write ( x, docu);
close ( x );
return "OK";
end
// From the script applied:
// ACF_run( "MergeRTFDocument"; ""; "")
From FileMaker, We use a script like this:
# Being in the document layout
Set Variable [ $Name; Value:Contacts::First Name & " " & Contacts::Last Name ]
Set Variable [ $Company; Value:Contacts::Company ]
Set Variable [ $Address; Value:Addresses::Address Line 1 & "¶" & Addresses::Address Line 2 & "¶" & Addresses::Postal Code & " " & Addresses::City ]
Set Variable [ $res; Value:ACF_run( "MergeRTFDocument"; "";"") ]
After a testrun, we have this result:

Summary:
This is a working example demonstrating how to perform merging in RTF documents for generating letters, contracts, and other documents from template files. In a fully functional solution, you would require a value list to select the template to use and some configuration settings to specify the location of the templates. Additionally, for archiving the resulting documents, further configuration settings would be necessary. To enhance user experience, you can utilize the openURL script step to automatically open the processed document in Microsoft Word, allowing users to add any additional details not covered by the merge operation. This comprehensive approach streamlines the document generation process.
The complete solution could also have some selection of canned text snippets to include in the document, making the document production faster and implying less afterwork with the merged document. A text field in the document table, could hold the selected canned paragraphs, and merged with a single merge tag.
We could also use the DocumentService functions in this plugin, to facilitate storage and- or encryption of the stored documents where more users can access the documents in a secure way.
References:
- Regex tool at regex101.com
- The Regex chapter in this manual.
- RTF spesifications
Back to top
Demo
Function: Instruction Videoes
I have made some instruction Videos as learning materials about the ACF plugin. It is best shown on a computer in full screen, or on a iPAD, to get the resolution needed for the videoes.
Instruction videos:
Video two: Formatting of text strings and date formatting:
In this video, we introduce a playground for testing functions in the ACF language. We look at text operations and formatting, date formatting and parsing.
Video three: SQL function and parsing the result using array functions:
In this video we focus on SQL functions. How we simplify handling results from multi-column SQL queries, and also introduces MySQL operations that can be used to control web-pages and such directly from FileMaker working on the WEB-page database directly.
We will add more videos here as they are being created.
Happy watching.
Back to top
Demo and Download ACF Plugin
For a demonstration of the ACF plugin, you'll find a demo license, plugin downloads, and instructions for the accompanying demo apps.
- NOTE: For Mac Users: All the demo FileMaker applications now come bundled with the 1.7.0 pre-release of the plugin. It will install it automatically. It is now available as a Universal plugin, so it should work natively on both older Macs and Apple Silicon (M-series).
- For Windows users:, It comes bundled with the plugin version 1.6.2 and is installed automatically. The new features of 1.7.0 are therefore not yet available. The planned release of the Windows version is December/January 2024.
The Demo Apps
There are three demo applications available:
DocuExample: This application is designed to manage and generate visually appealing manual pages based on Markdown-formatted source files. It allows you to convert your content into HTML manuals effortlessly.
ACF_DevStarter: This application contains the necessary tables, fields, layouts, and functions required to seamlessly integrate ACF into your existing application. It's a valuable resource for developers looking to leverage ACF within their projects.
ACF_RuntimeStarter: Similar to DevStarter, this application offers a streamlined version with fewer options for compiling and debugging code. It's perfect for those who want a simplified ACF integration experience.
Demo video materials: Portalsort demos, and the other ACF videos. Just Zipped the demo folder and uploaded it here.
When it comes to editing ACF source code, we recommend using the .acf file extension. These files are bundled with syntax coloring for TextMate on Mac and NotePad++ on Windows. Both of these applications are free and provide an excellent environment for editing your source code.
Instruction videos:
For the instruction videos - The have been moved to the instruction videoes page. In the download below, there is a folder where the demo materials can be downloaded.
On Mac: To ensure smooth integration, associate your chosen editor (TextMate is preferred due to its syntax coloring) with the .acf file extension. You can do this by right-clicking on a .acf file, selecting "File Info," and choosing TextMate as the default editor for such files. This step is crucial for ensuring that the OpenURL script step in FileMaker works correctly.
On Windows: Similar configurations may be required on Windows.
The Public Demo License
Please Note: The public demo license previously available on this page has expired. However, you can still obtain a time-limited demo license by using our Contact form.
Without a valid license, the plugin will function for 30 minutes. You will need to restart FileMaker to extend this period by another 30 minutes.
If you have downloaded the demo applications that include the demo license as part of the startup script, you can simply remove the "ACF register" line and restart FileMaker to access an additional 30 minutes of testing. Using ACF-Register with an expired license will disable the plugin's functions.
When you purchase a license, you will also receive instructions on how to register the license within your application.
Additionally, please review the startup script in the demo applications for more details.
Download Folder
You can access the download folder containing the demo applications and plugin files by clicking the link below:
The 'ACF.tmbundle.zip' is the syntax color definition for TextMate. The 'Notepad...' file is the syntax coloring definitions for NotePad++. The Plugins folder contains the plugin itself.

In the download folder, you will find two plugins for version 1.6.2 which include both Windows and Mac versions of the plugin, One folder for 1.6.3 (Mac), and the pre-release versions of 1.7.0 (Mac Universal), All from 1.6.3 and up featuring MySQL connectivity.
Good luck, and enjoy exploring the capabilities of ACF!
Back to top
Technical Details
Technical Details for the ACF-Plugin
You can click on any topic in the left sidebar for reference. Additionally, you'll find programming examples under the "Examples" section to help you get started.

Deployment-Friendly Solution
In a traditional FileMaker Solution, updating a deployed solution at a customer site typically involves changing scripts, layouts, and database definitions. This process can be tedious and time-consuming. Alternatively, you might choose to migrate all customer data into a new solution and re-implement custom code—a similarly laborious task.
ACF simplifies the update process significantly. Updating code within ACF functions is straightforward. You can either load the new compiled functions into the solution using simple cut-and-paste or a small script. Alternatively, you can utilize the document service to load binaries from a web service to which you've deployed the code. This web service supports encryption to ensure the code's integrity has not been compromised.
With just a click of a button, users can reload ACF binaries themselves, immediately gaining access to the updated functionality.
Code Portability: A Vital Consideration
One crucial aspect of development projects is the use of portable code segments—code that can be reused wherever needed. In a FileMaker script, achieving code portability can be challenging because script logic is often tied to its position in the relationship graph. This means that all field references used in the script must match the layout's position in the relationship graph.
For example, consider a scenario where you have a "Documents" table related to both "Orders" and "Invoices." You may have documents related to both or individually, all stored in the same table. In this case, the relationship from the invoice table is named "invoice_documents," while the relationship from the orders table is named "orders_documents." This leads to the necessity of maintaining two duplicate sets of nearly identical scripts—one for orders and another for invoices. These scripts are designed to work with field references specific to either orders or invoices, making them far from portable.
ACF addresses this challenge by enabling the creation of portable code. Advanced Custom Functions (ACF) do more than just offer custom functions; they often replace entire scripts or groups of scripts. Portable code created with ACF can save you significant development time because:
- There's no need to rewrite the same code repeatedly.
- Portable code is already tested and known to work reliably.
- ACF functions can be enhanced and seamlessly included in different projects without the need to modify scripts or update customer solutions.
Creating genuinely portable code does require some planning, and a few factors to consider include:
- The use of function parameters to prevent dependencies on the relationship graph.
- Utilizing SQL functions to retrieve, update, or insert data, querying the base-table instance instead of the relationship graph instance.
- When pulling data from the current layout, you can supply the relationship instance as a string to the ACF function, allowing it to build field names dynamically instead of relying on constant field names.
How This Manual Is Created
This manual consists of a collection of static HTML pages. The source text is initially authored using "Lightpaper" in Markdown format, which facilitates the inclusion of code samples and enables formatting for the manual pages.
Next, the Markdown source is integrated into a small FileMaker 17 application that incorporates functions written in the new language designed for Advanced Custom Functions. You can explore these functions in the example section of this manual or download the application from our website, see the "demo" section of this manual.
These functions serve to convert the Markdown-formatted manual pages into HTML format. Subsequently, the HTML files are dissected and organized into a structured layout featuring a left navigation bar, a top navigation bar, and a list of pages within the left navigation bar.
The final step involves cross-referencing the HTML text with other titles in the manual to generate links to the corresponding manual pages. If a phrase within the text matches the title of another document, it becomes a clickable link leading to that specific page.
All these components are then merged and saved to create the HTML files once more.
When new pages are added, we systematically loop through all the document records in the database, generate HTML files, and upload them to the web. This process ensures that all left navigation menus are updated across all documents. Remarkably, the entire operation of generating approximately 50 documents takes less than one second.
Back to top